9
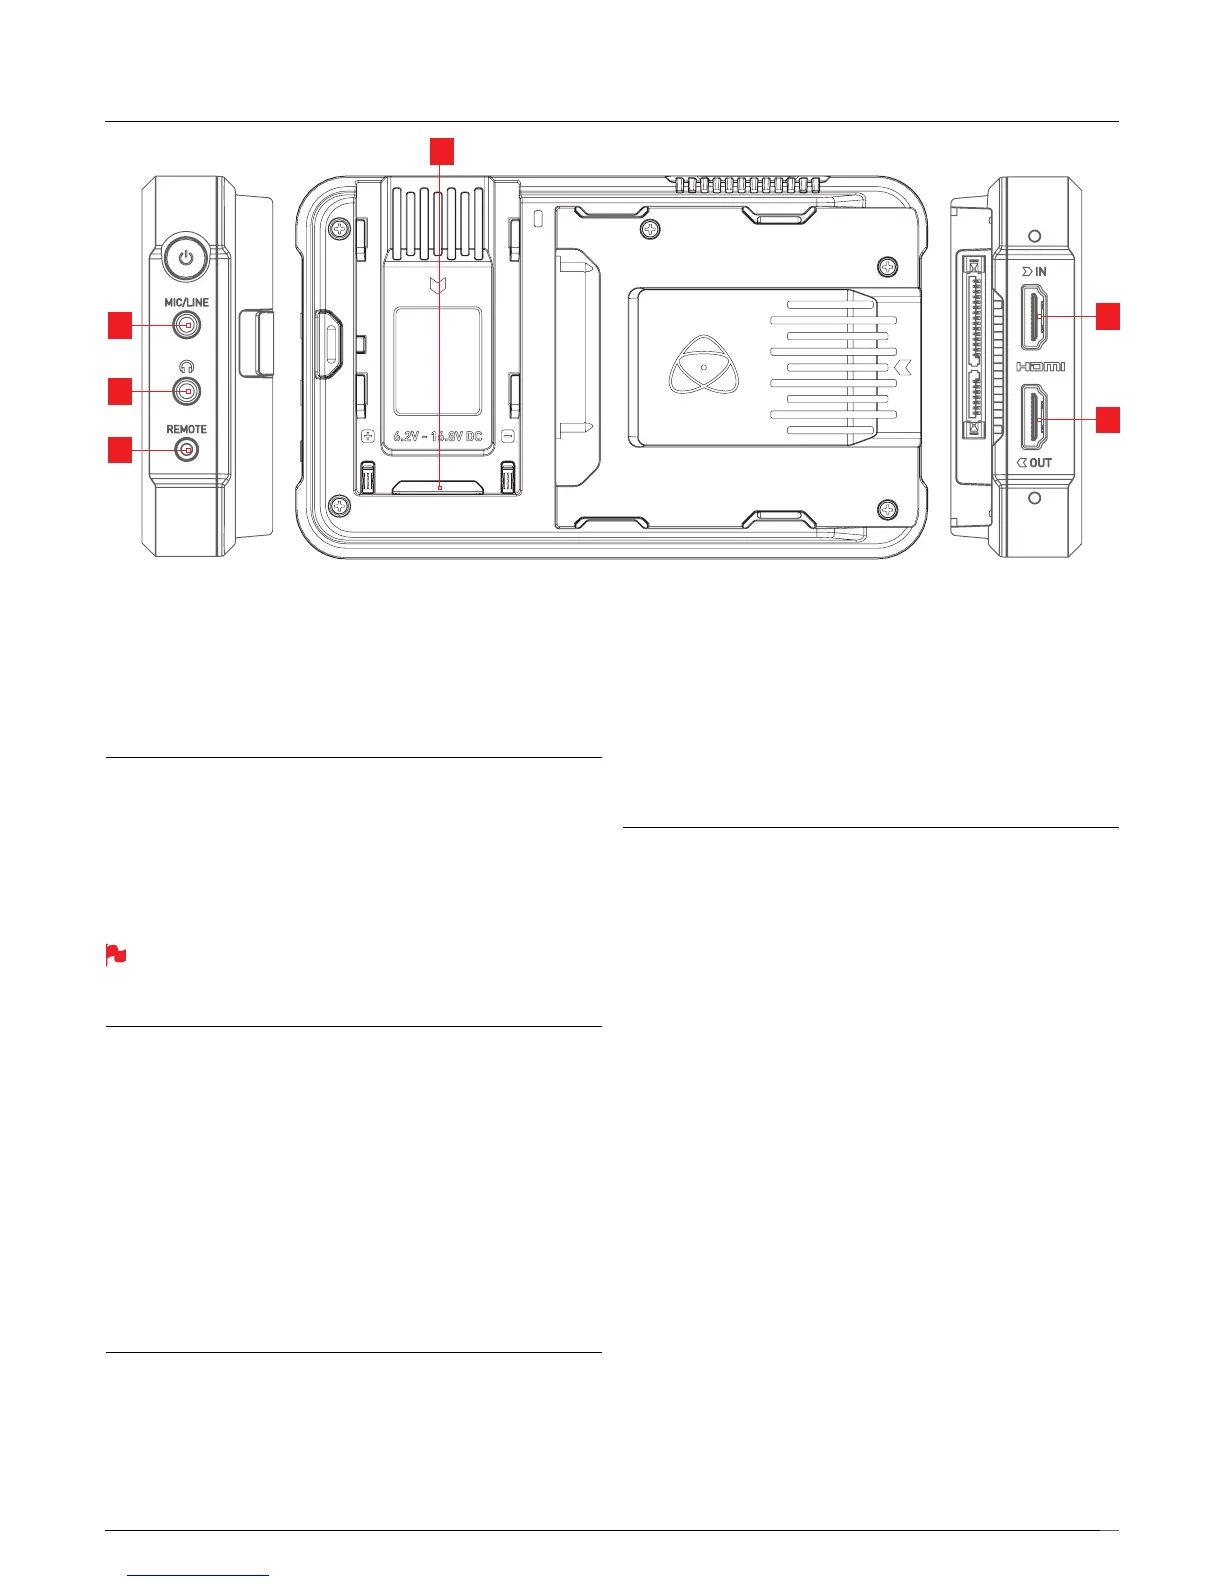
5. Ninja V Connections
1. Mic/Line in
A 3.5mm input jack is located under the power button. Channel selection
and volume for headphone monitoring is via the audio controls section,
accessible by touching the audio meters in the upper right side of the
touchscreen (monitoring mode) or in the bottom right of the screen
(homescreen mode).
2. Headphone/audio out
A 3.5mm headphone jack is located above the remote port. Channel
selection and volume for headphone monitoring is via the on-screen
audio controls section, accessible by touching the audio meters in the
upper right side of the touchscreen (monitoring mode) or in the bottom
right of the screen (homescreen mode).
When monitoring any channels please ensure that the headphone
selection is set to the stereo pair you’d like to monitor.
For more details see page 21.
3. Remote/Calibration Port
The calibration 2.5mm jack on the right hand side (looking from the front),
allows for the connection of the X-Rite i1Display Pro calibration device.
The calibration unit utilises the optional USB to serial adaptor cable.
For optimal calibration it is recommended that your Ninja V is powered
up for 30 minutes prior to calibration. The latest version of the Atomos
Calibration software is available at www.atomos.com/support
For remote operations via this port AtomOS supports both LANC in
Sony and Canon format. The Ninja V uses LANC Slave and so a LANC
controllermustrstbeattachedtoacameraandtheoutputtakenout
via a Y cable to the Ninja V.
4. Expansion Slot
Enhance your Ninja V through the in-built modular expansion slot. Bi-directional
high speed video, audio and power are available. Expansion modules dock
into the battery slot and can be stacked, passing power and offering
advanced connections and functions. www.atomos.com/AtomX
5. HDMI in
The video input is a full size HDMI 2.0a connection used to receive the
video. This connection also supports embedded audio and timecode if
your camera or device sends these out over HDMI. The image is both
displayed and recorded to the Atomos monitor/recorder storage media.
Embedded Audio: Most mirrorless cameras and camcorders send two
channels of audio over HDMI but the Ninja V can record up to 8 channels
of digital audio embedded in the HDMI signal if supported.
6. HDMI out
This is for connection to an external monitor or other device with an HDMI
input. It carries a loop-through of the incoming HDMI signal in record and
standby mode, and the playback signal when the Ninja V is in playback
mode. This output is 2.0a and can carry either a 4K or HD signal (with the
option to down convert the 4K input to HD).
Video Scale Convert: Video out also has the option for a downscale to
be applied allowing your 4K input to be converted to a 1080 HD output
for use with existing HD equipment.
3D LUT Output
3D LUTs can be applied to the outputs of the Ninja V and LUTs can
also be selected to be applied to the outputs and routed out to other
equipment via the HDMI connections.
HDR Output
The Ninja V can read the incoming HDR information frame from
compatible cameras that indicates if a signal is HLG or PQ. You can set
the Ninja V to automatically detect this and loop this out. You can also
convert between a Log input to HDR display standards or between
HLG <=> PQ. For more information see Page 20.
3
4
2
1
5
6