Atomos Shogun 7 – User Manual Edition 1: November 2019 9
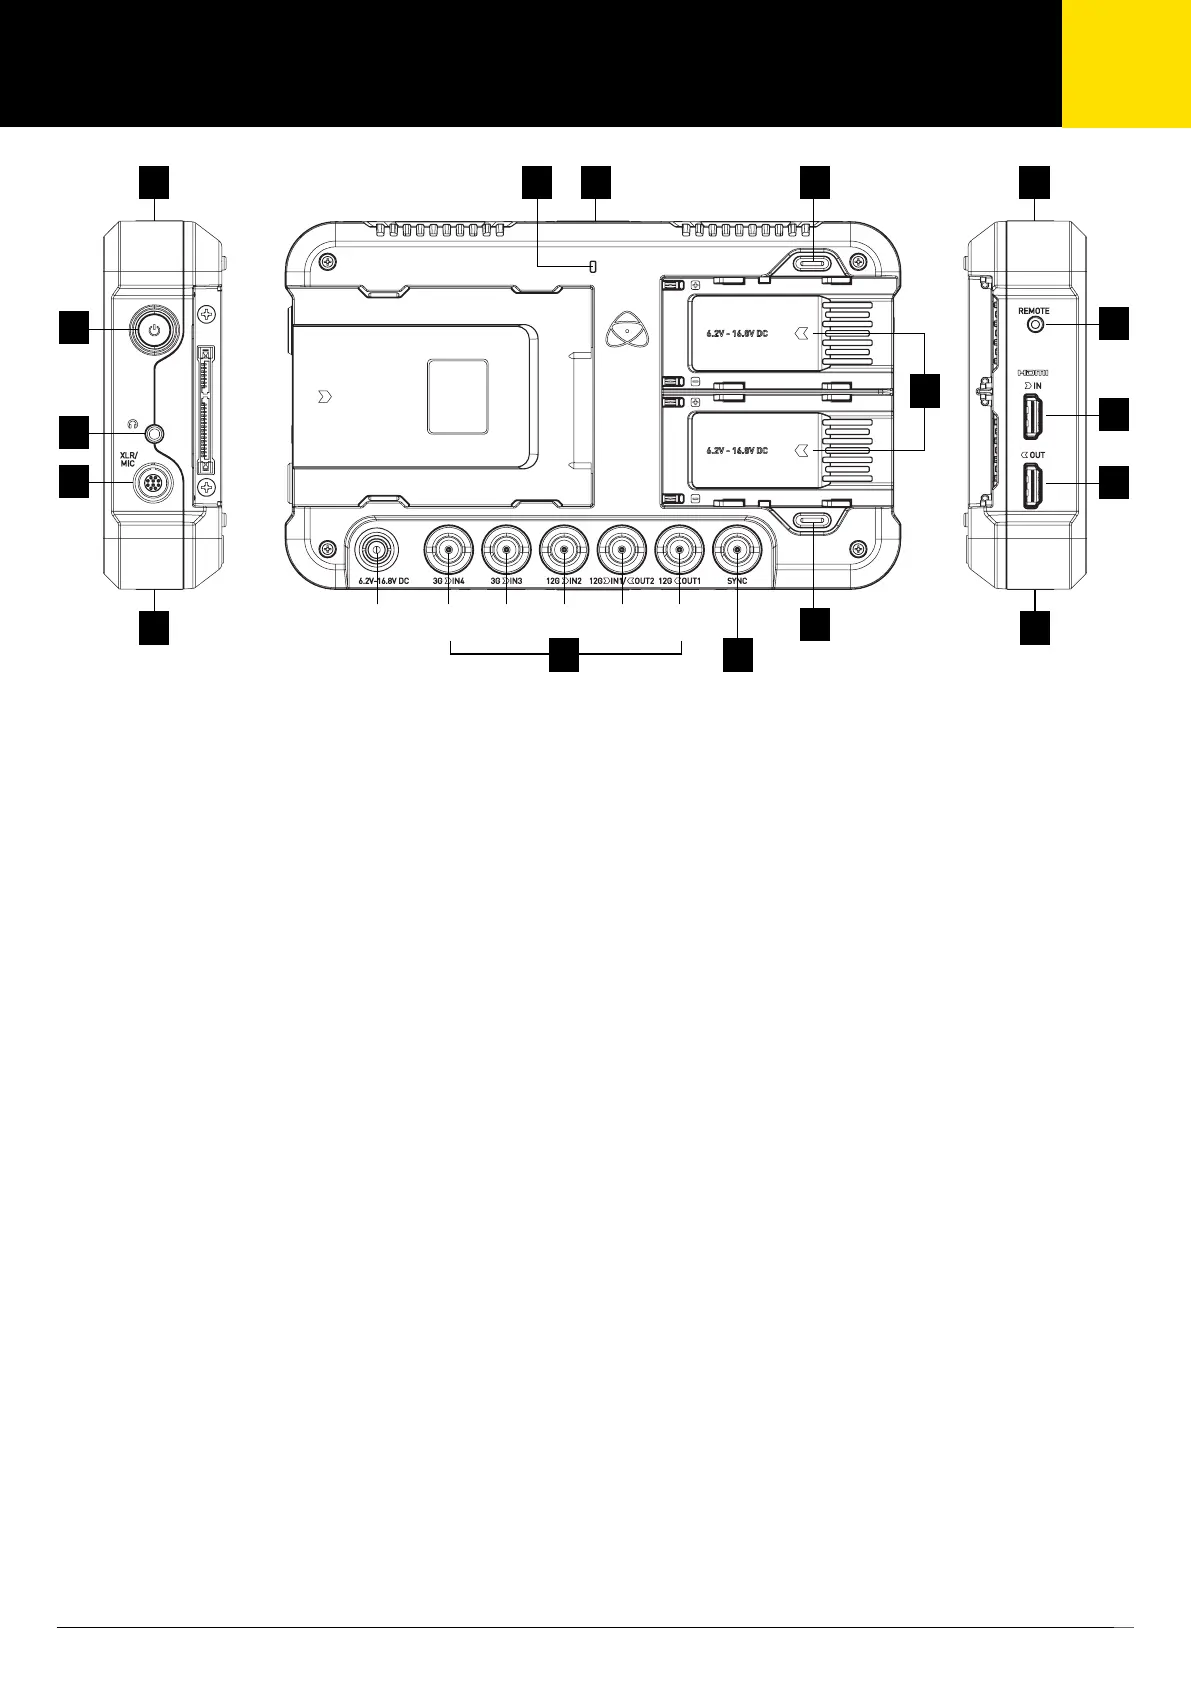
A. On/O and Screen Lock
To turn on, press the power button on the side of the unit. To shut down, hold
the button for at least 4 seconds (until unit turns off). LOCK: Tap to lock
screen, tap again to unlock.
B. Remote Control
Optionally control the Shogun 7 using Remote from your camera.
Additionally, calibrate using the X-Rite i1Display Pro.
The calibration 2.5mm jack on the left hand side (looking from the front),
allows for the connection of supported calibration devices with support
now available for the retail version of the X-Rite i1Display Pro as well as
legacy Atomos Spyder Calibrator. Both units utilize the optional USB to
serial adaptor cable. The latest version of the Atomos Calibration software
is available at www.atomos.com/support
C. HDMI In
The video input is a full size HDMI 2.0a connection used to receive
the video and when supported by your device embedded audio and
Timecode. This is both displayed and recorded to the Atomos recorder/
monitor storage media.
D. HDMI Out
This is for connection to an external monitor or other device with an HDMI
input. It carries a loop-through of the incoming HDMI or SDI signal in
record and standby mode, and the playback signal when the Shogun 7
is in playback mode. This ouput is 2.0a and can carry either a 4K or HD
signal (with the option to down convert the 4K input to HD).
The SDI <-> HDMI conversion is always live allowing for instant conversion
without any setup.
E. Headphone Output
A 3.5mm headphone jack is located under the power button. Channel
selection and volume for headphone monitoring is via the audio controls
section in the lower left hand side of the touchscreen.
F. XLR/Mic (Analogue audio)
On the side of the Shogun 7 unit is a multi-pin connector in to which the
XLR break out cable can be connected. A 2 in 2 out XLR cable is available
asanoptionaladditionalaccessory.TheinputscanbeconguredatLine,
Mic and Pro level in the Audio menu. The inputs can also provide 48V
Phantom power to compatible microphones.
The XLR out puts are available via the optional 2 x 2 XLR cable accessory
for monitoring and the audio channel routed to them can be selected via
the headphones selection in the Audio menu.
G. Battery Release Button
Press the release buttons and slide battery away from unit to remove.
H. Tally Light
Red tally light on the rear of the unit indicates active recording. Tally light can
be turned off in the menu options.
I. Screw holes and ARRI anti-rotational pin system
J. BNC Connectors
The SDI input connections are 12G compliant and backwards compatible
meaning that it can be used for 12G, 6G, 3G and 1.5G signals. The SDI
inputs support 3G in both level A and B standards. This input is also used
to input RAW signals from supported cameras.
K. SYNC: Genlock in / LTC rec.
Located with the SDI inputs and output is an additional BNC marked
SYNC.Genlockisshortfor“GeneratorLock”invideosystems.The
Genlock is an input only and will lock the internal timing system in a video
device to an external reference signal during play back.
The Sync BNC can also be used as a LTC Timecode input. This allows for
external LTC timecode to be used enabling multiple devices to be sharing
the same master timecode signal, which makes it perfect for multi-camera
setups. LTC is only available in Record mode and can be accessed via the
Time code menu
A A
B B
C C
D D
E E
F F
G G
H H
J J
K K
L L
M M
16
16
15
15
14
14
13
13
12
12
11
11
10
10
9
9
8
8
7
7
6
6
5
5
4
4
3
3
2
2
1
1
20190507_Shogun7_6View
重量:
A1
葉数 1 / 1
尺度: 1:1
図面番号:
名称:
改訂
図面測定不可
材料:
日 付
署 名
名 前
バリ取り、鋭角の除去
仕上げ:
指示なき場合:
寸法はミリメータとする
表面粗さ:
公差 :
寸法 :
角度 :
品 管
製 産
承 認
検 図
製 図
AC/DC Power
In 4
3G
In 3
3G
In 2
12G
In 1/Out 2
12G
Out 1
12G
A A
B B
C C
D D
E E
F F
G G
H H
J J
K K
L L
M M
16
16
15
15
14
14
13
13
12
12
11
11
10
10
9
9
8
8
7
7
6
6
5
5
4
4
3
3
2
2
1
1
20190507_Shogun7_6View
重量:
A1
葉数 1 / 1
尺度: 1:1
図面番号:
名称:
改訂
図面測定不可
材料:
日 付
署 名
名 前
バリ取り、鋭角の除去
仕上げ:
指示なき場合:
寸法はミリメータとする
表面粗さ:
公差 :
寸法 :
角度 :
品 管
製 産
承 認
検 図
製 図
A A
B B
C C
D D
E E
F F
G G
H H
J J
K K
L L
M M
16
16
15
15
14
14
13
13
12
12
11
11
10
10
9
9
8
8
7
7
6
6
5
5
4
4
3
3
2
2
1
1
20190507_Shogun7_6View
重量:
A1
葉数 1 / 1
尺度: 1:1
図面番号:
名称:
改訂
図面測定不可
材料:
日 付
署 名
名 前
バリ取り、鋭角の除去
仕上げ:
指示なき場合:
寸法はミリメータとする
表面粗さ:
公差 :
寸法 :
角度 :
品 管
製 産
承 認
検 図
製 図
A
E
F
B
C
D
G
K
GHI I
I I
I
J K
5. Shogun 7 Connections