E-2 cab Produkttechnik GmbH & Co KG
5
6
1
7
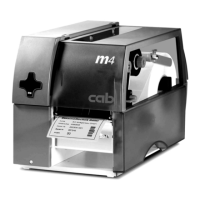
Fig. E-2 Changing Printhead A3/A4 (I)
1. Remove the media from the printer.
2. Swing the lever (6) to the position shown in figure E-2. In this position, the
printhead assembly is unlocked but still lying on the print roller.
3. Loosen the printhead locking screw (5) using the Allen key (7).
4. To lift the printhead assembly, swing the lever (6) clockwise until it stops.
5. Remove the printhead (1) from the pins (11) on the printhead carriage.
WARNING !
Unplug the power cord from the power source before starting!
CAUTION !
Protect the printhead against damage by electrostatic dischargement !
- Put the printer on to a grounded conductive surface !
- Ground yourself during printhead replacement for example using a
grounded wrist-strap !
- Do not touch the connector pins of the printhead by naked hands !
Make sure the glass surface on the printhead is not touched by sharp
objects or your hand!
Appendix E - Replacing Assembly Units
 Loading...