Do you have a question about the Diestro 103APV4R and is the answer not in the manual?
| Brand | Diestro |
|---|---|
| Model | 103APV4R |
| Category | Measuring Instruments |
| Language | English |
Defines the analyzer's purpose, sample types, and measurement capabilities.
Critical warnings and precautions for safe operation, handling, and electrical safety.
Explains standard symbols used in the manual and on the analyzer for clear communication.
Details the process of unpacking the analyzer and checking all included items for completeness.
Specifies essential requirements for setup, including power, grounding, and environmental conditions.
Provides step-by-step instructions on connecting the analyzer's components and grounding.
Explains the function, operation, and capillary adapter use of the analyzer's fill port.
Details calibration packs, their components, connection, and identification via +INFO.
Explains the function of the uChip for pack information, calibration values, and expiration dates.
Covers checking the expiration date of the calibration pack and its implications for use.
Details how the analyzer tracks solution consumption and alerts when a pack is empty.
Provides recommendations for optimal performance and explains pack design for sufficient solution.
Outlines the step-by-step procedure for safely replacing the calibration pack.
Introduces serum/plasma/whole blood measurement, emphasizing correct functioning and sample prep.
Details the procedure for loading serum, plasma, or whole blood samples, including safety.
Explains how to perform measurements, including lever operation and selecting TCO2/Ions.
Describes the format and content of printed measurement reports, including electrolyte values.
Explains how to measure and calculate pH-corrected calcium values using a specific equation.
Details how to perform quality control for serum/plasma measurements, linking to QC section.
Introduces urine measurement, emphasizing correct function, QC, and dilution requirements.
Details the procedure for loading urine samples, including dilution and safety precautions.
Explains how to perform urine measurements, including dilution and referencing serum measurement.
Introduces the three types of calibration performed by the analyzer: Ions, pH, and TCO2.
Explains the automatic 1-point calibration process performed during sample measurement.
Details automatic and on-demand procedures for 2-point calibration and frequency modification.
Describes the process for calibrating the TCO2 module, noting factory calibration.
Explains how to view and interpret calibration results, including status, gain, and balance.
Details the information included in a printed calibration report, such as Lot, Expires, and Reagents.
Explains how to access and view previously saved calibration results from memory.
Covers settings for calibration, including enabling/disabling electrodes and unit selection.
Details how to fine-tune analyzer values using correction equations for accuracy.
Provides access to historical data related to installed electrodes, such as serial number and usage.
Details how to view historical data related to the calibration pack usage, including type and expiration.
Explains the analyzer's standby mode, its automatic operations, and recommended uptime.
Explains the purpose of rinsing electrodes during measurement or calibration for optimal performance.
Details when automatic rinsing procedures are performed by the analyzer between samples and calibrations.
Describes how to initiate a rinse procedure manually when needed, including specific types.
Explains the process of filling pack and equipment pipes with calibration solutions for purging.
Details the purging procedure for the lactic acid pipe circuit, especially for TCO2 modules.
Describes the automatic purge performed after installing a new pack, followed by calibration.
Introduces the analyzer's quality control capabilities, control levels, and statistical calculations.
Details the procedure for measuring quality control samples at different levels.
Explains how to view measurement evolution graphs and select sample numbers for statistical analysis.
Describes how to edit limits for each analyte in the evolution graph and apply Westgard rules.
Explains how to view quality control measurements and delete stored data from memory.
Details entering the brand and batch of controls used for quality control for traceability.
Explains that the analyzer maintains date and time when powered off using an internal battery.
Guides on how to access and adjust the analyzer's date and time settings via the settings menu.
Introduces access to measurement and calibration results, ordered chronologically for review.
Details how to select and view measurement results, with printing and LIS transfer options.
Explains how to view measurements made with the autosampler, grouped by session and tube.
Guides on how to select, view, and print calibration results from the analyzer's memory.
Addresses samples not detected by the analyzer due to low conductivity or insufficient volume errors.
Explains how to manually position samples when the analyzer encounters a "Not Filled" error.
Introduces the analyzer's configuration menu for various settings and options.
Guides on enabling/disabling electrodes and selecting measurement units, including pH temperature.
Covers enabling/disabling automatic sample loading and setting delays for easier operation.
Explains how to set the duration for displaying measurement results before returning to the main menu.
Details how to edit lower and upper bound values considered "normal" for measurement ranges.
Covers enabling serial output, choosing ports, speed, and protocols for LIS interface.
Explains how to enable or disable the internal ticket printer functionality.
Covers editing detection values for various liquids used by the analyzer.
Guides on configuring the institution name displayed on tickets and the main menu.
Explains how to change the analyzer's display language and the requirement to restart.
Provides pinout details for the serial port connection cable between the analyzer and PC/LIS.
Explains connecting external USB barcode readers or keyboards to the analyzer's USB ports.
Describes how to view the analyzer's status via semaphore, reagent level, and electrode status indicators.
Lists common errors, their causes, effects, and recommended actions for troubleshooting.
Details daily cleaning and decontamination procedures, including ISE cleaning.
Outlines weekly tasks, including sodium conditioning and internal cleaning of the equipment.
Discusses general maintenance and the importance of using original spare parts for longevity.
Provides step-by-step instructions for opening the analyzer's front cover using a clamp button.
Guides on closing the analyzer's front cover and adjusting the clamp button securely.
Details the installation and replacement of the sampling cleaner module, including safety.
Provides instructions for safely transporting the equipment within the lab or for longer transfers.
Gives guidelines for the proper disposal of supplies, components, and consumables according to regulations.
Provides guidance on the final disposal of the analyzer itself after its service life.
Introduces the service menu for evaluating hydraulic circuits and the status of installed electrodes.
Guides on accessing manual/automatic maintenance menus and modifying detection thresholds.
Explains measuring voltage to evaluate electrode stability and gain for performance.
Details measuring voltages to verify electrode gain, referencing technical specifications.
Provides a step-by-step guide for replacing analyzer electrodes using original spare parts.
Details the procedure for replacing the thermal paper roll in the analyzer's printer.
Guides on how to safely remove and replace the peristaltic head, including performing a purge.
Explains how to replace the tip of the fill port needle assembly.
Details the process of replacing the stainless steel capillary needle, including alignment.
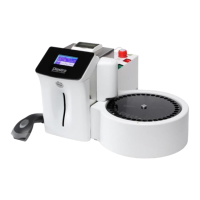
Introduces the autosampler, its capabilities, barcode reader option, and sample capacity.
Guides on how to install the autosampler and attach it to the analyzer, including cable connections.
Explains how to access the autosampler menu and select measurement modes (Easy Serum/Urine).
Details different methods for loading samples into the autosampler, including tubes and cups.
Covers the configuration options available for the autosampler, such as primer and error handling.
Details the barcode formats accepted by the analyzer for patient data entry via the autosampler.
Lists the specifications for primary tubes and sample cups used with the autosampler.
Details the end-of-day ISE Cleaning Solution procedure for the autosampler and disc cleaning.
Guides on removing the tube holder disc for cleaning after a liquid spill inside the sampler.
Explains how to change sampler disc separators for using shorter tubes with the autosampler.
Illustrates the front view of the analyzer with key components labeled for identification.
Illustrates the side view of the analyzer with key components labeled for identification.
Illustrates the rear view of the analyzer, showing ports and connections.
Provides dimensions and weights for the analyzer, autosampler, and their respective boxes.
Specifies ambient temperature and humidity limits for analyzer operation.
Outlines conditions for storing and transporting the equipment to maintain integrity.
States the required mains voltage and frequency for the analyzer's operation.
Lists input and output voltages for internal and external power supplies.
Provides sample measurement rates per hour for different analyzer configurations.
Specifies the maximum sample volume the analyzer attempts to load for serum analysis.
States the minimum sample volume required to fill the measuring chamber for serum.
Specifies the volume for diluted urine samples used in the analysis.
Lists detection ranges, resolution, and repeatability for electrolytes in serum and urine.
Notes that the analyzer uses maintenance-free selective ion electrodes.
Provides ranges for electrode gain and mV delta between calibration standards.
Mentions the 3V Lithium Battery CR1220 used for the internal clock.
Notes the optional NiMh backup battery pack provided by the manufacturer.
Lists supported barcode standards for external barcode readers and keyboards.
Explains the clinical significance of potassium levels in serum/plasma, including low and high ranges.
Details the clinical significance of sodium levels in serum/plasma, including causes of variations.
Explains the clinical significance of chloride levels in serum/plasma and its relation to anion gap.
Details the clinical significance of ionized calcium levels in serum/plasma and factors affecting it.
Explains the clinical significance of lithium levels in serum/plasma and therapeutic range considerations.
Covers pH definition, reference range, and clinical interpretation of acid/base balance disorders.
Discusses variations in urine chloride and sodium concentrations and their clinical relevance.
Explains variations in urine potassium concentration and clinical relevance, relating to salt intake.
Explains the Direct ISE measurement technology, its principles, and application in analyzers.
Details the chemical reaction and measurement principle for TCO2 determination using pressure changes.
Provides a table of reference values for electrolytes in serum and urine, including critical limits.
Lists analyzer parts, their reference codes, installation periods, and guarantees.
