Chapter 6: Mbox 2 Hardware Overview 33
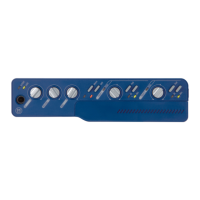
48V Switch and LED
Phantom power is activated by the switch la-
beled 48V on the front panel of Mbox 2. The
LED, when lit, indicates that 48V phantom
power is active on the Mic/Line inputs. These in-
puts provide phantom power for microphones
that require it to operate.
About Phantom Power
Dynamic microphones (such as a Shure SM57)
do not require phantom power to operate, but
are not harmed by it. Most condenser micro-
phones (like an AKG C3000) do require phan-
tom power to operate.
If you are not sure about the phantom power re-
quirements for your microphone, consult your
microphone’s documentation or contact the
manufacturer.
Peak LEDs
These LEDs are clip indicators. If the Peak LEDs
flicker occasionally, the signal reaching Mbox 2
has clipped.
Gain Controls
These knobs adjust the input gain levels of the
Mic/Line inputs.
Pad Switches and LEDs
The Pad switches engage a –20 dB pad on their
corresponding input channels. When engaged,
the Pad LEDs light.
Mic/DI Source Selectors and LEDs
These switches select either the Mic (XLR) and
Line (TRS) inputs or DI inputs for each channel.
The Mic and DI LEDs indicate the current source
input.
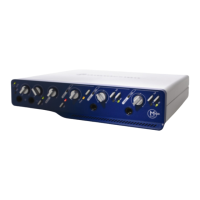
Removable Handle
Mbox 2 includes a handle that can be used for
carrying and tilting, as well as a replacement
panel that makes the unit more compact.
The handle can be used as a stand that tilts the
unit into a more easily viewable angle when the
Mbox 2 is placed on a desktop. The handle can
also be used to carry the unit.
The handle can also be replaced with the op-
tional Mbox 2 faceplate panel. This panel lets
Mbox 2 sit flat on a desktop, and reduces the
space required when packed for traveling.
To replace the handle with the Mbox 2 panel:
1 Unscrew the handle mounting screw located
along the right edge of the handle (when view-
ing from the front).
2 Remove the handle.
3 Mount the replacement panel in position
where the handle had been.
4 Secure the panel to the unit in its new position
using the same screw you removed in step 1.
5 Repeat the above basic instructions to replace
the panel with the handle.
Although phantom power can be used
safely with most microphones, it is possible
to damage some ribbon microphones with
it. Always turn off phantom power and wait
at least ten seconds before connecting or dis-
connecting a ribbon microphone.
When using phantom power, Mbox 2’s
maximum current per microphone is 4 mA.