Proline Prosonic Flow P 500
48 Endress+Hauser
3. Select the mounting location of the sensors with the given sensor distance and optimum inlet
run conditions,. In doing so, ensure there is nothing impeding sensor mounting over the entire
circumference of the measuring pipe.
4. Fit two strap bolts over strapping band 1 and guide approx. 50 mm (2 in) of one of the
strapping band ends into one of the two strapping band locks and into the lock. Then guide the
protective flap over this strapping band end and lock in place.
5. Position strapping band 1 as perpendicular as possible to the measuring pipe axis without
twisting it.
6. Guide the second strapping band end through the strapping band lock that is still free and
proceed in the same way as for the first strapping band end. Guide the protective flap over the
second strapping band end and lock in place.
7. Tighten strapping band 1 as tightly as possible by hand.
8. Align strapping band 1 in the desired position and place it as perpendicular as possible to the
measuring pipe axis.
9. Position the two strap bolts on strapping band 1, arranging them at a half circumference in
relation to one another (180° arrangement, e. g. 7:30 o'clock and 1:30 o'clock) or quarter
circumference (90° arrangement, e.g. 10 o'clock and 7 o'clock).
10. Tighten strapping band 1 so that it cannot slip.
11. Strapping band 2: proceed as for strapping band 1 (steps 4 to 8).
12. Slightly tighten strapping band 2 for final assembly. It must be possible to move strapping
band 2 for final alignment. The distance/offset from the center of strapping band 2 to the
center of strapping band 1 is indicated by the sensor distance of the device.
13. Align strapping band 2 so that it is perpendicular to the measuring pipe axis and parallel to
strapping band 1.
14. Position the two strap bolts on strapping band 2 on the measuring pipe so they are parallel to
one another and offset at the same height/clock position (e. g. 10 o'clock and 4 o'clock) in
relation to the two strap bolts on strapping band 1. A line drawn on the measuring pipe wall
that is parallel to the measuring pipe axis can be helpful here. Now set the distance between
the center of the strap bolts at the same level so that it exactly matches the sensor distance.
Alternatively, you can use the wire length here → 52.
15. Tighten strapping band 2 so that it cannot slip.
L
WARNING
Risk of injury due to sharp edges!
‣
After shortening the strapping bands, trim the cut edges.
‣
Wear suitable protective goggles and safety gloves.
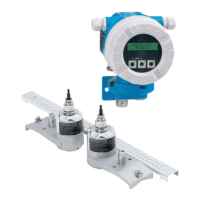
A0043374
40 Holder with strapping bands (large nominal diameters)
1 Strap bolt with guide*
2 Strapping band*
3 Tensioning screw
 Loading...