8
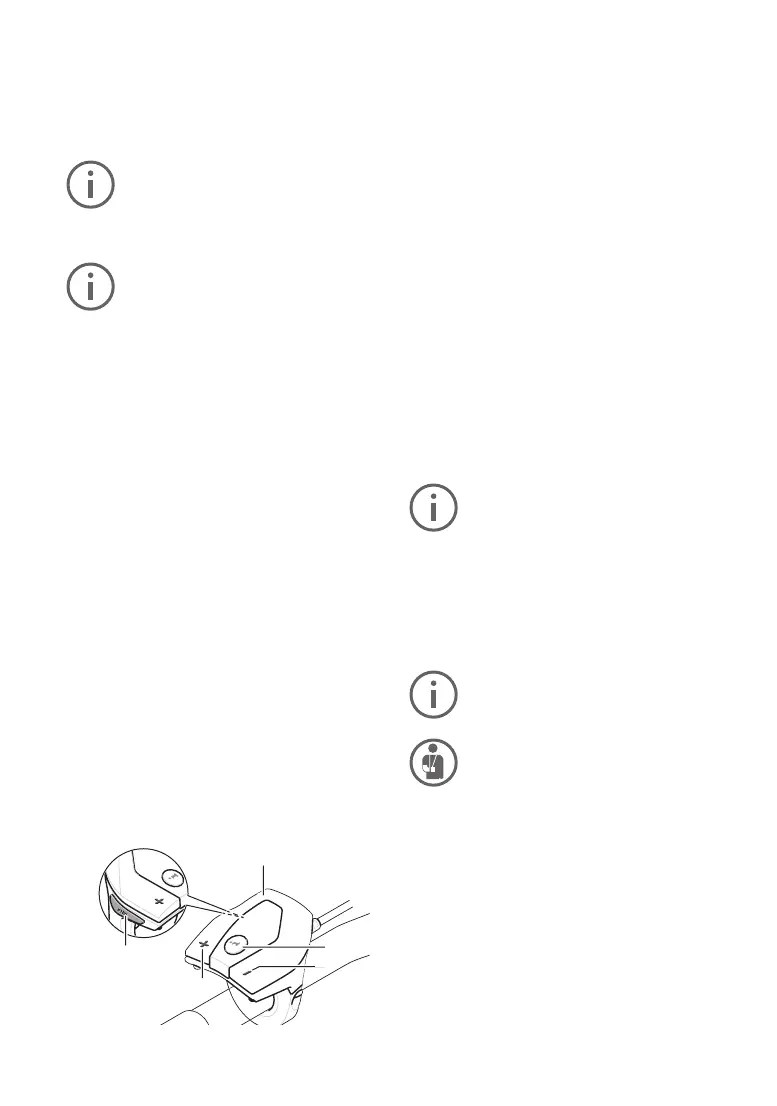
10. Control panel
11. The “i” button on the On-board computer
activates the display function.
12. Reduce value/scroll down “–” button
13. Increase value/scroll up “+” button
14. Pushing aid button “WALK”
Switchingthepushing/start-upaidonando
The pushing/ start-up aid can make it easier for
you to push the E-bike or get it moving. Do not
use the pushing aid to ride the bike.
FLYERS with pedalling support up to 25 km/h are
equipped with a pushing aid. This is limited to 6
km/h in the fastest gear. The FLYER can conven
-
iently be moved out of underground parking or
along steep paths using the pushing aid. Models
with pedal assist above 25 km/h are equipped with
asetting-o aid up to 18km/h.The installation is
performed in compliance with national regulations.
To activate the pushing aid, briey press the
«WALK» button on your on-board computer. Af
-
ter activation, press the «+» button within three
seconds
and hold it down. The E-bike drive will
be switched on.
The pushing aid cannot be activated in
support level «OFF».
The pushing aid isswitchedoas soon as one
of the following events occurs:
• You release the «WALK» 14 button,
• The wheels of the E-bike are blocked (e.g. by
breaking or bumping against an obstacle)
• speedexceeds6km/hor18km/h
With certain systems, the pushing aid
can be started directly by pressing the
«WALK» button.
Whenusingthepushing/setting-oaid,
the wheels must be in contact with the
ground to avoid the risk of injury.
Switchlightingon/o
The headlight and the rear light can be switched
onandoatthesametimebypressingthebutton
2 on the on-board computer when the respective
bicycle version supplies the riding lights from the
E-bike system. As a general rule, S-pedelecs with
pedal assist up to 45 km/h have a daytime run
-
ning light. The lighting will automatically turn on
when you switch on the system.
The button 2 will
notturnothelight.
Settingtheelectricalsupportlevel
Youcanusetheon-boardcomputer(10)tocon-
gure the level of assistance provided by the E-bike
drive when you are pedalling. The assistance level
can be adjusted at any time, including during your
ride.
Certain versions have a preset assis-
tance level that cannot be changed. Cer-
tain models may also have fewer assis-
tance levels to choose from than are
shown here.
IftheE-bikewasconguredwitheMTB
modeexworks,theSPORTassistance
level is replaced by eMTB. In eMTB
mode, the assistance factor and the
torque are adjusted dynamically de
-
pending on the pedal force applied to the
pedals. eMTB mode is only available
with Performance Line CX drives.
The full range of assistance levels includes:
• OFF:motorassistanceisswitchedo;theE-bike
is operated like a normal bicycle through pedalling
alone. The pushing aid cannot be activated in this
assistance level.
• ECO:eectiveassistancewithoptimumeciency
formaximumrange.
• TOUR: consistent levels of assistance for tours
with large ranges.
SPORT/eMTB:
• SPORT: powerful assistance for active riding on
hillyterrainandincitytrac.
• eMTB: optimum assistance on any terrain, fast
acceleration, improved dynamics, maximum per
-
formance
•
TURBO:maximumassistanceuptohighpedalling
frequencies for active riding
Increase the electrical support level by pressing
the “+” button 13 on the operating unit until the
desired electrical support level is shown at Indica-
tor b
or lower the value by pressing the “–” button
12. The motor power requested is shown on the
display a.Themaximummotorperformancede-
pends on the electrical support level chosen.
14
13
11
10
12