GAT SMART.Lock 7000 System
Mounting and Installation
www.gantner.com
HB_GAT-SMARTLOCK7000--EN_10
23
3.6 Mounting Security Bolt / Emergency Opening
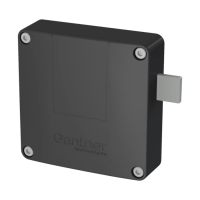
The GAT SMART.Lock 7001 is secured against unintentional locking prior to normal operation by a mounting secu-
rity bolt (8). The mounting security bolt must only be removed once the mounting, electrical connection, and the
functional testing of the GAT SMART.Lock 7001 have been completed successfully. Remove the mounting security
bolt by pulling it straight out of the housing.
Figure 3.15 – Mounting security bolt of the GAT SMART.Lock 7001
3.7 Points to be Observed during Installation
Fastening screws:
The GAT SMART.Lock 7001 is fastened with three screws onto the locker wall. Use the correct type of screws de-
pending on the type of locker material.
Mounting of the door shackle:
Depending on the type of locker material, use the correct type of screws for fastening the door shackle with the door
plate and distance plate onto the door. The positioning and mounting of the door shackle should be performed after
the final arrangement of the lockers on site.
No retaining devices:
No retaining devices such as springs should be used on the doors as this will prevent their correct operation.
Mounting security bolt:
The mounting security bolt must only be removed once the GAT SMART.Lock 7001 has been completely and suc-
cessfully installed.
 Loading...