EasyManuals Logo

GMI PS200 series User Manual

GMI PS200 series
88 pages
To Next Page IconTo Next Page
To Previous Page IconTo Previous Page
Page #62 background imageLoading...
Page #62 background image
5-2
USER HANDBOOK
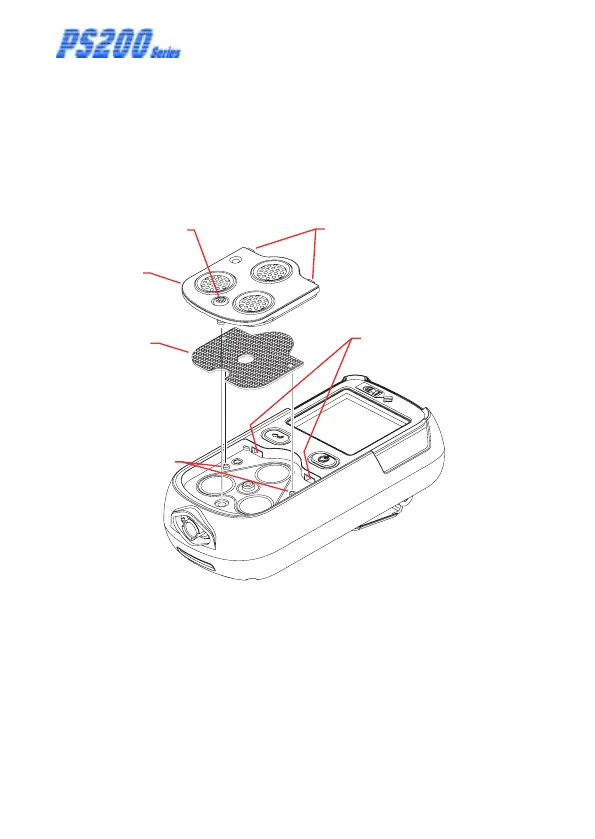
5.2.1 Replace Sensor Hydrophobic Filter
1) Using a No.1 Pozidrive
®
screwdriver, unscrew the
captive screw and remove the filter cover by sliding it
away from the display screen to disengage the locating
lugs from the corresponding slots in the filter recess.
LOCATING PEGS (2)
LOCATING SLOTS (2)
CAPTIVE SCREW LOCATING LUGS
HYDROPHOBIC
FILTER
(Part No. 64254)
FILTER COVER
ASSEMBLY
(Part No. 64240)
Fig. 5-1 Replace Sensor Filter
2) Carefully lift then remove the hydrophobic filter from
the instrument filter recess.
Note the locating pegs in the instrument filter recess and
mating pin-holes in the hydrophobic filter. Ensure correct
orientation of filter during assembly.

Table of Contents

Other manuals for GMI PS200 series

Questions and Answers:

Question and Answer IconNeed help?

Do you have a question about the GMI PS200 series and is the answer not in the manual?

GMI PS200 series Specifications

General IconGeneral
DisplayLCD
Alarm TypeAudible, visual, and vibration alarms
ResolutionDepends on the gas being detected
AccuracyVaries depending on the gas and sensor. Consult the specific sensor datasheet.
Operating Temperature-20°C to +50°C
Power SupplyRechargeable Li-ion battery
Pump TypeBuilt-in sample pump

Related product manuals