Prepare for shipping
To prepare the analyzer for shipping, do the steps that follow.
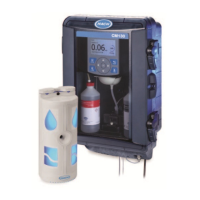
Items supplied by the user:
Deionized water in two
beakers
Cross-slotted
screwdriver
Original
packaging
Flat-bladed screwdriver,
medium
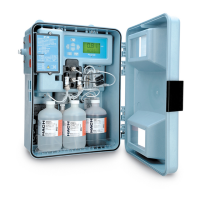
1. Remove the reagents from the reagent lines as follows:
a. Remove the indicator bottle cap (red) and the buffer bottle cap (black) from the reagent
bottles.
b. Remove the reagent bottles.
c. Put two bottles (or beakers) that contain deionized water on the reagent tray.
d. Put the indicator cap tubing and the buffer cap tubing in the deionized water.
e. Push menu. Select Maintenance>Prime reagents two times.
The reagents are removed from the reagent lines.
2. Remove the deionized water from the reagent lines as follows:
a. Remove the indicator bottle cap (red) and the buffer bottle cap (black) from the deionized
water bottles.
b. Remove the deionized water bottles from the analyzer.
c. Push menu. Select Maintenance>Prime reagents three times.
All of the liquid is removed from the reagent lines.
3. Select Power>shut down.
4. Wait for the analyzer to shut down. When the display is off, disconnect the power cord from the
electrical outlet.
Note: For user safety, the analyzer will automatically go back to idle mode if the power cord is not disconnected
in 5 minutes or less after the display goes off.
Note: When power is removed from the analyzer for more than 10 minutes, a power-loss beep is heard at the
remote indicator for approximately 5 minutes.
5. Turn the shut-off valve clockwise to stop sample flow to the analyzer.
6. Disconnect the sample inlet (black) tubing and drain (clear) tubing from the analyzer. Do not
disconnect the small diameter tubing from the metal fitting on the bottom of the analyzer.
7. Remove the pump clamp. Refer to Figure 22 on page 63. Keep the pump clamp for shipment with
the analyzer.
8. Drain the water from the colorimeter as follows:
a. Remove the thumbscrew from the colorimeter.
b. Lift the colorimeter off of the base.
c. Tilt the colorimeter backward 90 degrees so that the water in the chamber drains out the
opening in the back.
d. Tilt the colorimeter forward and backward two times to remove most of the water. Do not
shake the colorimeter.
e. Attach the colorimeter back to the base with the thumbscrew.
9. Disconnect the remote indicator cable and the Ethernet cable from the analyzer. Refer to
Analyzer electrical installation on page 37.
64
English