10
(4.0) Operation
This chapter describes HeadRush Core’s functions.
(4.1) Main Screen
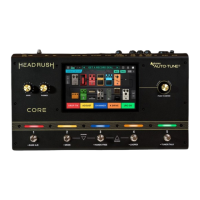
(4.1.1) Overview
(4.1.2) Basic Operations
Important: The sequence of blocks in your signal chain is not necessarily reflected in the footswitches. You can
freely assign blocks to available footswitches without changing your signal chain at all—and vice versa. See (4.6.1)
Hardware Assign > Footswitches to learn about this.
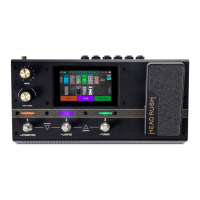
To assign a block (amp, cab, impulse response, effect, or clone) to an empty slot, tap the (
) icon and then use
the list that appears. See (4.3.1) Rigs > Creating a New Rig to learn about this.
To show a block’s Detailed Settings screen, double-tap it. Its settings screen will appear with its preset menu,
parameters, and assigned color. See (4.4) Adjusting Settings to learn about this.
To rearrange the blocks in your signal chain, tap and drag a block to another slot or
between two other blocks (the blocks after that position will shift one slot further down
the signal chain).
To activate or deactivate a block, press the footswitch assigned to it, or tap the block
and then tap the On/Off button that appears at the bottom of the screen.
To switch an amp, cab, or IR between a dual and single configuration, tap the amp,
cab, or IR, then tap the X2 button that appears at the top of the screen. See (4.1.4)
Amp/Cab Doubling to learn about this.
Tap to view the Hardware
Assign screen.
Tap and drag this bar downward to view the
Rig List screen. Double-tap to rename the rig.
Tap to create
a new rig.
Tap to view the Menu screen and
access more features and settings.
Double-tap to view the
Input Settings page.
Double-tap an effect,
amp, or cab to view its
Detailed Settings
screen.
Tap to save
the rig.
Turn the encoder to
move through selectable
items onscreen or to
adjust parameters. Press
the encoder as an Enter
command.
These five blocks show the current function of the 5 footswitches. Hold
Footswitch 2 (VIEW) to change the footswitch mode.
Double tap to view the Output
Settings page. You can also
use the meter to view the rig’s
output level.
Tap to enable/disable reverb
and delay tails when changing
the rig.
Tap to change the signal chain
type. (guitar, vocal, guitar/vocal,
etc.)