1-2
Installing the Yoke
Trackspot User Manual
To install the yoke:
1. Unplug the fixture. If the fixture has been operating, allow the
fixture to cool for at least 5 minutes.
2. Place the fixture on a sturdy surface so you can easily access both
sides of the fixture.
3. Remove the yoke screws and T-handles already installed in the
Trackspot fixture (see Figure 1-1).
4. Place the yoke ends over the fixture and align the yoke’s screw
holes with the screw holes on the fixture (see Figure 1-2).
5. Replace the yoke screws through the round holes in each side of
the yoke and tighten firmly.
Caution: You must tighten the yoke screws firmly. The
fixture may fall from the yoke if it is not
secured.
6. Replace the T-handles through the semi-circular opening in each
side of the yoke. The T-handles should not be very tight; you will
adjust the T-handles when mounting the fixture.
On the top of the yoke are three 13 mm (1/2 inch) diameter mounting
holes used to mount the fixture. For more information, see the section
titled “Mounting the Fixture” on page 2-8.
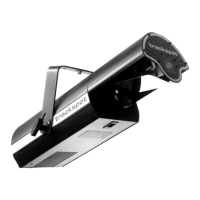
Figure 1-1. Side view of Trackspot
yoke screw
T-handle
LIGHTWAVE RESE ARCH
AUS TIN, TX U.S.A.
Figure 1-2. Inserting the yoke screws and T-handles
LIGHTWAVE RESE ARCH
AUSTIN, TX U.S.A.