Nome (*):
Cognome (*):
ID Cliente (*):
ID Punto (*):
Indirizzo:
Città:
Paese:
Zip (CAP):
Telefono (*):
Indirizzo e-mail (*):
Name (*):
Surname (*):
customer ID (*):
location ID (*):
Address:
City:
Country:
ZIP code:
phone(*):
e-mail (*):
Nome (*):
Cognome (*):
ID Cliente (*):
ID Punto (*):
Indirizzo:
Città:
Paese:
Zip (CAP):
Telefono (*):
Indirizzo e-mail (*):
Name (*):
Surname (*):
customer ID (*):
location ID (*):
Address:
City:
Country:
ZIP code:
phone(*):
e-mail (*):
Nome (*):
Cognome (*):
ID Cliente (*):
ID Punto (*):
Indirizzo:
Città:
Paese:
Zip (CAP):
Telefono (*):
Indirizzo e-mail (*):
Name (*):
Surname (*):
customer ID (*):
location ID (*):
Address:
City:
Country:
ZIP code:
phone(*):
e-mail (*):
Nome (*):
Cognome (*):
ID Cliente (*):
ID Punto (*):
Indirizzo:
Città:
Paese:
Zip (CAP):
Telefono (*):
Indirizzo e-mail (*):
Name (*):
Surname (*):
customer ID (*):
location ID (*):
Address:
City:
Country:
ZIP code:
phone(*):
e-mail (*):
20
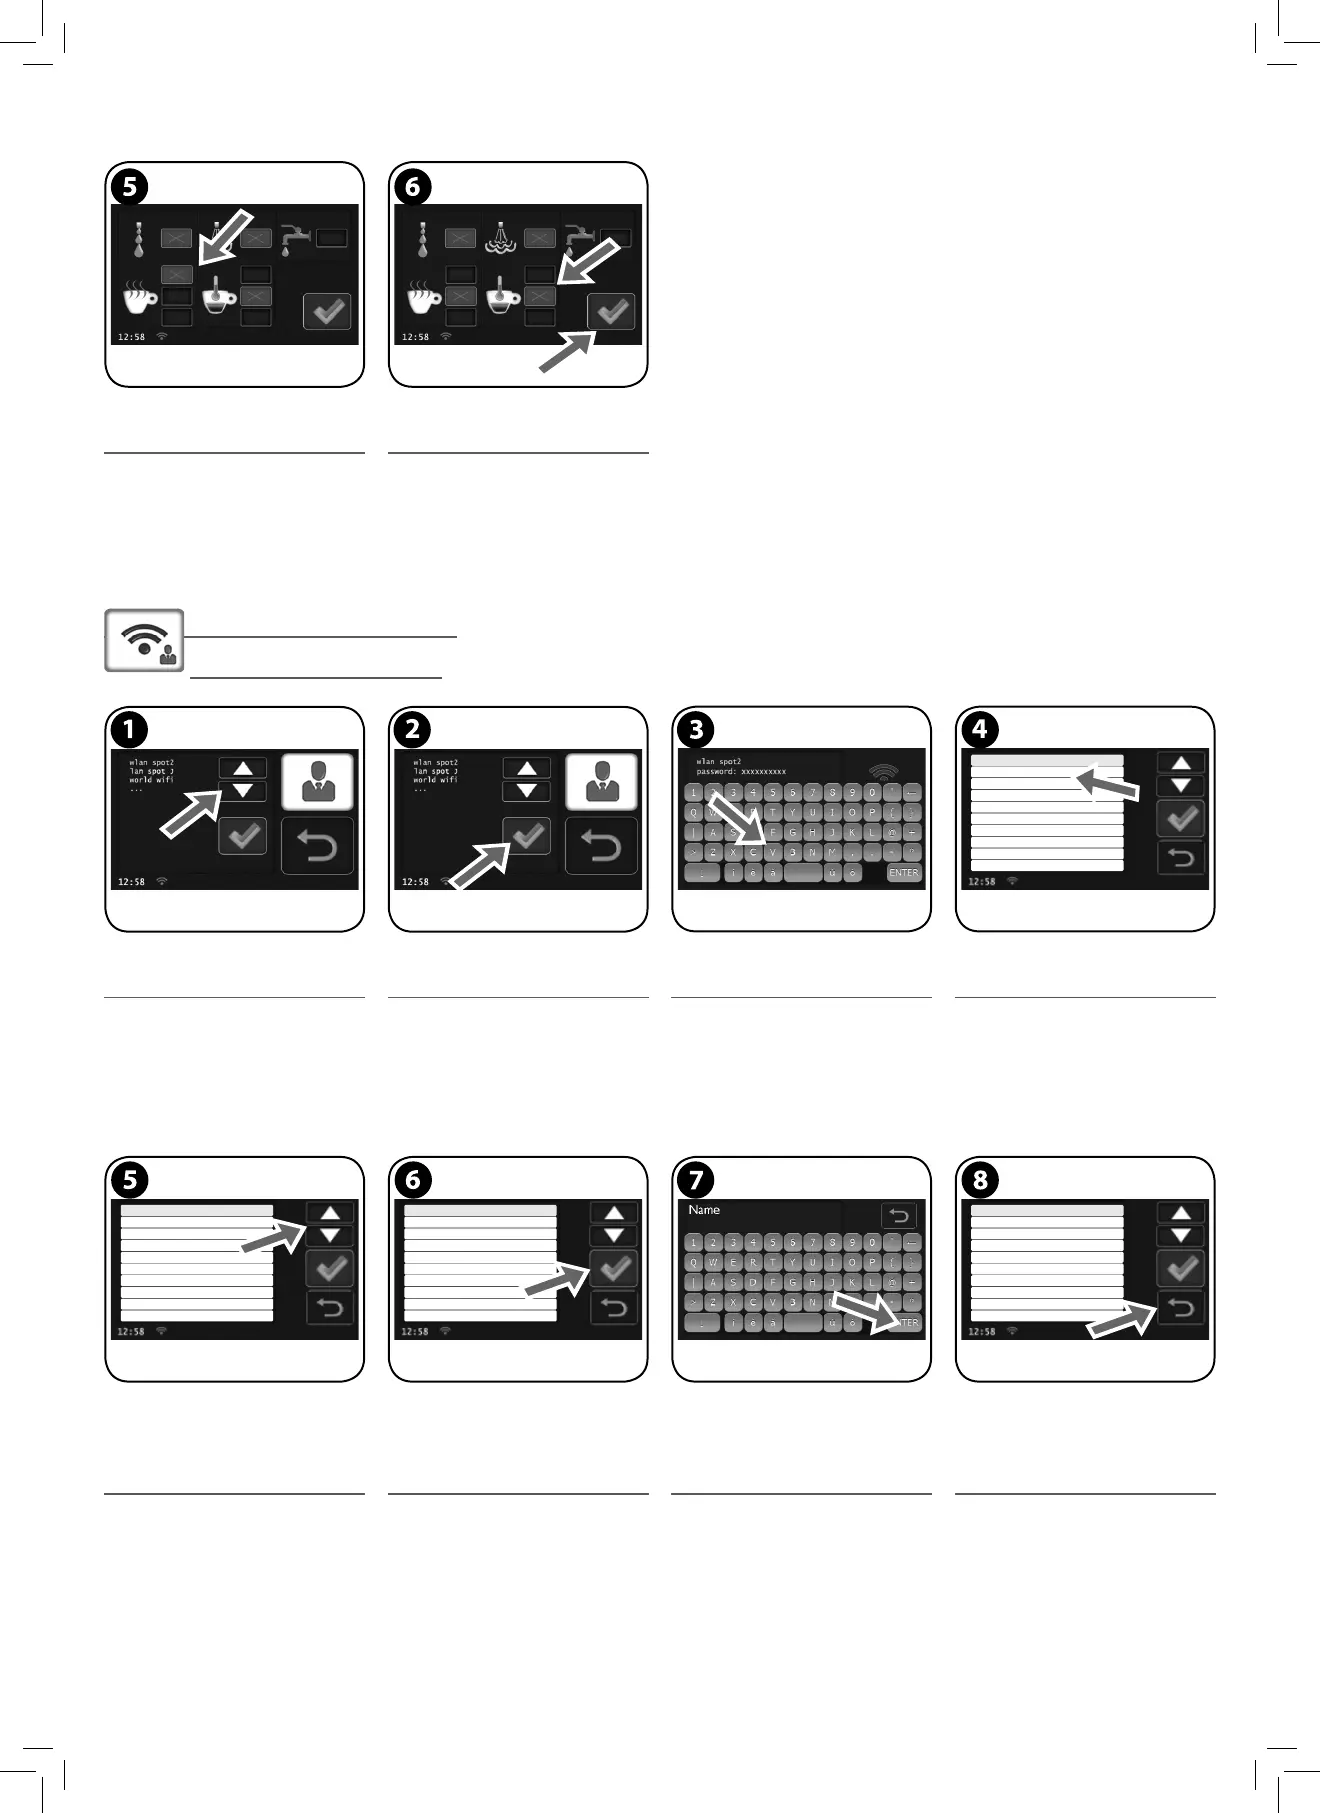
Impostazioni rete WIFI
WIFI Network Settings
Premere per selezionare la rete. Premere per confermare. Digitare la password con la tastiera virtuale. A connessione avvenuta, appare la schermata
d’immissione dei dati personali; questa appa-
re nella lingua selezionata precedentemente.
Press to select network. Press to con rm. Choose password using the virtual keyboard. Once the connection is established, the perso-
nal data entry screen is displayed in the pre-
viously selected language.
Premere per evidenziare il dato da inserire.
Nota: devono obbligatoriamente essere
compilati i campi contrassegnati con il
simbolo (*); in caso contrario non sarà
possibile uscire dalla schermata.
Dopo aver evidenziato il campo desiderato,
premere per accedere alla tastiera virtuale.
Inserire il testo con la tastiera virtuale.
Premere “ENTER” per confermare e uscire.
Compilati i campi necessari, premere per
uscire.
Press to highlight the data to be entered.
Note: elds marked with an asterisk (*)
are required to be lled in, otherwise it
will not be possible to exit the screen.
After highlighting the desired eld, press to
access the virtual keyboard.
Enter the text by using the virtual keyboard.
Press “ENTER” to con rm and exit.
Once the necessary elds are lled in, press to
exit.
Questo tasto abilita lo scaldatazze ad una
temperatura più elevata
Per regolare al temperatura del ca è (Max -
Standard illy - Min). Premere per memoriz-
zare ed uscire.
This button enables the cup warmer tray to a
higher temperature.
To adjust the co ee temperature (Max - Stan-
dard illy - Min). Press to save and exit.