Service ManualService Manual
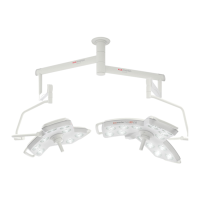
Operating Lights marLEDOperating Lights marLED
®®
E9 / E9i / E9 / E9i / E15E15
74 74 V V 1.01.0
10.210.2 Inspection Protocol for Intensive Maintenance includingInspection Protocol for Intensive Maintenance including
Technical Safety CheckTechnical Safety Check
Inspection Protocol for Intensive Maintenance including Technical Inspection Protocol for Intensive Maintenance including Technical Safety CheckSafety Check
Underline as appropriate:Underline as appropriate:
marLEDmarLED
®®
E9 / E9i / E15, TFT, surgiCamE9 / E9i / E15, TFT, surgiCam
® digital® digital
one / two / three / four lights,one / two / three / four lights,
ceiling, wall, mobileceiling, wall, mobile
Extras:Extras:
Room Room / / OR OR No.: No.: Serial Serial No.:No.:
Customer: Company:Customer: Company:
1. 1. ChecChecking king the the wall wall / / ceilceiling ing assassembly embly for for stastability bility OK. OK. Not Not OKOK N N / / AA
a) Checking the wall / a) Checking the wall / ceiling assemblyceiling assembly
–Heavy-du–Heavy-duty anchor torty anchor torque que ( ( Nm)Nm)
–Intermed–Intermediate ceiling aiate ceiling assembly torqssembly torque ue ( ( Nm)Nm)
b) Checking ceiling tube alignmentb) Checking ceiling tube alignment
c) Checking the insulating rings, c) Checking the insulating rings, washers and spring lock washerswashers and spring lock washers
d) d) Bolted Bolted connections connections of of ceiling ceiling tube tube ( ( Nm)Nm)
e) Electric lines, connections and circuit boardse) Electric lines, connections and circuit boards
2. 2. Checking Checking potential potential equalizatioequalization n / / protective protective conductor conductor (PE) (PE) resistance resistance N N / / AA
Light: internal resistance between PE main terminal (max. 0.3Light: internal resistance between PE main terminal (max. 0.3 ΩΩ))
and:and:
(See first-measured value recorded in Handover Report)(See first-measured value recorded in Handover Report) ΩΩ
3. Checking the suspension arm system3. Checking the suspension arm system
OK OK Not Not OK OK N N / / AA
a) Checking and securing the fixing screwsa) Checking and securing the fixing screws
b) Checking the safety sleeveb) Checking the safety sleeve
c) Checking the locking screwc) Checking the locking screw
d) Checking the nose segmentd) Checking the nose segment
e) Checking the brake setscrewse) Checking the brake setscrews
f) Checking the spring arm settingf) Checking the spring arm setting
g) Checking the type plate and the warning signsg) Checking the type plate and the warning signs
h) Checking the sliding contacts / h) Checking the sliding contacts / plug contacts in the cantileverplug contacts in the cantilever