17
Introduction
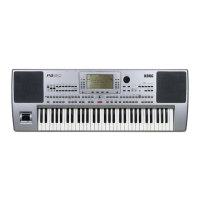
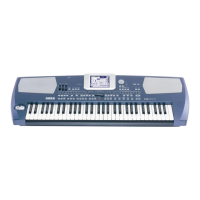
1 Music stand holes
A music stand comes standard with your Pa500. Insert its legs
into these two dedicated holes.
2 STANDBY/ON switch
Use this switch to turn the instrument on or off.
On The instrument is turned on.
Standby The instrument is turned off.
3 CARD DRIVE
Use this drive to read and write data from Secure Digital (SD) or
MultiMedia (MMC) cards. Data are managed in the “Media”
mode.
Note: Do not remove a card while it is being used.
Note: The card inserted in this drive can be read by a personal
computer, by connecting it to the Pa500 via the USB port. See
“USB” on page 226.
4 USB connector
USB Type B (Slave/Device) connector, USB 1.1 compliant (Full
Speed). Use it to connect the Pa500 to a personal computer, and
transfer data to/from a card inserted in the card drive of the
Pa500. See “CARD Connection” on page 226 for more informa-
tion.
MIDI Over USB is supported, so you can use this connector
instead of the MIDI ports (see “What is MIDI Over USB?” on
page 230).
5 MIDI INTERFACE
The MIDI interface allows your Pa500 to be connected to exter-
nal controllers (master keyboard, MIDI guitar, wind controller,
MIDI accordion…), to a series of expanders, or to a computer
running a sequencer. For more information on how to use the
MIDI interface, see the “MIDI” chapter.
IN This connector receives MIDI data from a com-
puter or a controller. Connect it to an external
controller’s or computer’s MIDI OUT.
OUT This connector sends MIDI data generated by
Pa500’s keyboard, controllers, and/or the internal
sequencer. Connect it to an expander’s or com-
puter’s MIDI IN.
6 PEDAL connectors
These connectors allow for connection of external pedals.
DAMPER Use this to connect a Damper pedal, like the Korg
PS1 or DS1H. To change its polarity, see
“Damper Polarity” on page 207.
Rear panel
Pa500-110UM-ENG.book Page 17 Friday, March 28, 2008 11:12 AM
 Loading...