L’apparecchio deve essere posizionato in piano agendo sui quattro piedini regolabili (fig. 6).
Se la lavastoviglie viene incassata, i pannelli laterali e lo schienale possono aderire ai mobili
adiacenti o alle pareti. I tubi di carico e di scarico possono essere orientati verso destra o sinistra
indifferentemente, ma quando l’apparecchio è posizionato i tubi e il cavo elettrico non devono
risultare schiacciati o piegati.
Fig. 6
2.2 Collegamento elettrico
ATTENZIONE!
Il collegamento elettrico deve essere eseguito in conformità alle norme vigenti del paese
nella quale viene installata la macchina.
Prima di collegare la macchina, accertarsi che il voltaggio e la frequenza della rete elettrica
corrispondano a quanto indicato nella targhetta identificativa e che la macchina
sia collegata ad un efficace impianto di messa a terra;
Nella parte posteriore della macchina è presente un morsetto contrassegnato con il simbolo
necessario per il collegamento equipotenziale tra i diversi apparecchi.
La macchina, deve essere protetta a monte, contro sovraccarichi e cortocircuiti da un
interruttore onnipolare di tipo magnetotermico,con adeguatopotere di interruzione, o da un
sezionatore sottocarico e fusibili del tipo gL di adeguata portata.
Contro i contatti indiretti deve essere installato subito a valle dell’interruttore magnetotermico
odel sezionatore/fusibili, un interruttore differenziale con corrente di intervento coordinata
con il valore della resistenza dell’impianto di terra dell’utente.
Il cavo di alimentazione, fornito con la macchina, è del tipo H07RN-F.
The wash programme screens are shown below by dishwasher type.
The programmes differ in duration, dosages and temperatures:
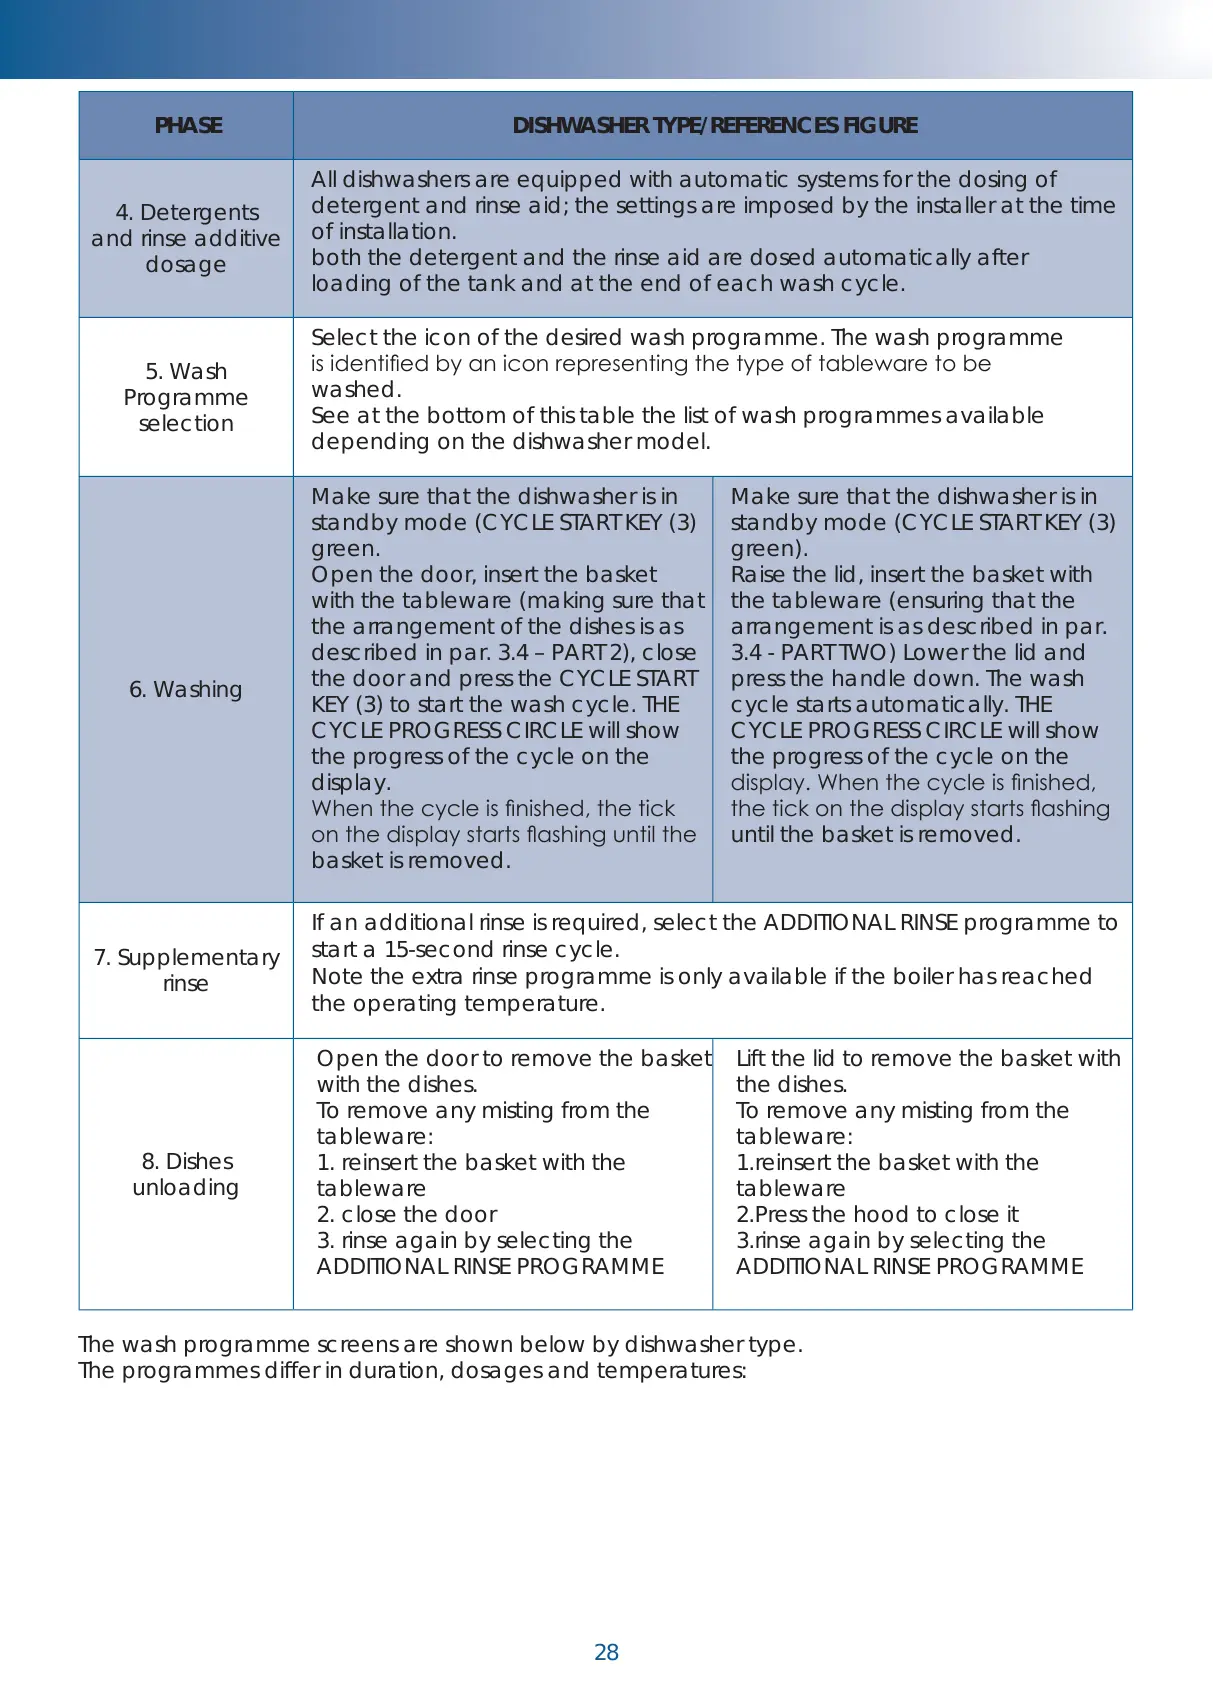
PHASE DISHWASHER TYPE/REFERENCES FIGURE
4. Detergents
and rinse additive
dosage
All dishwashers are equipped with automatic systems for the dosing of
detergent and rinse aid; the settings are imposed by the installer at the time
of installation.
both the detergent and the rinse aid are dosed automatically after
loading of the tank and at the end of each wash cycle.
5. Wash
Programme
selection
Select the icon of the desired wash programme. The wash programme
is identied by an icon representing the type of tableware to be
washed.
See at the bottom of this table the list of wash programmes available
depending on the dishwasher model.
6. Washing
Make sure that the dishwasher is in
standby mode (CYCLE START KEY (3)
green.
Open the door, insert the basket
with the tableware (making sure that
the arrangement of the dishes is as
described in par. 3.4 – PART 2), close
the door and press the CYCLE START
KEY (3) to start the wash cycle. THE
CYCLE PROGRESS CIRCLE will show
the progress of the cycle on the
display.
When the cycle is nished, the tick
on the display starts ashing until the
basket is removed.
Make sure that the dishwasher is in
standby mode (CYCLE START KEY (3)
green).
Raise the lid, insert the basket with
the tableware (ensuring that the
arrangement is as described in par.
3.4 - PART TWO) Lower the lid and
press the handle down. The wash
cycle starts automatically. THE
CYCLE PROGRESS CIRCLE will show
the progress of the cycle on the
display. When the cycle is nished,
the tick on the display starts ashing
until the basket is removed.
7. Supplementary
rinse
If an additional rinse is required, select the ADDITIONAL RINSE programme to
start a 15-second rinse cycle.
Note the extra rinse programme is only available if the boiler has reached
the operating temperature.
8. Dishes
unloading
Open the door to remove the basket
with the dishes.
To remove any misting from the
tableware:
1. reinsert the basket with the
tableware
2. close the door
3. rinse again by selecting the
ADDITIONAL RINSE PROGRAMME
Lift the lid to remove the basket with
the dishes.
To remove any misting from the
tableware:
1. reinsert the basket with the
tableware
2. Press the hood to close it
3. rinse again by selecting the
ADDITIONAL RINSE PROGRAMME
500-600 Under counter dishwasher basket (90-110-120-300 sec.)