Page 33
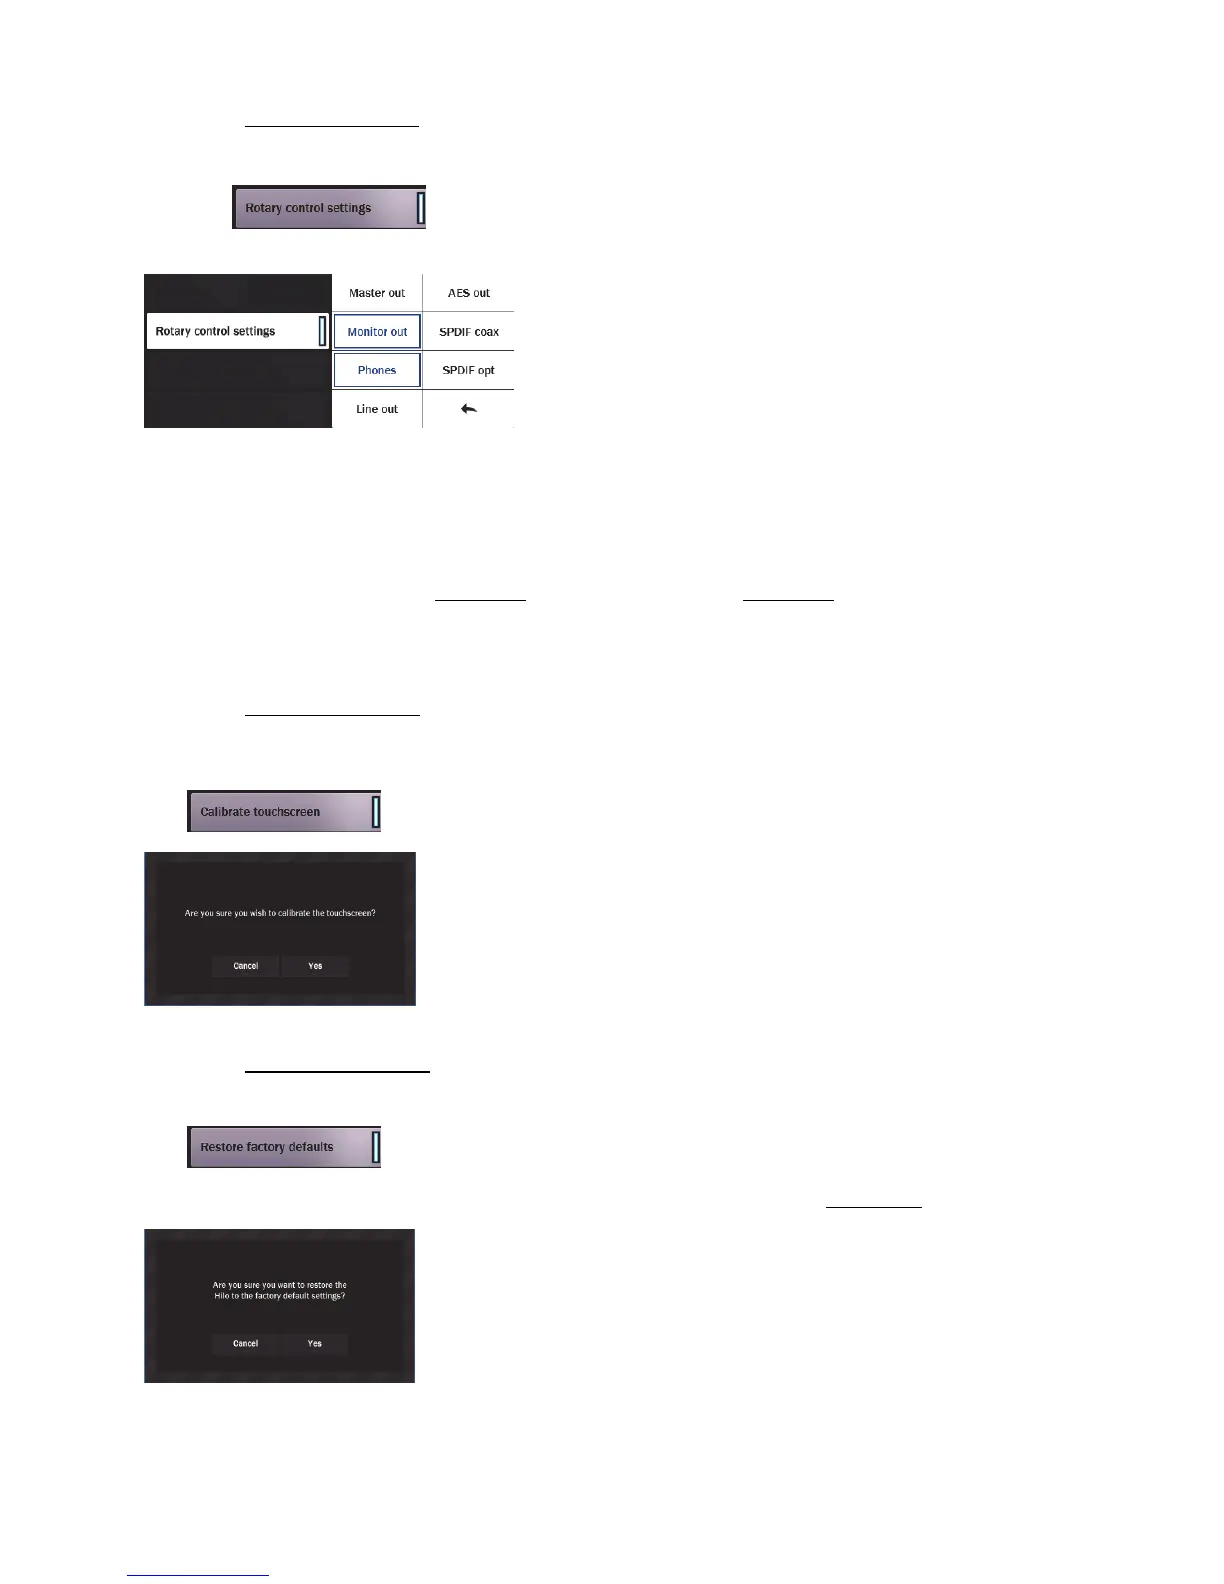
5.3.7.2.2 Rotary Control Settings
This menu allows you to select which outputs can be adjusted with the Hilo
rotary encoder. By default, the Monitor Out and the Phones Out can be
attenuated with the rotary encoder, and pressing in the knob will toggle
between those two choices. If additional choices are selected from the Knob
Settings menu, then pressing in the Rotary Encoder will toggle through all
the Outputs that have been selected.
Monitor Out and Phones Out can be de-selected by clicking in the
associated boxes, and/or additional outputs can be selected by tapping
their boxes.
Any number of sources can be selected, including Master Out
After the desired sources have been selected, turning the rotary encoder
from any Hilo screen other than the Routing or Monitoring pages will
change volume for the selected output and the level will be displayed
graphically in the status strip at the top of the page.
Pressing in the Rotary Encoder Knob will toggle through the available
choices.
NEW FEATURE: Version 8 of the Hilo firmware adds Master Out level control. This allows easy adjustment for ALL Hilo outputs
with one control. The Master Out will maintain the relative levels of attenuation for individual outputs, for instance, if the Monitor Out
is attenuated by 10dB, and the Master Out is at Unity, then when the Master Out gets turned down the Monitor will be reduced from
the -10 starting position. If Master Out is attenuated by -5dB, then the Monitor Out would have a total attenuation of -15dB. The
relative output levels can be established by pressing in the rotary encoder to the output one desires to adjust, or they can be adjusted
individually from the Routing page, see section 5.3.4, or the Monitoring page, see section 5.3.3 . Note, when the new Monitoring
Page is opened, Master Out gets switched ON automatically, irrespective of the state of the Rotary Control Settings page. Since the
output levels are a combination of individual channels and the Master Out, it is important to take care when switching the Master Out
OFF in the Rotary Control Settings page – this can result in a “jump” in output levels if there had been some Master Out attenuation at
the time it was switched off.
5.3.7.2.3 Calibrate Touchscreen
The LCD Touchscreen has a grid that detects when you touch it to select or change settings. If you find that the touch response gets
slow or does not always engage properly, you may need to recalibrate the touch screen.
Push the Calibrate Touchscreen button.
The screen will go black and give you instructions for recalibrating the screen.
Simply follow the instructions and the last screen you were on will come up when done.
Be sure to touch directly in the center of the target to give the most accurate touchscreen
calibration. Some people like to use a capped pen or eraser, rather than their finger, for
greater accuracy.
There are times when calibrating the touchscreen is necessary for optimum performance.
However if this setting was selected unintentionally, just tap “cancel” and return to the
Display Menu page.
5.3.7.2.4 Restore Factory Defaults
This button will return Hilo to its original factory settings. This impacts clock settings
routing, trims, Digital modes, etc,
Alternatively, there are factory and user scenes available from the Scenes page. The factory
scene presets may get the unit closer to a state that is suited for your purposes then the
system default. More information about Scenes is in section 5.3.2.
The critical factory default settings are:
SYNC SOURCE = Internal
DIGITAL IN SOURCE = AES
LINE IN and LINE OUT TRIM = +20dBu
OPTICAL OUT MODE = SPDIF
SRC = OFF
ROTARY CONTROL SETTINGS = Monitor Out and Phones
LANGUAGE = English
USB MODE = 8 Channel