OM-269681 Page 12
4-6. Lens Delay Control
OM-269681 Page 1
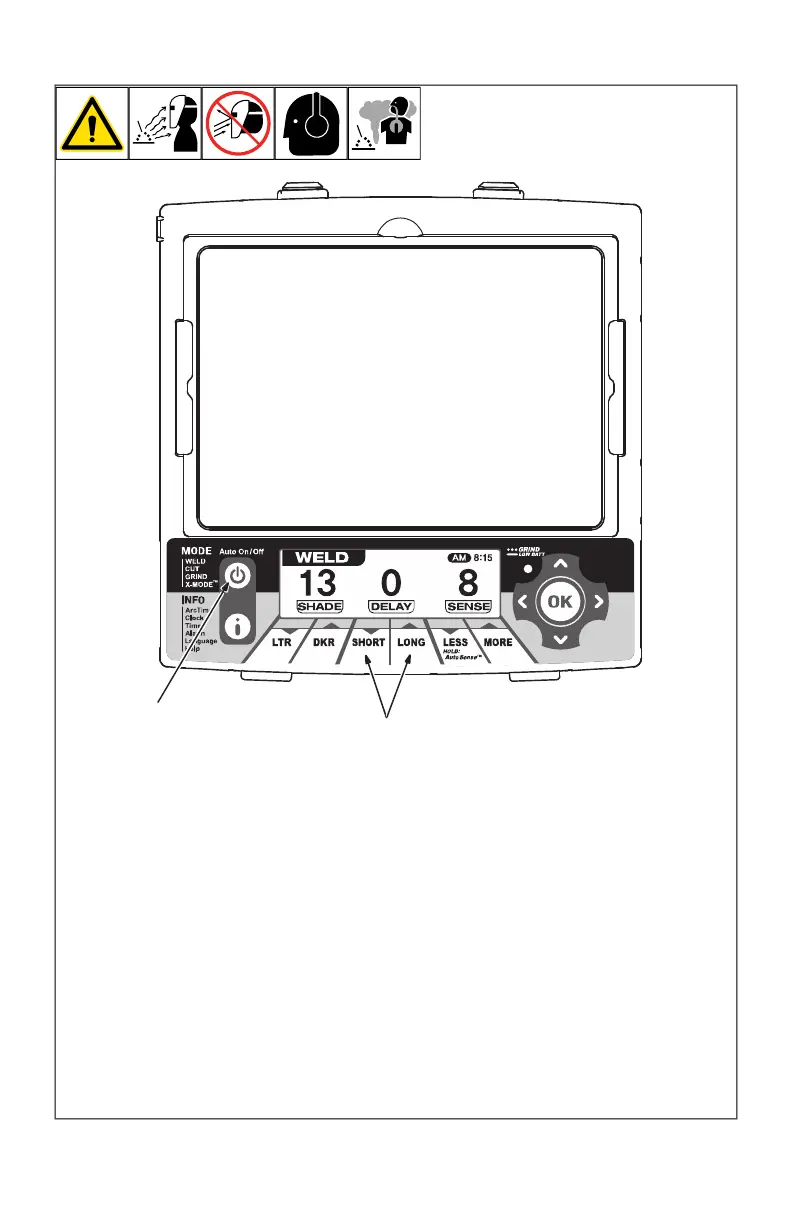
1
1 Lens Delay Adjustment
Buttons
2 Mode Control Button
Use the Lens Delay Short
and Long buttons to adjust
the time for the lens to switch
to the clear state after weld-
ing or cutting.
The delay is particularly use-
ful in eliminating bright af-
ter-rays present in higher
amperage applications
where the molten puddle re-
mains bright momentarily af-
ter welding. Use the Lens De-
lay Control buttons to adjust
delay from 0 to 10 (0.1 to 1.0
second).
The delay ranges for each
mode are as follows:
Weld, Cut, X-Modes
0 10
Grind Mode No delay ad-
justment
There is no lens delay
adjustment in the Grind
mode.
Lens Delay Adjustment
Procedure
Press Auto On/Off but-
ton to turn helmet On.
Press Mode button to se-
lect desired function:
Weld, Cut, or X-Mode.
Use Short and Long ad-
justment buttons to se-
lect desired delay.
Begin welding or contin-
ue with other lens adjust-
ments.
2
1 Lens Delay Adjustment Buttons
2 Auto On/Off (Mode) Control Button
Use the Lens Delay Short and Long buttons
to adjust the time for the lens to switch to the
clear state after welding or cutting.
The delay is particularly useful in eliminating
bright after-rays present in higher amperage
applications where the molten puddle re-
mains bright momentarily after welding. Use
the Lens Delay Control buttons to adjust de-
lay from 0 to 10 (0.1 to 1.0 second).
The delay ranges for each mode are as
follows:
Weld, Cut, And X-Modes - No. 0–No. 10
Grind Mode - No delay adjustment
F
There is no lens delay adjustment in
the Grind mode.
Lens Delay Adjustment Procedure
l Press Auto On/Off (Mode) button to turn
helmet On.
l Press Auto On/Off (Mode) button to se-
lect desired function: Weld, Cut, or X-
Mode.
l Use Short and Long adjustment buttons
to select desired delay.
l Begin welding or continue with other
lens adjustments.