2.3 Preparatory Steps
Before mounting the MOBOTIX D12 and (if required) the Outdoor Wall Mount (see
sections 2.9 and 2.12), the following questions should be solved:
• Which connections should the camera use (network/ISDN/RS232)?
• Where should the camera be mounted and which area should the PIR sen-
sor cover?
• How will you provide the camera power supply (PoE switch, inline using Net-
work Power Adapter/Rack, external power supply)?
• How will the connections be provided from within the building (network,
ISDN, RS232, power supply)?
• Which other mounting options (e.g. corner/pole mount) are available?
2.3.1 Mounting to a Ceiling
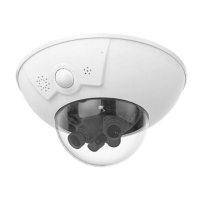
When mounting the camera to a ceiling, make sure that the PIR sen-
sor points into the direction where it is most useful. The PIR sensor
reaches about 10 meters (33 ft) and has a field of view of ±15°. The
cable outlet should be positioned so that it is directly behind the
center of the camera housing.
Use the supplied drilling template (
fold-out at the back of the manual
) to properly
position the holes for the camera fixtures.
© MOBOTIX AG • Security-Vision-Systems • Made in Germany
www.mobotix.com • sales@mobotix.com
28/132
D12 Camera Manual Part 1
Note
In order to solve these and other questions, you should consult
shop.mobotix.com for more information on the MOBOTIX D12D,
the D12D-Outdoor, D12D-180° and the D12M-CS as well as the avail-
able accessories.
1.6 m/5.3 ft
3 m/10 ft
2.8 m/9.2 ft