Pixie service manual
77
FUNCTION TESTS
- performed test(s)/measuring value(s), test points
- used test equipment
- signature
8.7.3 Test sequence
Danger of electrical shock/short circuit!
Do not plug in the coffee machine during insulation test.
Danger of electrical shock!
Do not touch tip of test probes.
Do not touch metallic parts of coffee machine during test.
Read and observe safety instructions in user manual of test equipment.
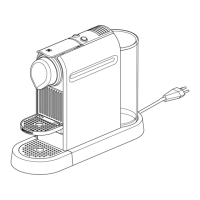
A Swiss power plug is
shown here as an
example.
Use a short circuit
plug or special alliga-
tor clips etc. as sub-
stitute for this test adapter.
1) Connect the phase and neutral pin of
the power plug together with a test
adapter (procured by the repair
centre).
2) Connect the black measuring cable to
the test adapter (see image).
3) Switch on coffee machine.
Symbolic illustration
of test equipment.
4) Switch on test equipment and select
an insulation test voltage of 500 V DC.
MEASURE
LOCK/STOP
COMP
LIGHT
0Ω ADJ
Some test equipment
displays test passed
or failed instead of
the insulation resistance.
5) Touch right side panel with red test
probe.
6) Press "measure" button.
7) Read off displayed insulation resist-
ance or test result.
8) Test left side panel in the same way.
The insulation resistance must
always be higher than 300 kOhm
(300,000 Ohm).
6
Test passed
5