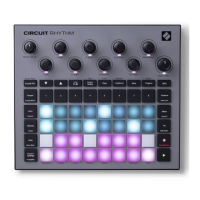
You can change Velocity value by pressing the pad in the Velocity value display rows that
corresponds to the Velocity value. If you wanted the hit at Step 12 in the example above to have
a Velocity value of 96 instead of 40, you would press pad 12; Pads 1 to 12 now illuminate sand.
If you want to decrease a Velocity value, press the pad corresponding to the required value.
You can also use Velocity View to change Velocity values while a pattern is playing. In this case,
you need to press and hold the pad for the step to have its Velocity value changed; you can do
this at any point in the pattern. The held step pad will illuminate red, and the other two rows will
“freeze” to display the Velocity value of the selected step. Press the pad corresponding to the
new value required. The pattern continues to play, so you can experiment with different Velocity
values in real time.
Velocity View can also be used to enter drum hits. Hold down the pad
corresponding to the step where a hit is to be added, and press a pad on the
velocity value display; the pad denes the velocity of that note. This is great
for adding a series of “ghost” hits at low volume.
Fixed Velocity
If you’re entering hits on the four performance pads in Expand View, you may prefer to disable
Velocity; then the hits comprising your drum pattern will all be at the same volume. Circuit has a
Fixed Velocity function, which sets Velocity at value of 96 (pad display12).
Fixed Velocity is enabled by pressing Velocity
6
while holding down Shift
19
. Fixed Velocity
is conrmed by the Velocity button illuminating white while Shift is held down.
You will now nd that all the drum hits you enter have a Velocity value of 96 (pad display 12).
You can still change this to another value if you want by following the procedure described
above.
Recording Knob Movements
As with synth sounds, you can tweak drum sounds in real time using the eight Macro
controls
3
. Circuit features Dynamic Automation, which means you can add the effect of these
tweaks to the recorded pattern by putting Circuit into Record Mode (by pressing
Record
12
) while moving the knobs.
When you have entered Record Mode, the LEDs below the Macro controls initially retain the
colour and brightness they had previously, but as soon as you make an adjustment, the LED
turns red to conrm that you are now recording the knob movement.
In order for the knob movements to be replayed, you must drop out of Record Mode before
the sequence loops right round, otherwise Circuit will overwrite the automation data with that
corresponding to the new knob position. Provided you do this, you’ll hear the effect of the
Macro control being replayed when the sequence next loops round, at the point in the pattern
where you turned the control.


![Preview: Novation Launchpad Mini [MK3]](https://data.easymanua.ls/products/284351/200x200/novation-launchpad-mini-mk3.webp)