Requirement Action Evaluation kit cable
Power up Connect 12 V
DC
to the
power connector.
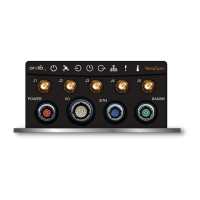
Attach a cable and apply 12 V
DC
to the plug labeled
"Main" (CA08R-CRPB-0002)
Caution: If your unit does not power up, and this is your first install-
ation using your cables, check the polarity of the wires and confirm
that the unit will power up normally before proceeding with these
steps or making any other connections.
3.
Install the GNSS antenna(s). Follow your antenna manufacturer's instructions. :
For additional information on GNSS antenna installation considerations, including
cabling, an Orolia tech note is available here.
4.
Wire the antenna cables and interface cables. Most customers will require the
Multi I/O and Ethernet cables for these connections, as well as a PC..
Requirement Action Evaluation kit cable
USB con-
nection
Connect USB to the Multi
I/O connector.
Connect the USB connector to a PC with a ter-
minal emulator program (CA08R-CRUB-0002)
Network con-
nection
Connect at least one of the
two Ethernet connectors to
a network.
Connect the RJ45 jack labeled ETH0 or ETH1
to a network hub/switch or directly to a PC
(CA08R-CRET-0002)
USB: Connect the Multi I/O connector to the VersaSync unit. If you are using
the Evaluation Kit, connect the Multi I/O USB output to a PC. Install a ter-
minal emulator program on the PC (e.g., TeraTerm
®
or PuTTY
®
).
Ethernet: Connect the Ethernet cable to one of the ETH ports of the unit. If
you are using the Evaluation Kit, connect at least one of the two I/O cable Eth-
ernet ports (ETH0 or ETH1) to a network switch/hub, or to the PC mentioned
above (using a standard Ethernet patch cable, or a crossover cable).
For pinout tables, see "Connectors and their Pinouts" on page9 and "Configuring
Inputs/Outputs" on page38.
5.
Establish a network connection so as to allow access to the web user interface
("Web UI"). See "Initial Network Setup" on page29 for information on the USB
driver installation and network address configuration.
Note: You can also use Zeroconf to access the Web UI (see "Zero
Configuration Setup" on page34).
2.2 Installation Overview
CHAPTER 2 • VersaSync User Manual Rev. 7.0
27