• First mount the stopping plate using the two screws and spring washers provided. This
plate has two tabs which restrict the push rod to a certain degree of movement. Be sure
to mount it using the middle hole (3
rd
) on both sides.
• Now mount the the L-profile mounting brace using the two bolts and washers provided.
Be sure to place the washers under the brace. It will then sit on top of the stopping plate
as well. Apply Loctite 243.
• Now fit the 130 mm push rod with two rod ends and two nuts. Mount it to the
servomotor's arm using the three washers, nut and bolt provided. The two thicker
washers are to be placed on either side of the rod end, while the thinner washer gets
placed between the servomotor's arm and the bolt head.
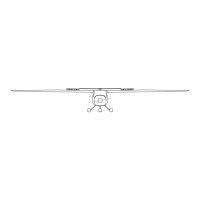
• Drill three Ø5 mm holes in the belly of the fuselage. These holes will allow you to fix the
servomotor to the fuselage under the cabin floor. The position of the servomotor,
however, is critical. Two of the three hole locations can be seen in the diagram below.
They are to be measured from the fuselage's front rim (just behind and below the motor)
and from it's center axis. Use a string, if need be, to make a visual reference for the
central axis. The diagram shows the front end of the Sinus seen from UNDERNEATH the
fuselage.
http://www.pipistrel.si © Pipistrel Release March 2009 © Page 238 of 267