PreSonus StudioLive
™
24.4.2
114
Quick Start:
Level
Setting
Overview Controls Scenes,
Presets &
System
Menu
Technical
Information
Tutorials Trouble-
shooting
& Warranty
Connecting
to a
Computer
Owner’s Manual
115
Quick Start:
Level
Setting
OverviewControlsScenes,
Presets &
System
Menu
TutorialsTechnical
Information
Trouble-
shooting
& Warranty
Software
Universal Control,
Capture, and
Studio One Artist
Hookup
Hookup
Software
Universal Control,
Capture, and
Studio One Artist
Connecting
to a
Computer
SOFTWARE: Universal Control, Capture, and Studio One Artist 7
Studio One Artist 7.47.4 Studio One Artist
7 SOFTWARE: Universal Control, Capture, and Studio One Artist
Activating Studio One Artist Oine
t Once you have created a user account, launch Studio One Artist. From
the Activate Studio One Menu, click on the Activate Oine link. Follow
the instructions to log in to your previously created user account, register
the product, and obtain a license le.
t Next, copy the license le to the computer on which Studio One has
been installed and locate the license le as instructed in the Activate
Studio One menu. The activation process is now complete.
Installing Bundled Content for Studio One Artist
Studio One Artist comes bundled with an array of
demo and tutorial material, instruments, loops,
samples, and other third-party content. The Studio
One Artist bundle includes all that you need to begin
producing music.
t Upon completing the Studio One Artist installation
and activation process, the Studio One Content
Installer will appear. If it does not appear,
navigate to Help/Studio One Installation.
t At the top of the installation menu, select the source
from which the content will be installed, as well as
the location where you wish to install the content.
The source of the content will be the same DVD from
which you installed Studio One Artist. By default,
Studio One Artist will point to your DVD drive as the
content source. Listed in the installation menu are
separate entries for each available item. Click the
checkbox next to each item you wish to install, then
click on the Install Packets button at the bottom
left of the menu to install the selected content.
t When nished installing content, click on
the Done button to exit the menu.
Studio One Artist content can be installed at any time by accessing
the Help/Studio One Installation menu. If you choose not to install
any portion of the content, you can install it at a later time.
7.4.2 Enabling the Audio Driver
Studio One and Studio One Artist were designed with PreSonus interfaces
in mind. Your StudioLive is already integrated into Studio One Artist, so
setup is quick and easy. When Studio One Artist is launched, by default
you will be taken to the Start page. On this page, you will nd document-
management and device-conguration controls, as well as a customizable
artist prole, a news feed, and links to demos and tutorials from PreSonus.
If you have an Internet connection on your computer, these links will be
updated as new tutorials become available on the PreSonus Web site.
Complete information on all aspects of Studio One Artist is
available in the Reference Manual PDF located on the Studio
One Artist installation disc. The information in this tutorial covers
only the basic aspects of Studio One Artist and is intended
to get you set up and recording as quickly as possible.
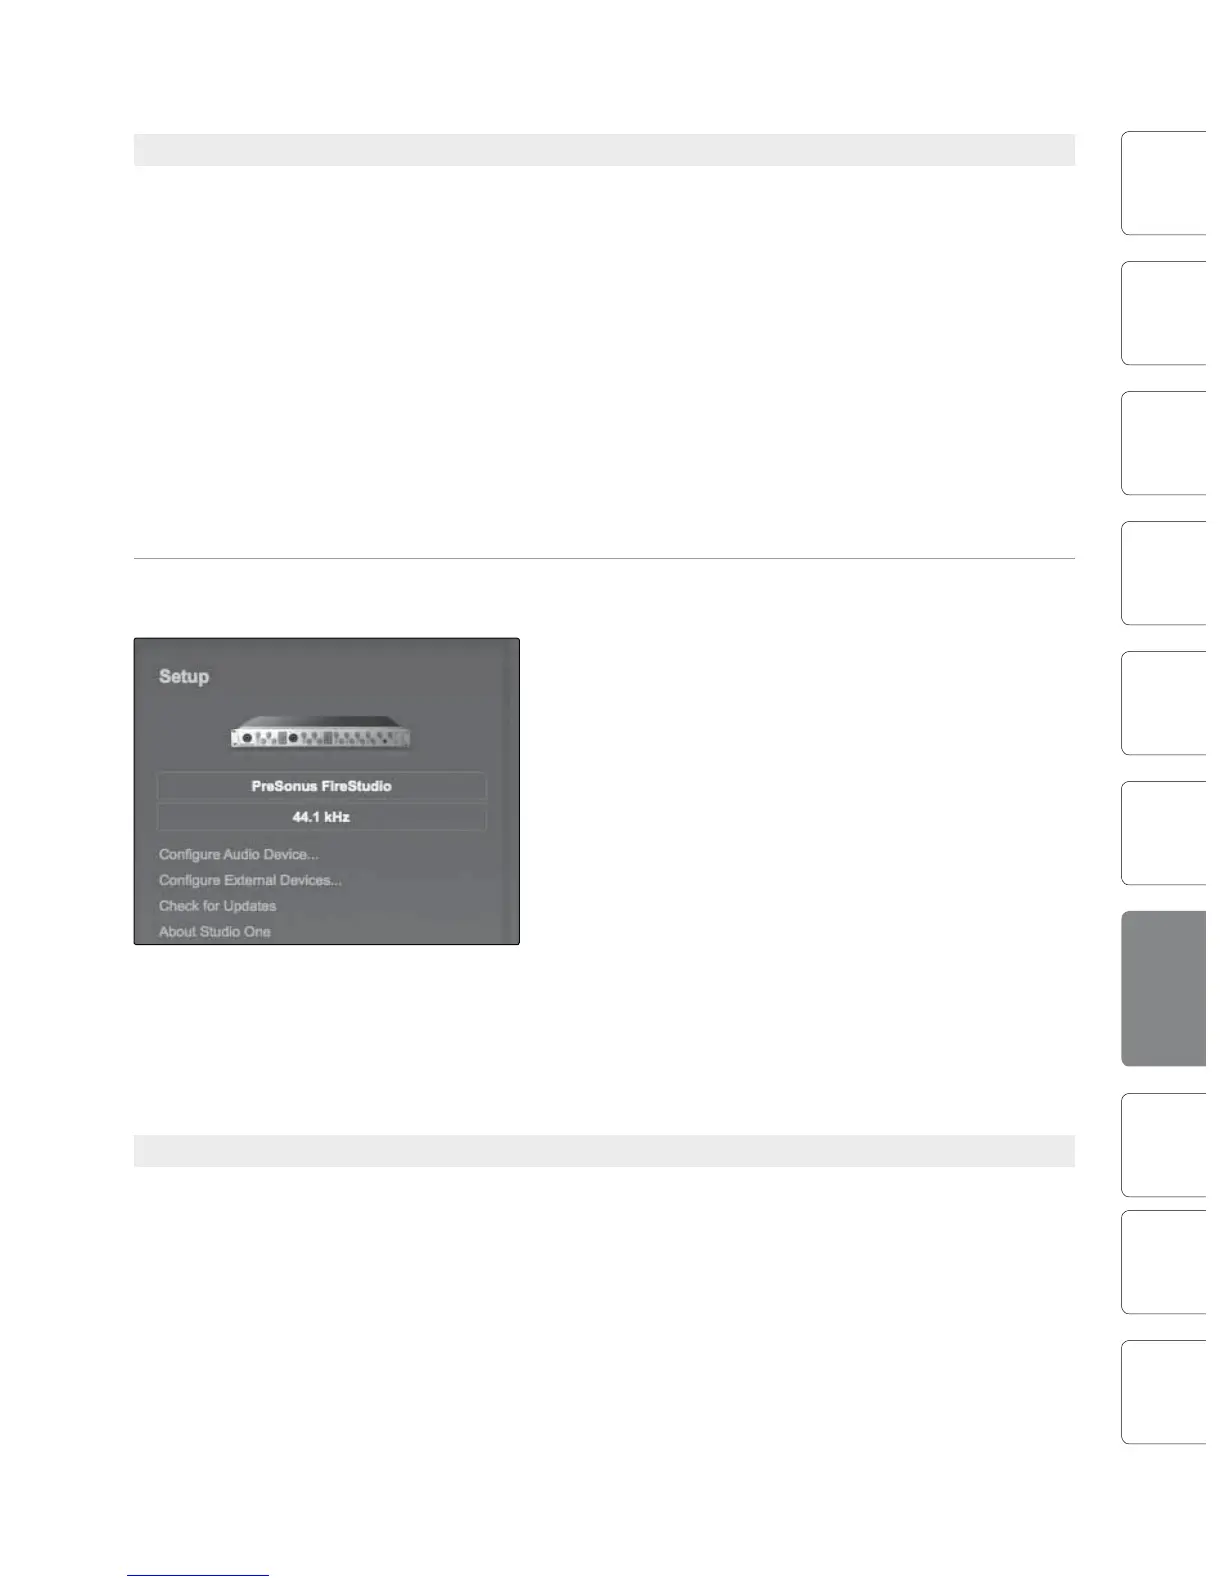
Start Page: Setup Area Shows Active Audio Driver and Sample Rate and Provides
Quick Links to Congure Audio and MIDI.
In the middle of the Start page, you will see the Setup
area. Studio One Artist automatically scans your system
for all available drivers and selects a driver. By default, it
will choose a PreSonus driver if one is available.
Selecting a Dierent Audio Driver from the Start Page
Your StudioLive uses the same driver as the FireStudio
family of interfaces. If you do not see “PreSonus
FireStudio” on the Start page when you launch Studio
One, click on the Congure Audio Devices link in the
Setup area to open the Audio Setup Options window.
In the Audio Device menu, select “PreSonus
FireStudio.” Click the Apply button and then OK.
After you have veried that the PreSonus FireStudio Universal driver has been detected,
please continue to the next section to set up your external MIDI devices. If you do
not have any MIDI devices to connect at this time, please skip to Section 7.4.4.
7.4.3 Conguring Your MIDI Devices
From the External Devices window in Studio One Artist, you can congure
your MIDI keyboard controller, sound modules, and control surfaces.
This section will take you through setting up your MIDI keyboard
controller and sound module. Please consult the Reference Manual
located on your Studio One Artist installation DVD for complete setup
instructions for other MIDI devices. Before beginning this section,
you must rst install the drivers for your MIDI interface or USB MIDI
Controller keyboard. Please consult the documentation that came
with your MIDI hardware for complete installation instructions.