PreSonus StudioLive
™
24.4.2
120
Quick Start:
Level
Setting
Overview Controls Scenes,
Presets &
System
Menu
Technical
Information
Tutorials Trouble-
shooting
& Warranty
Connecting
to a
Computer
Owner’s Manual
121
Quick Start:
Level
Setting
OverviewControlsScenes,
Presets &
System
Menu
TutorialsTechnical
Information
Trouble-
shooting
& Warranty
Software
Universal Control,
Capture, and
Studio One Artist
Hookup
Hookup
Software
Universal Control,
Capture, and
Studio One Artist
Connecting
to a
Computer
SOFTWARE: Universal Control, Capture, and Studio One Artist 77 SOFTWARE: Universal Control, Capture, and Studio One Artist
7. Click on the Outputs tab, and you will see all of the
available outputs on your StudioLive. At this time,
you can add the number of output buses to which
you would like to have access and can give them
names.
We recommend that you create a mono output for
each for the 24 FireWire returns on your StudioLive,
as well as one stereo output assigned to FireWire
returns 25-26 to use for your stereo main output.
In the lower right corner, you will see the Audition
select menu. This allows you to choose the output
from which you will audition audio les prior to
importing them into Studio One Artist. In general,
you will want this to be the main output bus.
If you would like this output conguration
available every time you launch Studio One
Artist, click the Make Default button.
Now that you’ve congured your MIDI and
audio I/O and created a new Song, let’s
go through some of the basics of Studio
One Artist so you can start recording!
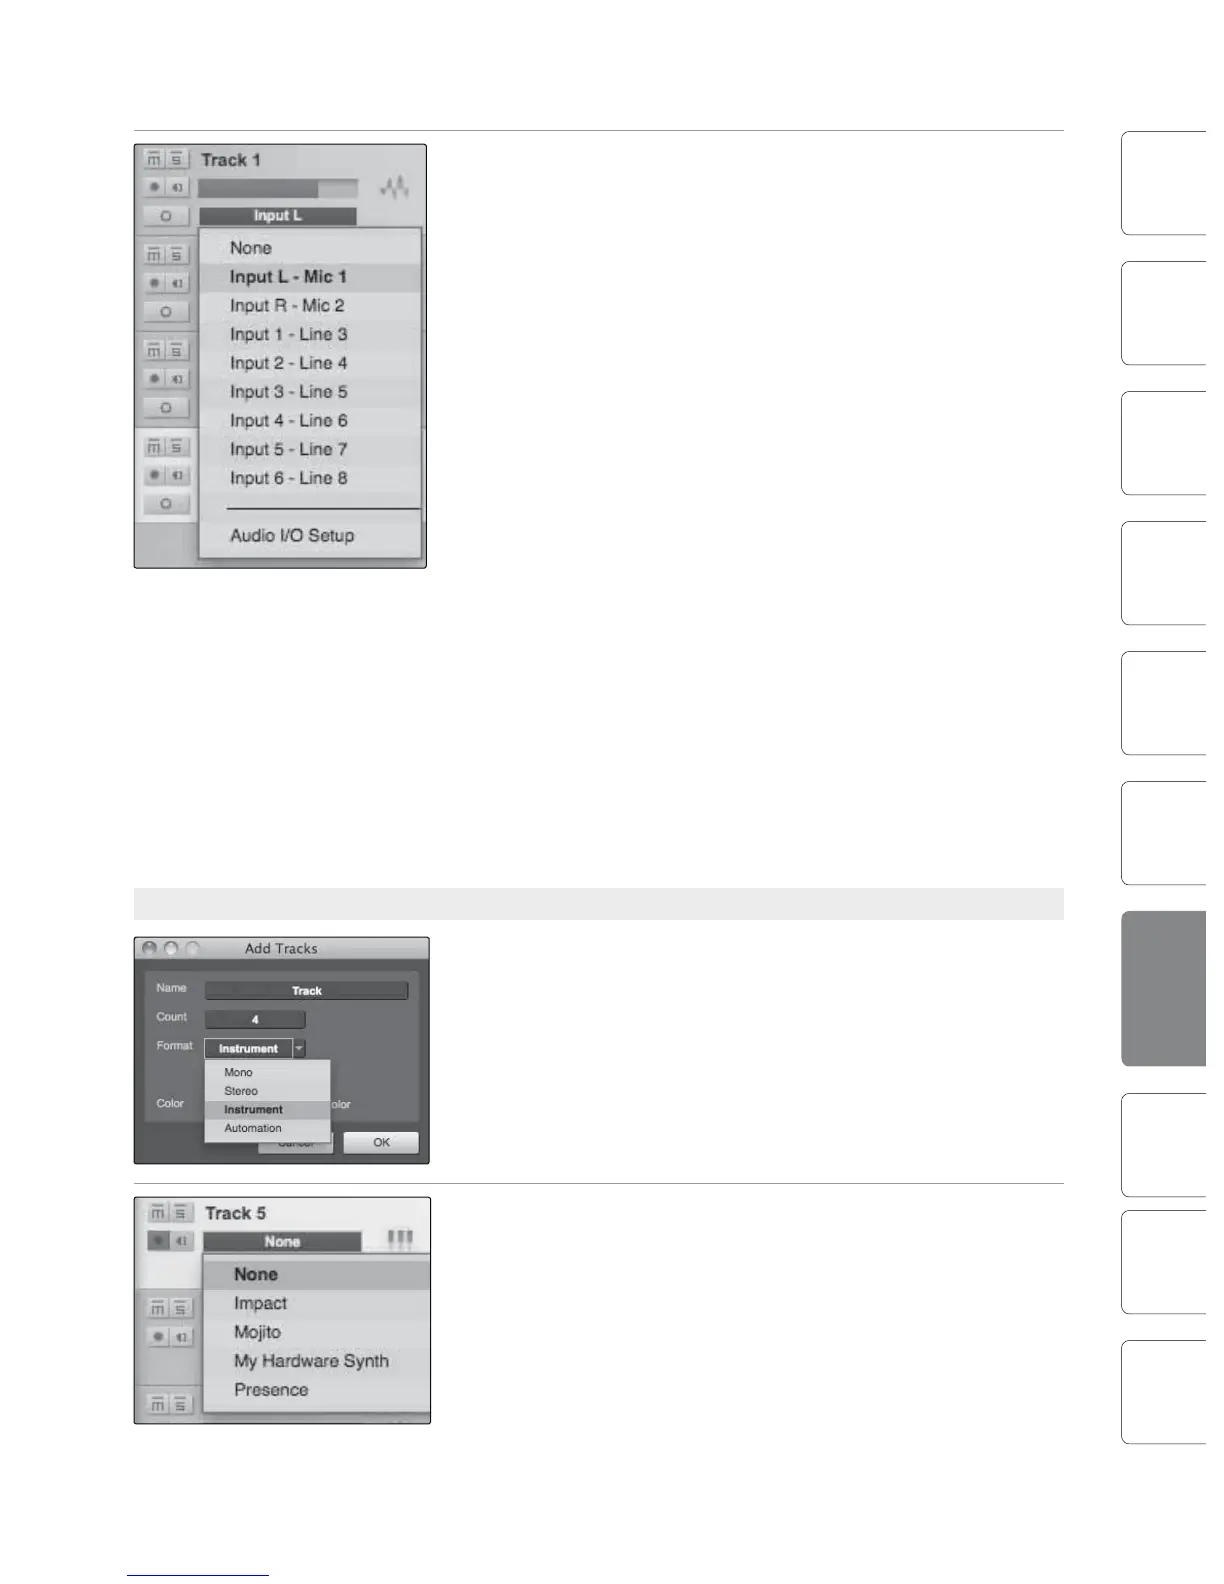
7.4.5 Creating Audio Tracks
1. In the upper left corner of the Arrange window, you
will notice several buttons. The middle button is the
Add Tracks button. Click this button to bring up the
Add Tracks window.
2. In the Add Tracks window, you can select the
number and type of tracks you’d like to create
(Mono Audio, Stereo Audio, Instrument, or
Automation) and can customize the track name and
color.
3. Once you have added your tracks, you can assign
the input by simply clicking on the input to which a
track is currently assigned. This will bring up the
inputs list. You can also access the audio I/O setup
from here.
If you would like to add a track for each
of the available inputs and have the
routing automatically assigned, simply
go to Track | Add Tracks for All Inputs.
To begin recording, create an audio track, assign
it to input 1, and connect a microphone to the
rst channel on the StudioLive. Select Record
Enable on your track in Studio One Artist. Turn
up the Channel 1 fader while speaking/singing
into the microphone. You should see the input
meter in Studio One Artist react to the input.
Adjust the gain so the input level is near its
maximum without clipping (distorting).
Connect a set of headphones to the StudioLive
headphone output and select the Main button in
the Monitor section on your StudioLive. You may
also wish to connect monitors to the StudioLive‘s
control-room outputs. You are now ready to record.
For complete instructions, please consult the
Studio One Reference Manual, which is located
on your Studio One Artist installation DVD.
7.4.6 Creating MIDI Tracks
1. Click on the Add Tracks button. When the Add Tracks window
launches, select Instrument as the track format and click the OK
button.
2. To assign your MIDI input, click on the MIDI Inputs list and select your
external sound module.
If you have added virtual inputs to your session,
you will also see them as available inputs.
If you selected your MIDI keyboard controller as the default keyboard,
it will already be selected. If not, choose your MIDI controller from the
Output menu directly below.
Studio One Artist 7.47.4 Studio One Artist
 Loading...