PreSonus StudioLive
™
24.4.2
12
Quick Start:
Level
Setting
Overview Controls Connecting
to a
Computer
Scenes,
Presets &
System
Menu
Technical
Information
Tutorials Trouble-
shooting
& Warranty
3 Hookup
12
Owner’s Manual
13
Quick Start:
Level
Setting
OverviewControlsScenes,
Presets &
System
Menu
TutorialsTechnical
Information
Trouble-
shooting
& Warranty
Hookup
Hookup 3
13
Software
Universal Control,
Capture, and
Studio One Artist
Hookup
Connecting
to a
Computer
Software
Universal Control,
Capture, and
Studio One Artist
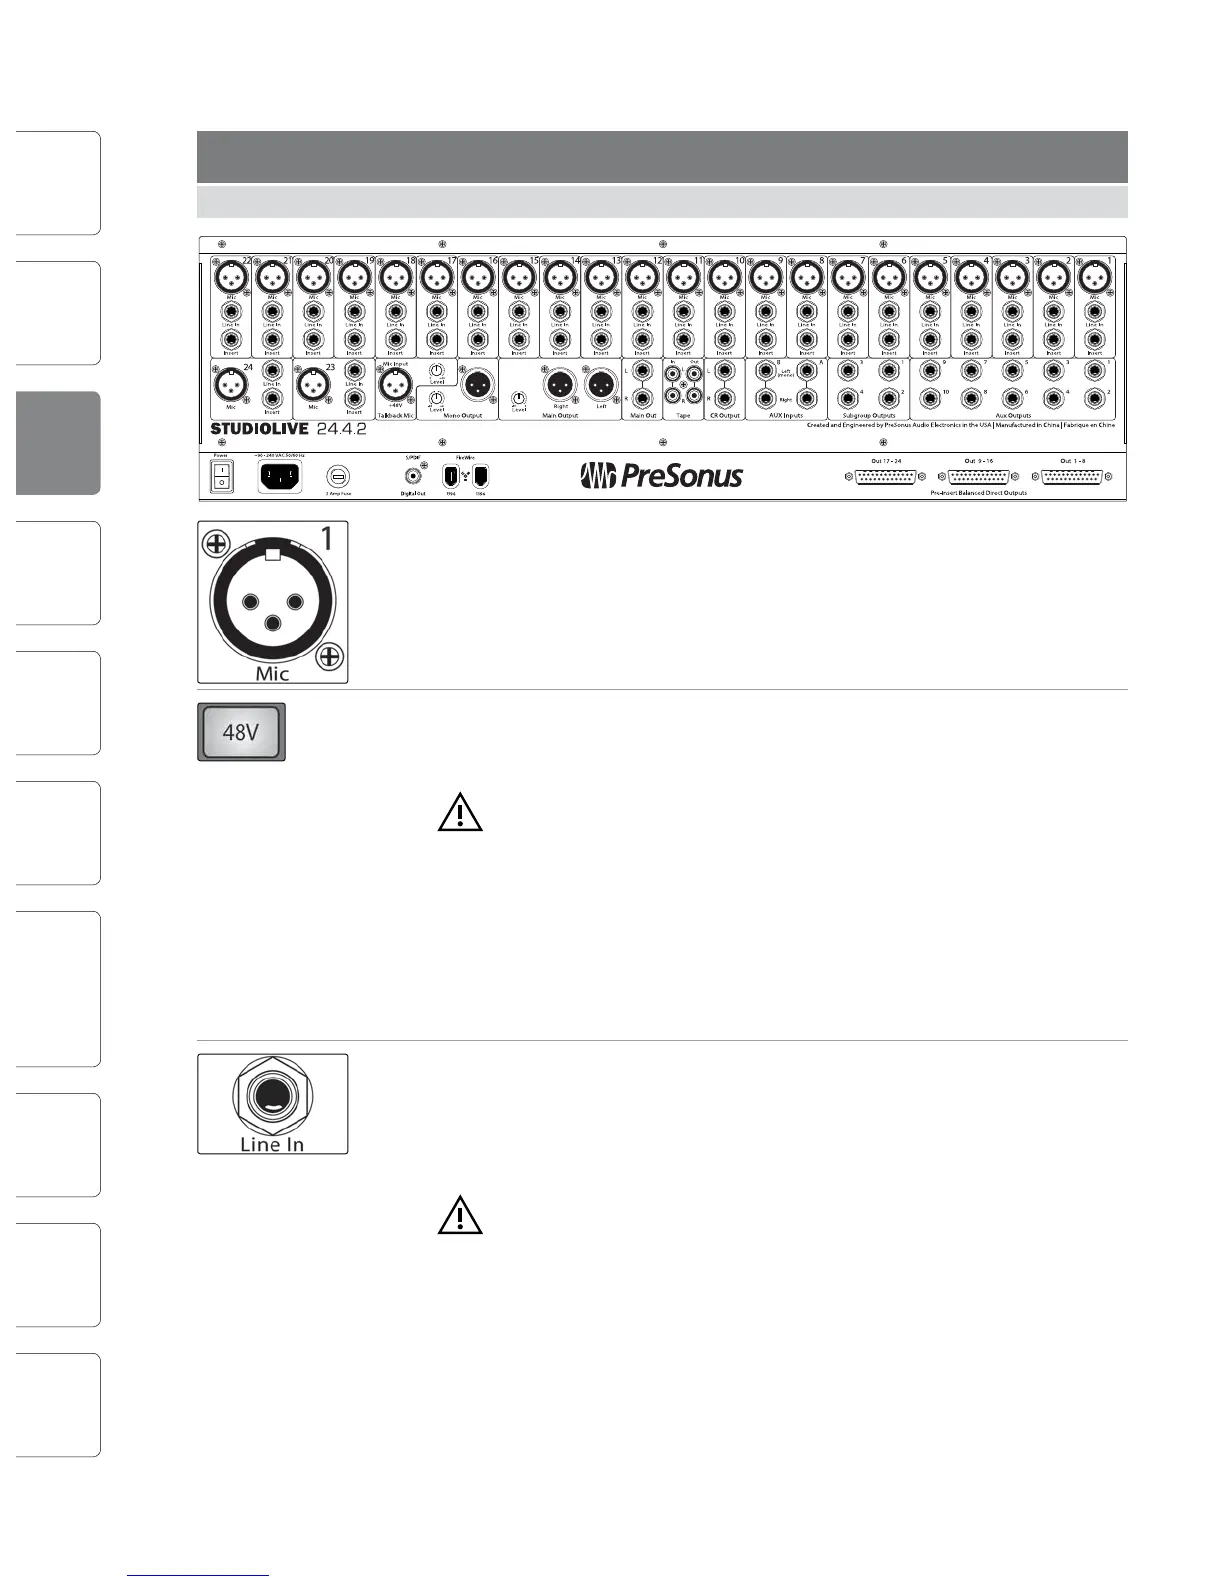
Rear Panel Connections 3.13.1 Rear Panel Connections
3.0 Hookup
3.1 Rear-Panel Connections
Microphone Inputs. Your StudioLive is equipped with 24 PreSonus XMAX
microphone preampliers for use with all types of microphones. (A 25th XMAX
preamp serves the talkback section.) The PreSonus preamplier has a Class A input
buer, followed by a dual-servo gain stage. This arrangement results in ultra-low
noise and wide gain control, allowing you to boost signals without increasing
unwanted background noise.
48-volt Phantom Power. The StudioLive provides 48V phantom power for the
microphone input on each channel. This feature can be individually enabled for
each channel using buttons on the top panel.
WARNING: Phantom power is only required for condenser micro phones and
can severely damage dynamic mics, especially ribbon mics. Therefore, switch
phantom power o for all channels where it is not required.
XLR connector wiring for phantom power:
Pin 1 = GND
Pin 2 = +48V
Pin 3 = +48V
Line-level Input. Each channel of the StudioLive has a 1/4-inch, balanced TRS
connection for line-level input. When these inputs are engaged, the microphone-
preamp circuit is bypassed. Typical examples of line-level connections are
synthesizer outputs, CD/DVD-player outputs, and (with exceptions) signal-
processor inputs and outputs.
Please note: As with any mixer, plugging in a microphone or a line-level
input device, or turning phantom power on or o, will create a momentary
spike in the audio output of your StudioLive. Because of this, it is highly
recommended that you mute or turn down the channel trim before changing
connections or turning phantom power on or o. This simple step will add years to
life of your audio equipment.
Insert. Each channel of the StudioLive has a direct-insert point. These unbalanced,
1/4-inch connectors can be used to connect external processors (such as
compressors, EQs, de-essers, and lters) to your StudioLive’s preamps and line
inputs. The insert’s send is after the channel’s gain control but before the digital
bus. The return goes straight to the digital bus. So if you insert a de-esser on your
vocalist’s channel, you will be sending an unprocessed, amplied signal to the
de-esser; the processed signal returned to the StudioLive will then be routed to the
digital bus, where it can be sent through the Fat Channel, Aux and FX buses, etc.
t Insert connector wiring:
t Tip = send (output to inserted device)
t Ring = return (input from inserted device)
t Sleeve = common ground
Aux Inputs. The StudioLive oers two auxiliary inputs, which are generally used as
eects returns. In Section 8.5.2, we discuss using an aux bus to send several
channels to an external eects processor; the aux inputs can be used to return the
processed signal to the mixer. Each input is balanced stereo. The left input is
normalled to the right input, so if you are returning a mono signal to the mix,
connect it to the left input, and the signal will be routed to both sides of the mix.
Subgroup Outputs. These are balanced mono outputs for each subgroup.
Aux Outputs. The StudioLive is equipped with six
auxiliary outputs. In Section 8.5, we discuss in detail
how to create aux mixes for monitoring and eects
processing. Aux mixes are routed to these outputs.
Talkback Mic Input. The StudioLive does not have an onboard talkback mic; an
external mic must be used. Phantom power is always enabled on this microphone
preamp, so either a dynamic or a condenser microphone can be used. This is the
same high-quality XMAX preamp that is featured on Channels 1 through 24, and
the talkback can be used as an extra input when using the StudioLive as an audio
interface. See Section 6.4.2 for details.