PreSonus StudioLive
™
24.4.2
36
Quick Start:
Level
Setting
Overview Connecting
to a
Computer
Scenes,
Presets &
System
Menu
Technical
Information
Tutorials Trouble-
shooting
& Warranty
Controls
4 Controls
36
Owner’s Manual
37
Quick Start:
Level
Setting
OverviewScenes,
Presets &
System
Menu
TutorialsTechnical
Information
Trouble-
shooting
& Warranty
Controls
Controls 4
37
Software
Universal Control,
Capture, and
Studio One Artist
Hookup
Hookup
Software
Universal Control,
Capture, and
Studio One Artist
Connecting
to a
Computer
Metering 4.24.1 The Fat Channel
Because the settings are copied nondestructively, it is possible to A/B
dynamics settings with the touch of two buttons. Whichever channel
is selected when the Link button is engaged will be the Link Master.
When either channel in the stereo link is selected, both channels‘
Select buttons will illuminate, but the Link Master‘s ID number will be
displayed in the Selected Channel LED read-out in the Fat Channel.
4.1.5 Fat Channel: Output Assignments
Output assignments are set within the Fat
Channel. It should be noted that the StudioLive
will prevent you from creating a feedback loop.
Subgroups can only be assigned to the main outs, and the ten aux
sends cannot be assigned to a subgroup or to the main outputs.
Any channel on the input bus can be assigned to any or all of the
subgroup outputs, as well as to the main outputs. This includes the 24
main inputs and the 2 auxiliary inputs. The internal eects returns can also
be assigned to any or all of the subgroups and to the main outputs.
The Fat Channel also gives you the option of sending just the unprocessed audio to
your computer or including the Fat Channel settings in the recorded signal. When
the Dig Out button is enabled, the signal being sent to the FireWire bus is post-EQ
and post-dynamics processing; the button will illuminate to indicate this signal
ow. When the button is disabled, the signal being sent to the FireWire bus is
pre-Fat Channel. The Dig Out button is only available when one of the 24 channel
inputs is selected. The subgroups, main output, aux bus, aux inputs, and internal
eects returns automatically send their signals post-Fat Channel dynamics and EQ.
All FireWire sends are pre-fader except for the subgroups and the main outputs. For
more information on using your StudioLive as an audio interface, please consult
Section 6.
4.1.6 Copying, Loading, and Storing Fat Channel Settings
Every setting in the Fat Channel can be copied from one to channel to
another and can be saved and stored as a user preset to be recalled later.
Press the Copy button to copy the settings on the selected channel or bus. Every
Select button on the StudioLive except the button for the currently selected
channel will begin to ash. The Select button for the selected channel will not
illuminate. You can copy a Fat Channel setting from any channel or bus to any
combination of channels and buses.
The Load button will also start to ash.
To paste the current channel’s Fat Channel setting to another channel or bus,
simply press that channel’s Select button. It will stop ashing and illuminate. After
you have selected every channel to which you want the settings pasted, press the
Load button. The StudioLive will return to its normal state, indicating that the Fat
Channel settings have been successfully pasted.
The Load button can also be used to recall saved settings and
presets. For complete recall instructions, see Section 5.2.
You can save your Fat Channel settings for future use. To store the currently
selected channel’s Fat Channel settings, press the Save button. For complete
channel-preset storage instructions, see Section 5.2.
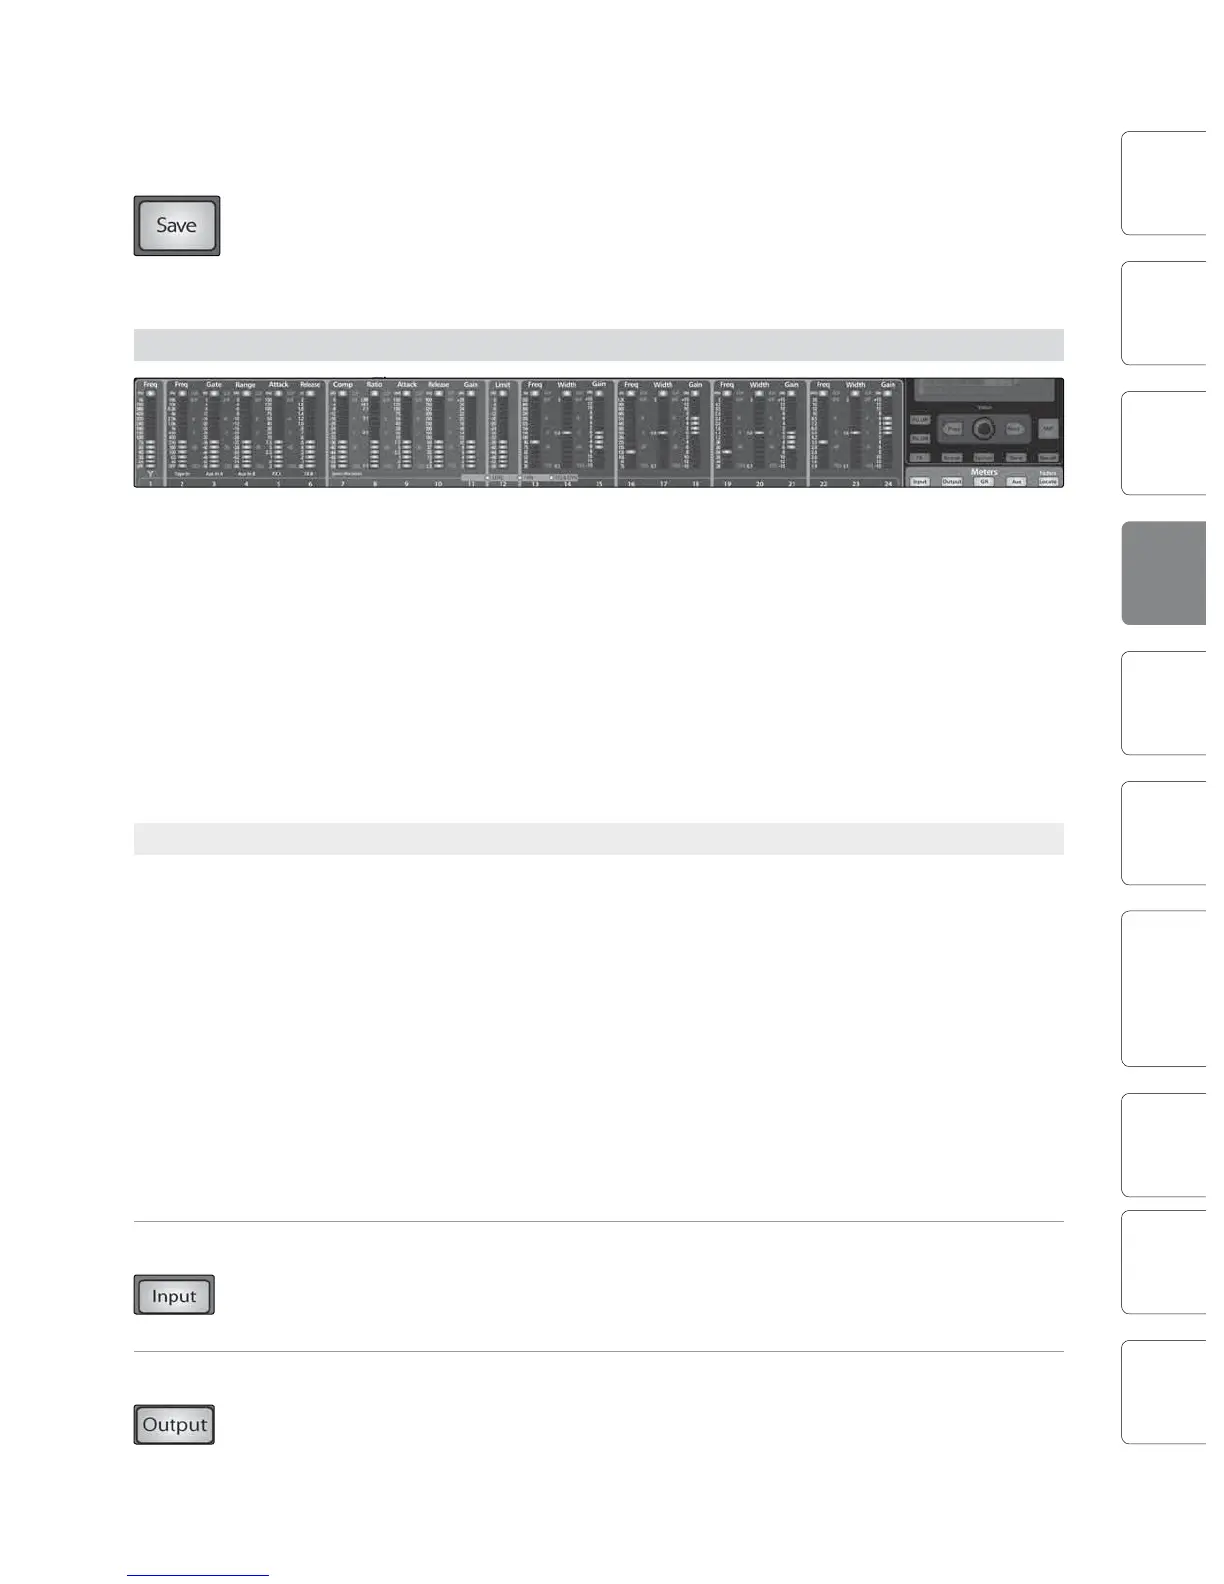
4.2 Metering
Th
The StudioLive oers exible metering at the touch of a button. The 24 meters in
the Fat Channel section can monitor:
t All 24 inputs, post-gain and pre-dynamics, pre-EQ, and pre-fader
t All 24 inputs, post-dynamics, post-EQ, and post-fader
t The gain reduction for all 24 inputs
t The output volume of each of the 10 aux sends
t The output volume of both of the internal eects buses
Finally, the meters can be used to recall the fader settings for a saved Scene.
4.2.1 StudioLive Metering Controls
The Meters section of the StudioLive is located below the System
section. Each of these buttons are toggle switches; you turn them on
and o by pressing them. The meter state can also be changed by
pressing another button in the Meter section, or any Select button on
the StudioLive, or a Mix or Mix/Pan button in the Aux section.
It is important to mention that the meters simply overlay the selected Fat Channel
state. For instance, if you have Channel 16 selected and then press the Output
button in the Meter section, the knobs and buttons in the Fat Channel section
will still be active, and any changes made will be applied, but the changes will
not be displayed in the Meter section. The advantage of this is that you can make
adjustments in the Fat Channel, press a Meter button, and monitor your entire mix,
then press the same button to return to setting up your Fat Channel selection.
Input Metering Button Turns PFL Input Metering On and O.
Switches the meters to display the pre-dynamics, pre-fader level of the input bus.
Meters are one to one (Meter 1 shows the level of Channel 1, etc.).
Output Metering Button Turns Post-Fader Output Metering On and O.
Switches the meters to display the post-dynamics, post-fader level of the Input bus.
Meters are one to one (Meter 1 shows the level of Channel 1, etc.).