PreSonus StudioLive
™
24.4.2
84
Quick Start:
Level
Setting
Overview Controls Scenes,
Presets &
System
Menu
Technical
Information
Tutorials Trouble-
shooting
& Warranty
Connecting
to a
Computer
Owner’s Manual
85
Quick Start:
Level
Setting
OverviewControlsScenes,
Presets &
System
Menu
TutorialsTechnical
Information
Trouble-
shooting
& Warranty
Software
Universal Control,
Capture, and
Studio One Artist
Hookup
Hookup
Software
Universal Control,
Capture, and
Studio One Artist
Connecting
to a
Computer
SOFTWARE: Universal Control, Capture, and Studio One Artist 77 SOFTWARE: Universal Control, Capture, and Studio One Artist
7.2.5 VSL: GEQ Tab
The StudioLive 24.4.2 features 4 dual-mono Graphic EQs. Assignable
in stereo pairs, these Graphic EQs can be inserted on any of the 10
Aux Buses, the 4 Subgroups, or the Main Bus. In addition to allowing
you to control each Graphic EQ individually, VSL automatically
links each dual-mono Graphic EQ to create a true stereo Graphic
EQ if the pair is inserted onto a stereo bus, allowing you to control
both sides at once (e.g., if you insert GEQ 1/2 onto Subgroups 3
and 4 and stereo-link the Subgroups, GEQ 1/2 will function as
a stereo Graphic EQ rather than a dual-mono Graphic EQ).
Note: The GEQ Menu on your StudioLive does not have to be active
to make changes to a Graphic EQ from VSL. If you wish to use the Fat
Channel encoders to control the Graphic EQs in VSL, then you must
open the GEQ Menu on your StudioLive by pressing the GEQ button.
Selecting a GEQ to Edit
Along the right side of the GEQ tab, you will see another set of tabs, one
for each dual-mono GEQ. To bring a GEQ in focus so that you can edit it,
simply click on its tab.
GEQ Bus Assignment
To Insert a Graphic EQ on a bus, click on the pull-down menu below
the GEQ's number and select the pair of buses onto which you'd like to
insert it.
Enabling a GEQ
By default, all Graphic EQs on your StudioLive 24.4.2 are disabled. To
enable them remotely, via VSL, simply click on the Enable button to the
left of the sliders.
Flattening a GEQ Curve
To zero out all curve settings on any GEQ, click on the Flatten GEQ button
directly below the Enable button. This will atten all band gains to 0 dB so
that they neither boost nor attenuate any of the 31 bands.
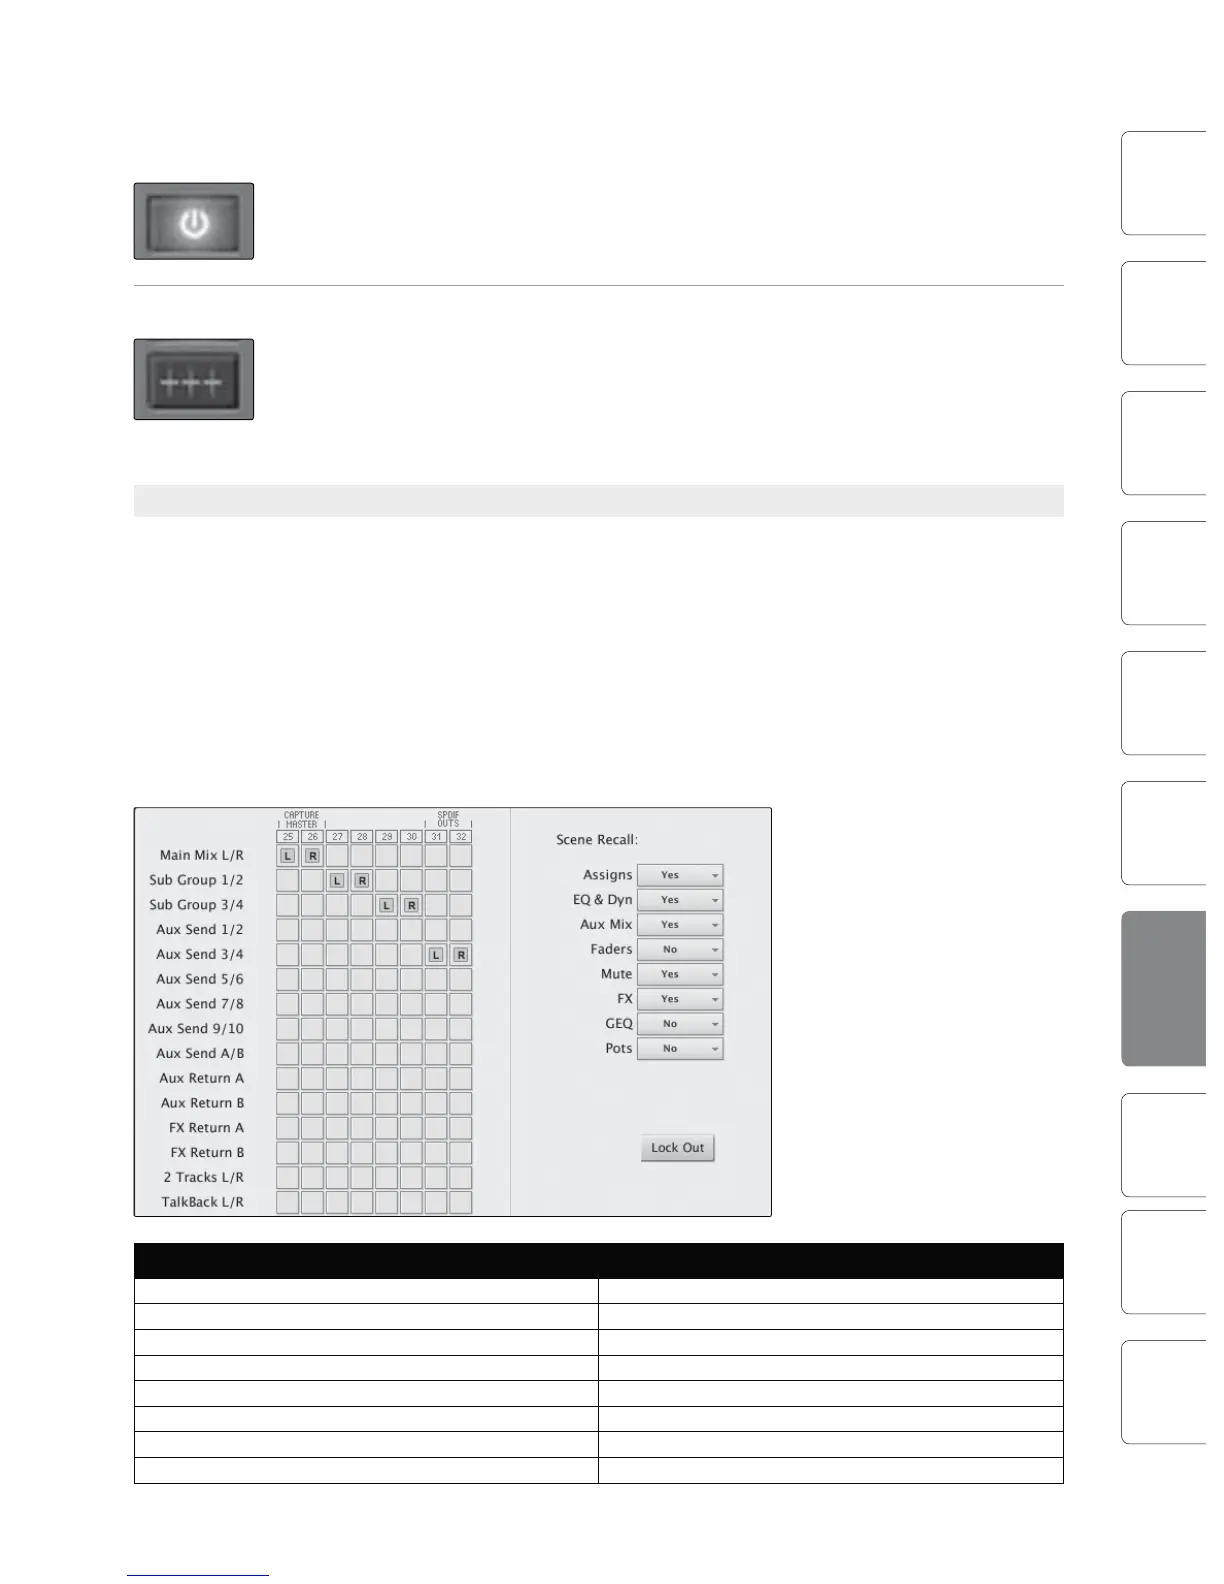
7.2.6 VSL: Setup Tab
As discussed in Section 6.4.2, the StudioLive allows you to route any 8 of
23 buses and inputs, in addition to its 24 input channels. This is done via
the Auxiliary Inputs Router on the Setup tab. To route FireWire Sends 25
through 32, first decide which buses and inputs you would like to record
in addition to your input channels. Once you’ve determined your input
pairs, simply patch them to a stereo pair of auxiliary inputs of your choice.
Remember, all of these buses and inputs are automatically set to send
their signals post-Fat Channel dynamics and post-EQ (where applicable).
The inputs and buses selected in the Auxiliary Input Router will be
displayed in your recording application with the name of their routing.
For instance, the routed pairs in
the picture would translate as
the following chart in your host
recording application:
PHYSICAL SOFTWARE
Main Mix Left Auxiliary In 25
Main Mix Right Auxiliary In 26
Subgroup 1 Auxiliary In 27
Subgroup 2 Auxiliary In 28
Subgroup 3 Auxiliary In 29
Subgroup 4 Auxiliary In 30
Aux Send 3 Auxiliary In 31
Aux Send 4 Auxiliary In 32
VSL: Virtual StudioLive 7.27.2 VSL: Virtual StudioLive