PreSonus StudioLive
™
24.4.2
140
Quick Start:
Level
Setting
Overview Controls Connecting
to a
Computer
Scenes,
Presets &
System
Menu
Technical
Information
Trouble-
shooting
& Warranty
Tutorials
8 Tutorials Owner’s Manual
141
Quick Start:
Level
Setting
OverviewControlsScenes,
Presets &
System
Menu
Technical
Information
Trouble-
shooting
& Warranty
Tutorials
Tutorials 8
Software
Universal Control,
Capture, and
Studio One Artist
Hookup
Hookup
Software
Universal Control,
Capture, and
Studio One Artist
Connecting
to a
Computer
8.3 Equalizers Equalizers 8.3
much boost between 1 kHz and 2 kHz can make your mix sound thin or “tinny.”
High Mids (2 kHz to 4 kHz). The attack portion of percussive
and rhythm instruments occurs in this range. High mids are also
responsible for the projection of midrange instruments.
Presence (4 kHz to 6 kHz). This frequency range is partly responsible
for the clarity of a mix and provides a measure of control over the
perception of distance. If you boost this frequency range, the mix will
be perceived as closer to the listener. Attenuating around 5 kHz will
make the mix sound further away but also more transparent.
Brilliance (6 kHz to 16 kHz). While this range controls the
brilliance and clarity of your mix, boosting it too much can cause
some clipping so keep an eye on your main meter.
8.3.2 Equalization Settings: How to Find the Best and Leave the Rest
How do you nd the best and worst each instrument has to oer and
adjust their frequency content accordingly? Here’s a quick guide:
t First, solo just the instrument with which you are working. Most engineers start
building their mix with the drums and work from the bottom up (kick, snare,
toms, hi-hat, overheads). Each instrument resonates primarily in a specic
frequency band, so if you are working on your kick-drum mic, start with the
lowest band of the EQ. Tune in the best-sounding low end and move on to the
attack. It is not uncommon to hear an annoying ringing or a “twang” mixed
in with your amazing-sounding low end and perfect attack, so your next
task will be to nd that oending frequency and notch it out. Once you are
satised with your kick drum, mute it, and move on to the next instrument.
t Taking your time with equalization is well worth the eort.
Your mix will have better separation and more clarity.
Additional advice:
t You can only do so much. Not every instrument can or should have a full, rich low
end and a sharp attack. If every instrument is EQ’d to have the same eect, it will lose
its identity in the mix. Your goal is not individual perfection, it is perfection in unity.
t Step away from the mix. Your ears get fatigued, just like the rest
of you. If you are working particularly hard on one instrument, your
ears will be quite literally numbed to that frequency range.
t Your memory is not what you think it is. Comparing a at EQ and the
curve that you’ve created allows you to see and hear exactly what you’ve
done. So be honest with yourself. Sometimes that EQ setting you’ve
been working on for 15 minutes is not the right choice, so move on.
t Never be afraid of taking a risk. The best EQ tricks were found by mad scientists
of sound. With every instrument, there are frequencies that can be attenuated or
boosted to add clarity or fullness. Altering the wrong frequencies can make an
instrument shrill, muddy, or just downright annoying. The following two charts
suggest frequency ranges that should be accentuated or downplayed for the most
common instruments. These are just suggestions; the frequencies may need to
be adjusted up or down depending on the instrument, room, and microphone.
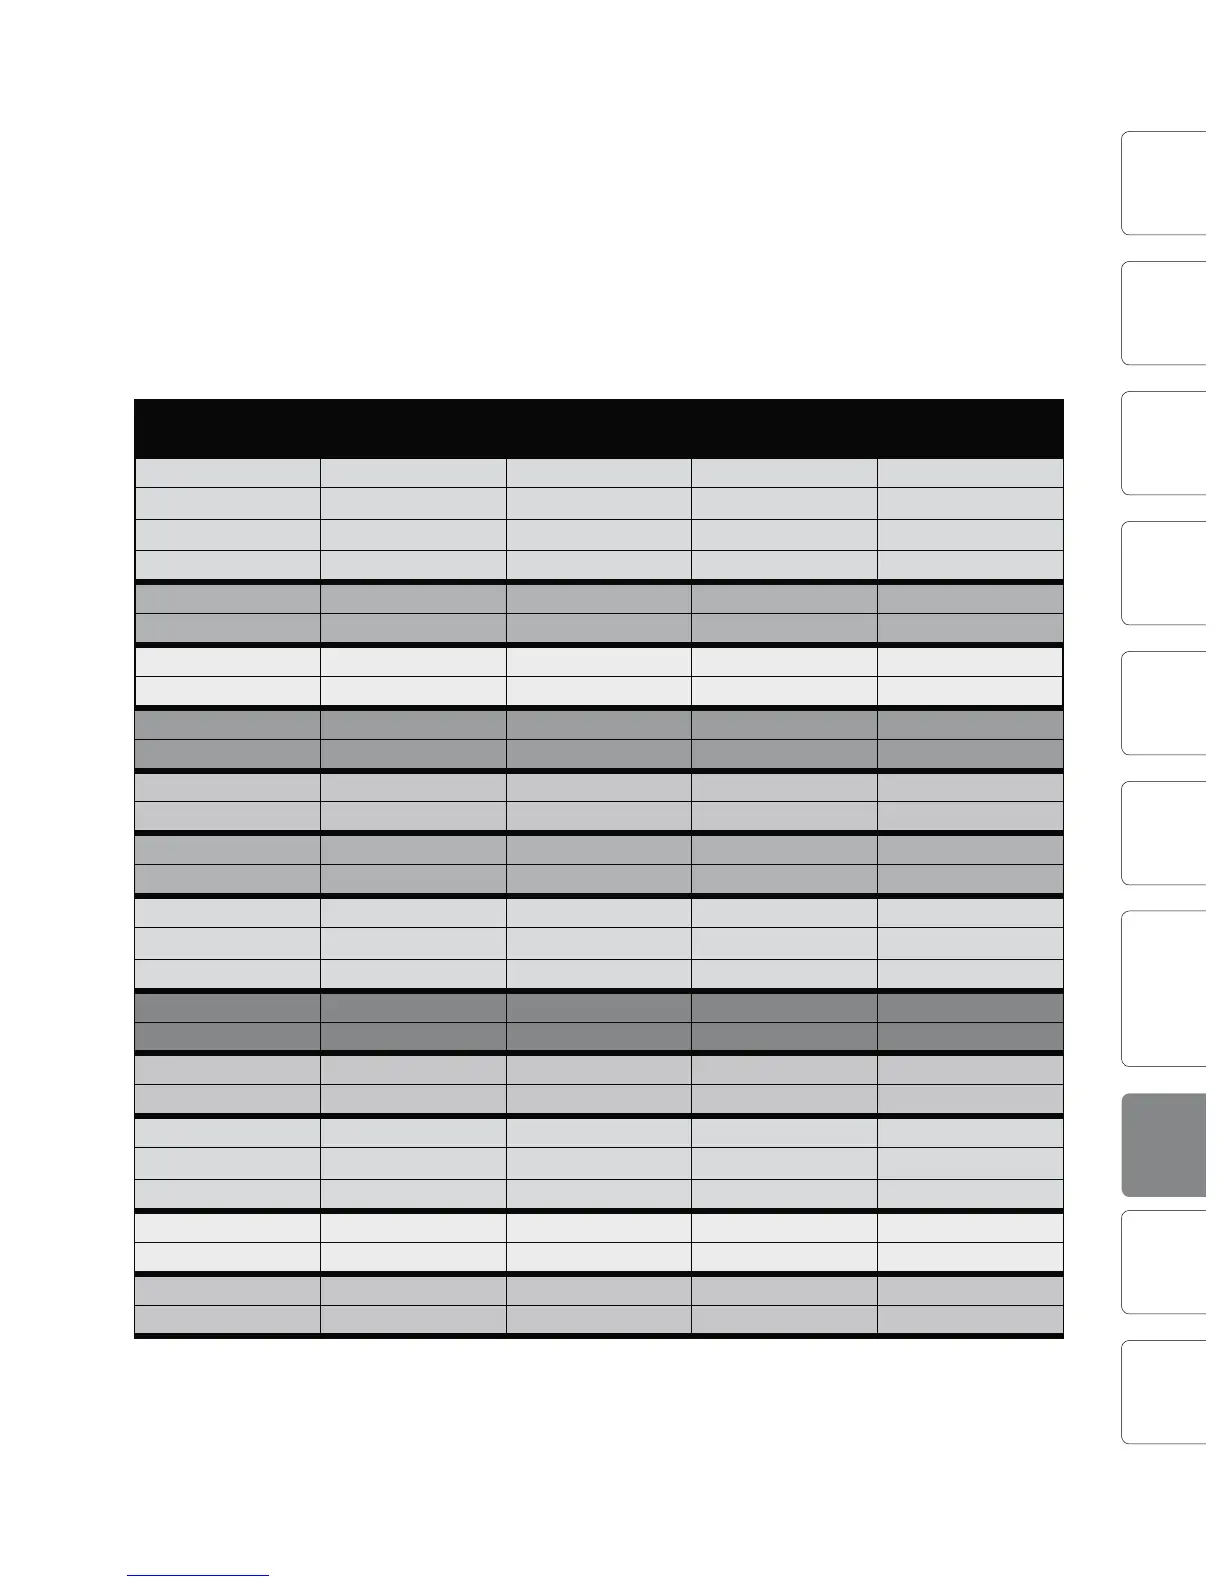
Table 1
Instrument What to Cut Why to Cut What to Boost Why to Boost
Human Voice 7 kHz Sibilance 8 kHz Big sound
2 kHz Shrill 3 kHz and above Clarity
1 kHz Nasal 200-400 Hz Body
80 Hz and below Popping P’s
Piano 1-2 kHz Tinny 5 kHz More presence
300 Hz Boomy 100 Hz Bottom end
Electric Guitar 1-2 kHz Shrill 3 kHz Clarity
80 Hz and below Muddy 125 Hz Bottom end
Acoustic Guitar 2-3 kHz Tinny 5 kHz and above Sparkle
200 Hz Boomy 125 Hz Full
Electric Bass 1 kHz Thin 600 Hz Growl
125 Hz Boomy 80 Hz and below Bottom end
String Bass 600 Hz Hollow 2-5 kHz Sharp attack
200 Hz Boomy 125 Hz and below Bottom end
Snare Drum 1 kHz Annoying 2 kHz Crisp
150-200 Hz Full
80 Hz Deep
Kick Drum 400 Hz Muddy 2-5 kHz Sharp attack
80 Hz and below Boomy 60-125 Hz Bottom end
Toms 300 Hz Boomy 2-5 kHz Sharp attack
80-200 Hz Bottom end
Cymbals 1 kHz Annoying 7-8 kHz Sizzle
8-12 kHz Brilliance
15 kHz Air
Horns 1 kHz Honky 8-12 kHz Big sound
120 Hz and below Muddy 2 kHz Clarity
String section 3 kHz Shrill 2 kHz Clarity
120 Hz and below Muddy 400-600 Hz Lush and full