Do you have a question about the Siemens Cerberus PRO FC721 and is the answer not in the manual?
Describes the intended audience for the manual, including installation, commissioning, operating, and maintenance personnel.
Explains the structure of the document ID code and date format conventions.
Details the special markups and symbols used throughout the document for clarity and emphasis.
Lists related documents and their IDs, providing further technical information.
Provides the internet address for downloading various types of documents and software related to the product.
Details the changes and updates made in different versions of the document, including new features and corrections.
Explains how fire control panels and fire terminals are displayed in tables and the key deviations from the original representation.
Outlines the essential safety notices, including danger symbols, signal words, and measures for hazard avoidance.
Provides crucial safety guidelines for electrical installations and general operation methods.
Details safety precautions for mounting, installation, and maintenance work, including tool usage and system stability.
Outlines procedures and precautions for testing product operability, ensuring correct function and preventing erroneous transmissions.
Warns about risks from modifications and specifies requirements for spare parts, including battery types and disposal.
States Siemens' disclaimer of liability for damages or injuries resulting from incorrect application or disregard of safety instructions.
Informs where a list of standards and directives complied with can be obtained from Siemens.
Advises reading Release Notes before planning/configuring installations or performing firmware updates due to potential limitations.
Highlights the importance of security functions and comprehensive security concepts for building automation and control systems.
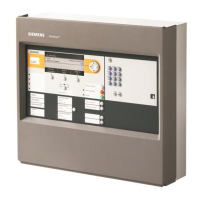
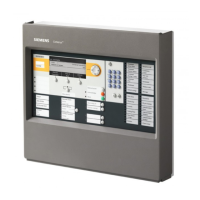
Lists key features of the FC721 fire control panels, such as integrated operating units and power supplies.
Provides an overview of different FC721 station types (ZZ, YZ, HZ) and their configurations, including options.
Details the system limits and available options for the FC721, including detector line addresses, loops, and input/output capabilities.
Explains how alarm decisions are made at zone level, based on single or multi-detector dependency.
Describes the AVC function for delayed alarm transmission, involving operating personnel in monitoring and false alarm prevention.
Explains how universal controls can be configured to actuate devices logically based on alarm events.
Mentions chronological alarming for evacuation and introduces the Cerberus Remote Operating Tool for PC access.
Details the control outputs available for the FC721 and various hardware modules, including notes on linking events and configuring outputs.
Provides initial steps for mounting and assembling a station, emphasizing visual checks for transport damage and adherence to standards.
Gives detailed instructions on mounting the station, including environmental conditions, height, accessibility, and surface requirements, plus safety warnings.
Details the steps for surface-mounted assembly, including cable entry, drilling, and fixing the housing.
Explains how to assemble an additional empty housing for larger battery capacity and optional power supply with the FC721.
Lists the steps for assembling the FC721 with an additional housing, focusing on cable routing and securing the components.
Describes the mounting and wiring of the operating unit, referencing a specific document for PMI and mainboard details.
Details the steps for mounting and wiring the operating unit, including hinge attachment and cable routing.
Explains the LED module in the FC721-YZ, its configuration as zone indicators, and its availability as a built-in feature.
Describes the EVAC-NL operating unit for evacuation control functions required in the Netherlands, its connection, and its use with FC721-HZ.
Provides instructions for fitting extra relays onto the DIN rail and connecting them to configurable control outputs.
Explains how to install RS232/RS485 modules in the FC721, noting limitations on the number of modules and their mounting locations.
Details the mounting steps for serial modules, including cable gland attachment, module insertion, securing, and wiring.
Lists the pin assignments for RS232 (X3 DTE-HOST) and RS485 (X2 connector) modules.
Shows the pin assignments and descriptions for the X3 DTE HOST connector on the RS282 module.
Details the pin assignments for the X2 connector on the RS485 module, including line connections and termination.
Guides on how to mount shield connection terminal blocks using a clamp bar and screws.
Explains the use of the communication cable kit FCA2014-A1 as an intermediate piece for wiring external lines.
Provides instructions on how to insert the license key (S1) FCA2033-A1 into the corresponding holder on the operating unit.
Describes the 19" mounting kit for installing the station into a 19" rack or cabinet, including mounting instructions.
Provides installation instructions referring to EN 54 standards and manufacturer recommendations, requiring qualified electricians.
Advises checking system planning against system limits, including technical data, cable lengths, and device numbers.
Directs users to relevant literature for detailed specifications on producing a lightning protection concept.
Contains a critical safety warning about high voltage during mounting and installation, requiring qualified staff and de-energized systems.
Warns about potential damage from overvoltage and specifies requirements for nominal voltage, fuses, and EMC measures.
Explains how protection elements like fine protection and EMC filters minimize faults caused by electromagnetic influence and over-voltages.
Presents a table showing possible energy supply types for the FC721, including AC 230V with batteries and AC 230V.
Details operation with battery backup, explaining the UPS function, protection against voltage issues, and optimal hardware protection.
Describes operation without batteries, used when external buffering is available or battery backup is omitted, and notes battery monitoring deactivation.
Illustrates the position of components within the FC721, including batteries, power supply, mains terminals, periphery board, and optional components.
Explains the factory-connected internal cabling for the power supply and lists available power supplies (standard and optional).
Provides detailed steps and a diagram for connecting the mains voltage, emphasizing safety precautions and wire routing.
Explains the use of an additional empty housing for a 150 W power supply and larger batteries, as shown in a figure.
Details the emergency power supply from batteries, bridging time dependency, activation at low battery voltage, and connection precautions.
Warns about errors during configuration detection and advises connecting battery cables only after all installation work is complete.
Provides a formula and examples for calculating the required battery capacity based on quiescent and alarm currents and desired duration.
Guides on selecting the correct battery type based on calculated capacity, listing permitted batteries and notes on connection and dimensions.
Warns about hardware damage due to CE conformity and the use of UL94-V2 batteries.
Shows the position of connection terminals on the periphery board (1-loop) of the FC721, listing various connectors and their functions.
Details the allocation of terminals for fault and alarm relays, including inverse operation for fault relays and alarm relay connections.
Explains the use of monitored outputs for alarm and fault signals for remote transmission equipment, including monitoring resistors.
Describes the connection of monitored acoustic signal transmitters, detailing normal operation monitoring and alarm event polarity reversal.
Explains how configurable inputs/outputs on the periphery board can be set as inputs or outputs, detailing their functions and connection principles.
Explains the connection of the C-NET detector line to the periphery board and the function of integrated line separators.
Explains the function of integrated line separators in C-NET devices for fault isolation and segment shutdown.
Notes that connectable C-NET devices and line length depend on connection factors, potentially reducing maximums.
Lists connectable C-NET devices, indicating features like alarm indicators (AI, Ext. AI) and sounder bases (DBS720).
Lists connectable devices and notes about supply, line separators, and country-specific approvals.
Warns about earth fault monitoring issues with devices having separate supplies and the impact of external supply unit failure.
Illustrates and describes permissible C-NET topologies (loop, stub, sub-stub) and notes system limits.
Shows an example of a C-NET loop circuit connection with a maximum of 126 line devices.
Illustrates a C-NET stub circuit connection, supporting up to 32 devices per stub or 64 per line connection.
Recommends cable types for detector lines, including twisted and shielded options, and notes on cable shielding connection.
Advises on proper cable shielding connection to prevent impairment of fire control panel function.
Explains the wiring principles for connecting C-NET devices using screw terminals, detailing connections for different device types.
Compares the functions of indication and operating elements across different devices like FC721, LED module, and repeaters.
Describes the indications and operations possible on the FT2010 floor repeater terminal for decentralized event display and limited operation.
Details the indications and operations available on the FT2011 floor repeater display for event monitoring.
Provides guidelines on external power supply for repeater terminals and the necessity of electrical isolation.
Warns about the impact of electrical isolation on earth fault monitoring and current connection factors.
Describes the FT2001 mimic display driver as a parallel LED indicator for system-wide signaling connected to the C-NET detector line.
Explains how to connect external alarm indicators to C-NET devices and the conditions under which the output is activated.
Introduces the engineering tool for programming control panel functions and customer-specific configurations.
Describes Cerberus-Remote software for displaying the station's PMI on a PC for display or operation.
Explains the Quantities Tool for calculating C-NET utilization and line load, including device counts and battery capacity.
Details how to select and open/execute list items using navigation keys and buttons on the control panel.
Explains how to change the selection in lists using specific buttons and softkeys.
Describes how to scroll through displayed lists, including limited functions for start/end of lists and general scrolling.
Explains the use of a vertical bar to indicate the position and length of lists that exceed display capacity.
Describes shortcuts for direct execution of entries in selection lists using numeric keys.
Explains the use of favorites for executing operation sequences, with a maximum of 8 configurable favorites.
Guides on using the keyboard for numeric and alphanumeric entry in input dialogs, including overwrite mode and cursor navigation.
Explains how to configure the Windows firewall to prevent connection issues and ensure proper communication for firmware updates.
Provides specific steps for disabling and re-enabling the firewall in Windows XP for compatibility.
Details how to set up firewall rules in Windows 7/8/10 using Local Security Policy for Siemens PCs.
Explains the connection procedure between a PC and the station using an Ethernet cable for commissioning and maintenance.
Outlines the correct procedure for disconnecting the PC from the station to avoid connection issues, including a waiting period.
Explains how to load data (initialize, download site) from the Cerberus-Engineering-Tool to the station and which data is overwritten.
Details the process of initializing a station to assign a unique address, especially after first start-up or firmware updates.
Provides steps for initializing a station, including login, PIN entry, and confirmation, with a notice about connection modules.
Explains how to use the 'Download site' function to load configuration from the PC to the station, with notices about network configuration differences.
Warns about potential activation of fire/smoke dampers during station restart and advises temporary output blocking.
Details the process for loading configuration, covering connection steps, station selection, and confirmation.
Explains how to use the 'Upload site' function to load configuration from the station to the PC.
Details how to create a backup file of the 'Site' configuration, including conditions for a complete backup and BDV compatibility.
Outlines the process of creating a backup, including selecting the site, connection, and saving the configuration.
Specifies the standard directory and naming convention for backup files, including handling of incomplete backups and file limits.
Introduces the chapter on initial commissioning of the FC721, listing key steps like activating access level and auto-configuration.
Warns against connecting the C-NET and line tester simultaneously to prevent damage.
Provides steps for checking C-NET lines using a line tester before commissioning and auto-configuration.
Explains how access levels protect the station from unauthorized operation and the procedure for enabling access levels with or without a PIN.
Mentions the time control function for operation enable expiry after a configurable period.
Details how to log in and change access levels by entering a PIN or using a key switch.
Explains the auto-configuration function for control panels, components, and C-NET, noting it prepares the panel for detection with limitations.
Warns that auto-configuration may overwrite existing configurations and advises saving them first.
States that the control panel is ready for detection but alarm transmission and signal activation are not configured.
Guides on how to auto-configure a C-NET detector line via the maintenance menu, creating elements in the detection tree.
Illustrates the display menus and navigation steps for the auto-configuration process.
Explains how to display and configure C-NET detector lines and devices after auto-configuration, showing navigation through the topology.
Provides an example of selecting a line and viewing device details, including type designations for detectors.
Details how to enter or change customer text for elements on the control panel, which is displayed on subsequent access.
Guides on setting the system time and date, especially after de-energizing the panel, and notes automatic DST switching.
Emphasizes changing the default PIN after commissioning for security and explains the consequences of losing the PIN.
Explains how to change, create, or delete PINs, or configure them via the Engineering Tool if PIN administration is unavailable.
Provides steps to create a new PIN for a specific access level.
Details the process for deleting an existing PIN.
Outlines different methods to restart the station, including via the menu, the S32 button on the PMI, or the S8 button on the CPU card.
Describes how to restart the CPU card using the S8 button and confirming the action.
Details the initial steps for preparing the station for commissioning, including connecting peripherals, power, and verifying firmware.
Outlines preparation steps without BDV installation, allowing for initialization, auto-configuration, or loading PC configuration.
Guides on how to auto-configure the station through the menu by selecting Topology and Execute commands.
Explains how to auto-configure the C-NET detector line, including notices on incorrect reading order and overwriting configurations.
Details how to load an auto-created configuration from the station to the PC using the 'New site' and 'Upload from station(s)' functions.
Lists aspects of site configuration that can be adapted in Cerberus-Engineering-Tool, such as customer texts, parameter sets, and network settings.
Provides safety warnings about switching off system parts, emphasizing the risk of unhindered fire spread and the need for staff monitoring.
Details the procedure for switching off a C-NET detector line via the menu, noting the activation of the yellow 'ISOLATION' LED.
Explains how to switch off a zone via the menu, with warnings about system parts being switched off and the 'ISOLATION' LED status.
Describes how to switch on a C-NET detector line via the menu, noting the 'ISOLATION' LED goes out.
Explains how to switch on a zone via the menu, noting the 'ISOLATION' LED goes out.
Details the procedure for restarting a detector line, including warnings about damper activation and messages displayed during restart.
Explains how to freeze outputs to prevent activation during restarts or module resets, and notes the duration of the freeze.
Guides on how to manually deactivate output freezing by selecting 'Freeze selected outputs OFF'.
Details the procedure for reading in C-NET devices on a detector line, including notices on incorrect loop reading order.
Explains how to detach a device permanently, requiring uninstallation and connection of wires.
Guides on how to delete a device from the Person Machine Interface by navigating through topology and executing commands.
Explains how to remove elements (e.g., devices) from logical structure trees in Zone using the 'Find' function.
Details the process of activating detectors and manual call points in test mode, noting alarm indicator behavior.
Explains how to test logged activations via the event memory or by uploading site event memory.
Guides on switching elements (Area, Section, Zone) to test mode, indicated by the yellow 'DETECTOR TEST' LED.
Explains how to switch elements back to normal operation, indicated by the yellow 'DETECTOR TEST' LED turning off.
Provides a shortened procedure to switch individual zones to normal operation via the message summary.
Guides on rectifying localization errors by accepting replaced devices and notes that missing devices may still show error messages.
Refers to testing the 'Site' function in various modes and to a specific document for details.
Lists the final steps for commissioning, including checking date/time, setting PINs, fitting covers, and labeling the installation plate.
Details the procedure for temporarily removing a C-NET device, reporting a fault, and re-inserting it.
Explains how to temporarily remove multiple C-NET devices, e.g., for painting, emphasizing re-insertion into original bases and avoiding exchanges.
Guides on switching off a zone before removing devices, noting the 'ISOLATION' LED and warnings.
Provides steps for removing, performing tasks, and re-inserting devices, emphasizing marking their original positions.
Details switching a zone back on after device re-insertion, noting potential localization faults and the 'ISOLATION' LED.
Outlines the steps for permanently removing C-NET devices, including switching off the line, deleting from the panel, and updating configurations.
Details the procedure for replacing a C-NET device with one of the same type, including waiting periods and checking for correct insertion.
Explains how to detach a C-NET device and the subsequent fault reporting by the station.
Guides on installing a new C-NET device, referring to device-specific documentation.
Details how to replace a C-NET device within a specific zone using Cerberus-Engineering-Tool's find functions.
Introduces testing functions for devices and logical functions, noting that some methods can be combined.
Shows recommended intervals for checking functions like software, detector lines, fire controls, and alarm devices, referencing applicable documents.
Defines technical terms used in the manual, such as AI, Alarm indicator, Auto-configuration, BDV, C-NET device, CPU, Danger level.
| Model | FC721 |
|---|---|
| Type | Control Panel |
| Number of loops | 2 |
| Display | LCD |
| Networkable | Yes |
| Power Supply | 24 V DC |
| Compatibility | Cerberus PRO |
| Redundancy | Optional |
| Relative humidity | 95% max |