2-11
Installation
1. System Status
When beginning the start-up procedure, the
condition of the system is as follows:
• All field wiring is connected to all screw
terminals, except for the analog loops—
they should be disconnected. All field
devices are installed.
• No modules are installed in the MOM-2/4
cage.
2. Create a Test Configuration
Create a test configuration on your CSG-M
that includes every module that will be on
your final system. Do not include any
initiating devices. You will use this test
configuration in checking out the System.
3. SMB-2 Checkout Minus the Analog Loops
Turn on the AC power to the system.
• The power light on the MKB-4 turns on
• the System displays the default message:
SIEMENS BUILDING TECHNOLOGIESSIEMENS BUILDING TECHNOLOGIES
SIEMENS BUILDING TECHNOLOGIESSIEMENS BUILDING TECHNOLOGIES
SIEMENS BUILDING TECHNOLOGIES
MXLMXL
MXLMXL
MXL
Transfer the test configuration from your
computer to the MXL-IQ. Refer to the
CSGM Manual (P/N 315-090381) for the
correct procedure.
After the transfer process is complete,
MXL-IQ resets itself; after 5 minutes, the
state of the system should be as follows:
• No trouble condition for the signaling
circuits on the main board.
• A battery trouble condition if the battery
option was selected.
• All optional modules configured on the
system are in trouble since they are not
yet installed.
4. SMB-2 Analog Loop Checkout
Modify your test configuration by adding to
it the analog devices that are connected to
analog loop 1.
• Turn off the power and connect the field
wiring to analog loop 1 on the SMB-2.
• Turn on the power. Wait for the System
to initialize (approximately 3 minutes).
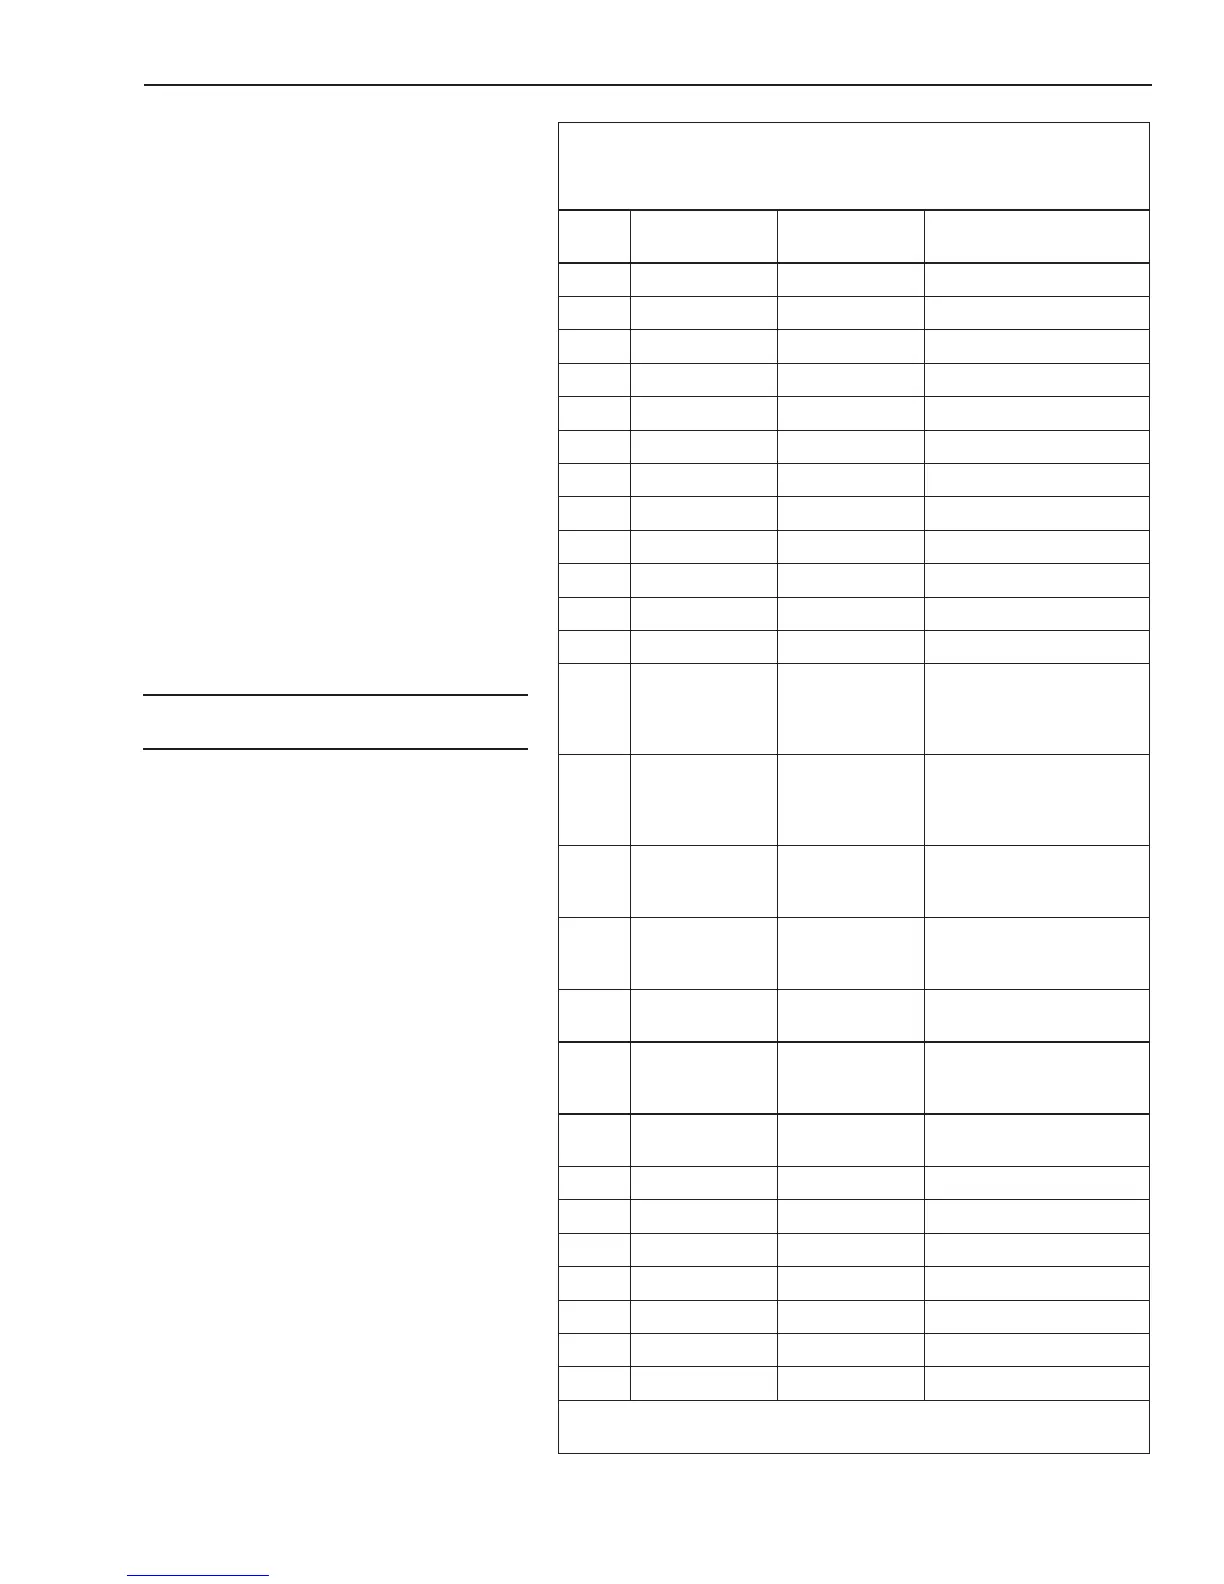
8ELBAT
TUOKCEHCGNIRIWDLEIF
EDIUGGNITOOHSELBUORTDNAGNIRIWLANRETXE2-BMS
5-BT
ecnatsiseR
seriWneewteB
stluseRderiseDmelborPfOesuaCelbaborP
.121-1otsissahCgeM1>.gniriwnitrohS
.221ot11smh
o5.1<.gnolooteniL;nepoeniL
.301ot9smho5.1<.gnolooteniL;nepoeniL
.48ot7smho5.1<.gnolooteniL;nepoeniL
.56ot5smho5.1
<.gnolooteniL;nepoeniL
.64ot3smho5.1<.gnolooteniL;nepoeniL
.72ot1smho5.1<.gnolooteniL;nepoeniL
.821ot9geM1>.detroh
seniL
.98ot5geM1>.detrohseniL
.014ot1geM1>.detrohseniL
.118-1ot21-9geM1>.detrohseniL
.214-1ot8-5geM1>.detrohseniL
.31)-
(5ot)+(8%01±K2.2
gnorW;nepoeniL;detrohseniL
eciveD;ecivedLOEoN;ecivedLOE
toneciveD;drawkcabderiw
.deziralo
p
.41)-(1ot)+(4%01±K2.2
gnorW;nepoeniL;detrohseniL
eciveD;ecivedLOEoN;ecivedLOE
toneciveD;drawkcabderiw
.dez
iralop
.51
8-1ot21
4-13/2BTot21
4/2-MOMllaot21
geM1>
geM1>
geM1>
.detrohseniL
.61
4-1ot8
4-13/2BTot8
4/2-MOMllaot
8
geM1>
geM1>
geM1>
.detrohseniL
.71
4-13/2BTot4
4/2-MOMllaot4
geM1>
geM1>
.detrohseniL
2-BT
dna
3-BT
ecnatsiseR
ser
iWneewteB
stluseRderiseDmelborPfOesuaCelbaborP
.1
llaotsissahC
slanimret
geM1>.gniriwnitrohS
.22ot1smho05<.gnolo
oteniL;gniriwninepO
.34ot3smho05<.gnolooteniL;gniriwninepO
.44ot1Fµ4.<.eriwhcumooT
.5)-(4ot)+(1smhoK01>.detrohsen
iL
.6)4-1(3-BT)4-1(2-BTgeM1>.detrohseniL
.7)21-1(5-BT)4-1(2-BTgeM1>.detrohseniL
.8)21-1(5-BT)4-1(3-BTgeM1>.detroh
seniL
.ytiralopdaelretemetacidni)-(dna)+(
nahtssel=<;nahtretaerg=>