31
SKOPE Reflex Underbench Fridge and Freezer
Replacement Procedures
Service Manual
Removing the
Cartridge
Note: The electronic controller and electrics panel (including light power supply) is matched to
the cabinet, and must be left with the cabinet when exchanging the cartridge. Replacement
spare part cartridges are not supplied with controller and electrics panel.
Follow the steps below and image over the page to remove the refrigeration cartridge from the
cabinet. Ensure the cabinet is disconnected from the power supply before removing the
cartridge.
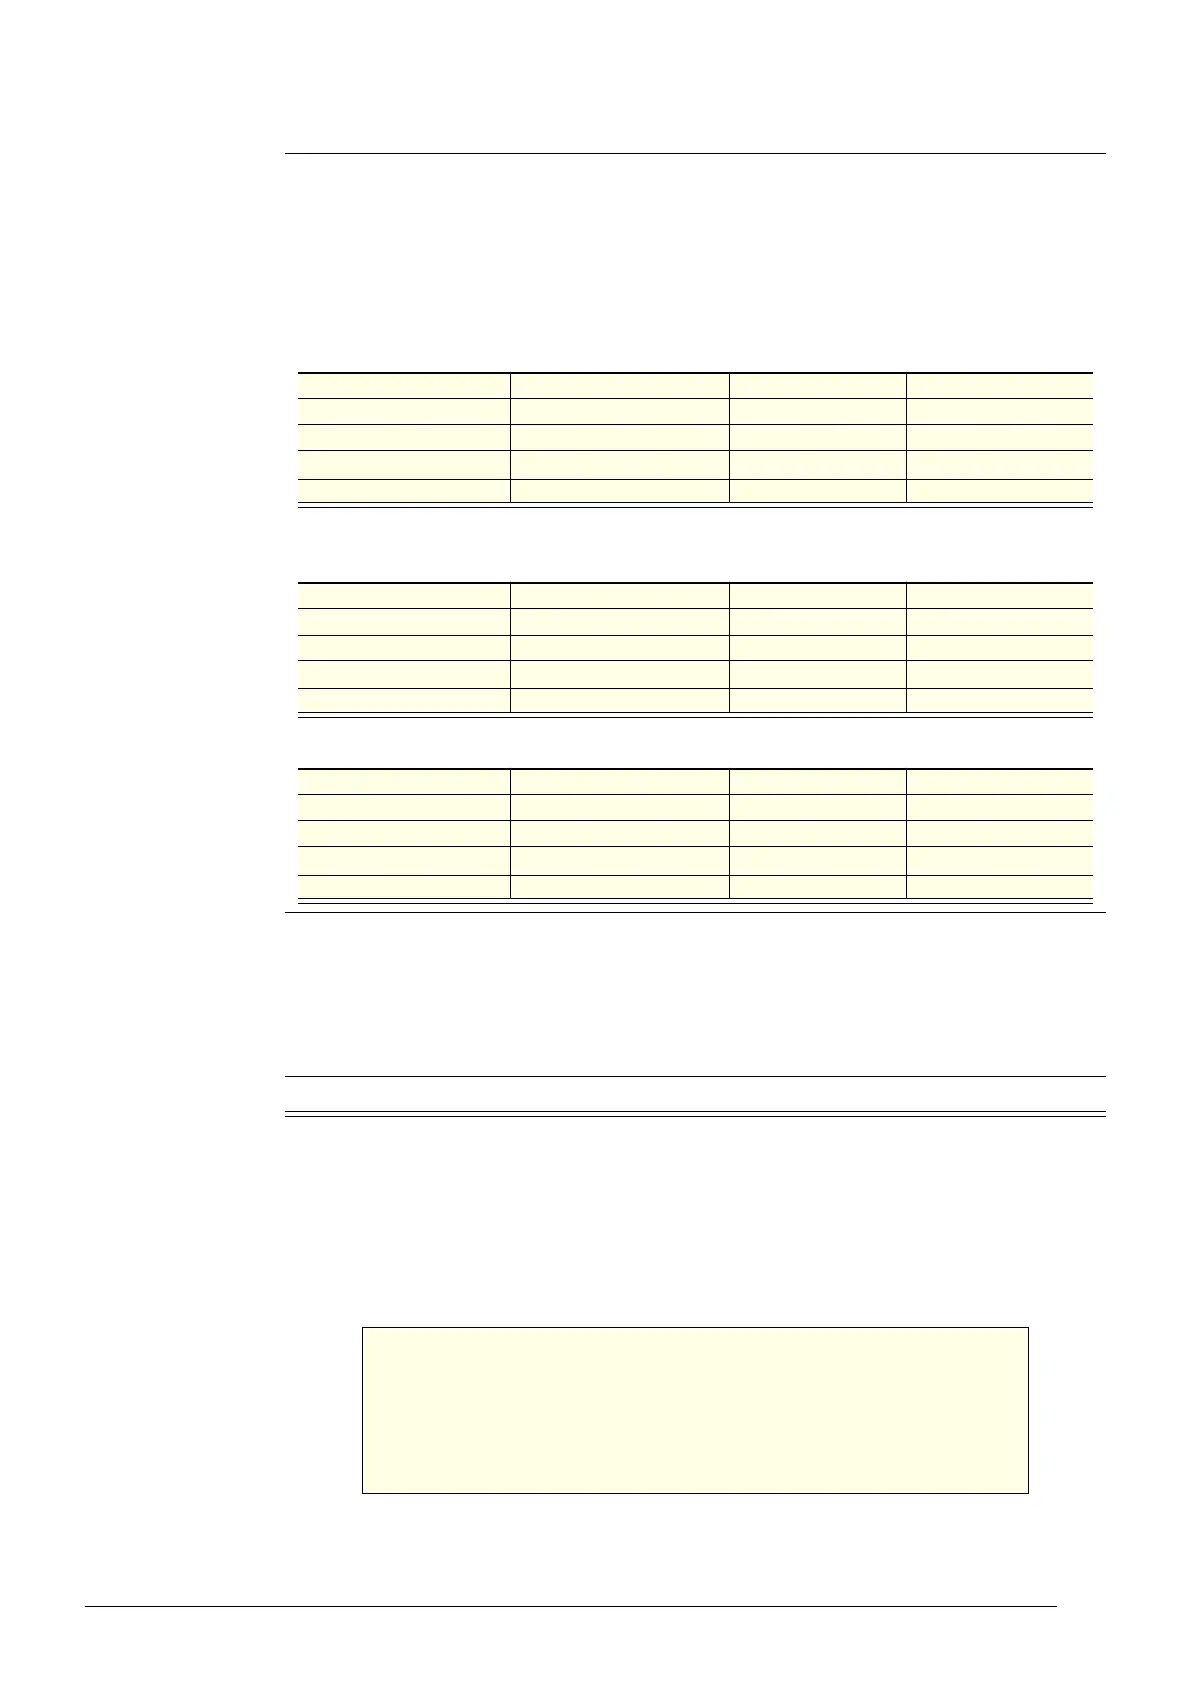
8. Use the relevant table below as a guideline to determine if the system charge is correct at typical
ambient conditions around 25°C for a cartridge running on the bench.
The point where the frost
stops is affected by the ambient temperature.
• Generally, a system with the correct refrigerant charge will frost back to the compressor.
• If the frost does not go back to the point shown there may be a capillary blockage or
compressor fault.
9. Determine whether the system is short of refrigerant, blocked capillary or compressor fault.
A dry suction could indicate either short of gas, blocked capillary or compressor fault, and further
analysis may be required.
• If there is no frost present at the evaporator coil inlet pipe a blocked capillary is likely.
• If frost is forming at evaporator coil inlet pipe system, and suction/compressor is behaving as
shown in the relevant table above at 50% or 75%, the system is likely to be short of gas.
10. After fault has been diagnosed and repaired, reassemble the refrigeration system and test run.
Procedure 14: To diagnose lack of gas (continued)
Table 7: RF7.UBR.2.SD, RF7.UBR.2XL.SD, RF7.UBR.2.GD
(cartridge ULKCNI-0021, ULKCNI-0027, ULKCNI-0040-P)
Observation 50% charged 75% charged 100% charged
Suction pipe at compressor Suction dry Suction dry Suction cold
Evaporator coil Top row return bends frosted ½ return bends frosted All return bends frosted
Cartridge power
Less than 100 W 110 W to 115 W Greater than120 W
Evaporator temperature Greater than -10°C -10°C to -12°C Less than -15°C
Table 8: RF7.UBR.3.GD, RF7.UBR.3.SD, RF7.UBR.4.GD, RF7.UBR.4.SD
(cartridge ULKCNI-0022, ULKCNI-0028, ULKCNI-0041-P)
Observation 50% charged 75% charged 100% charged
Suction pipe at compressor Suction dry Suction dry Suction cold
Evaporator coil No return bends frosted ½ return bends frosted All return bends frosted
Cartridge power
Less than 13 5W 135 W to 145 W Greater than 145 W
Evaporator temperature Greater than -10°C -10°C to -12°C Less than -15°C
Table 9: RF7.UBF.2.SD, RF7.UBF.3.SD (cartridge ULKCNI-0023)
Observation 50% charged 75% charged 100% charged
Suction pipe at compressor Suction dry Suction cold Suction cold and wet
Evaporator coil Top row return bends frosted ½ return bends frosted All return bends frosted
Cartridge power
Less than 27 5W 290 W to 300 W Greater than 300 W
Evaporator temperature Greater than -15°C Less than -30°C Less than -30°C
WARNING
The cabinet body is connected to installation earth via the
refrigeration cartridge. Removing the cartridge removes the
cabinet earth. NEVER connect cabinet heating leads to the
electrics box or any other power supply with the cartridge
removed or risk of electric shock may be created.