Page 42 Nucleus
2
User Guide
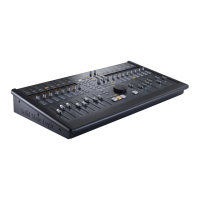
Plug-in Control (Pro Tools Only)
Nucleus
2
is able to control plug-ins and their parameters using the standard HUI plug-in editor. This consists of four
encoders with integral switches, a two-line 40-character parameter display, plus additional switches to assign and control
the plug-ins within a Pro Tools channel strip.
Note that the alignment of some of the labels in the Nucleus
2
scribble strip is approximate.
F
ull details of the plug-in editor’s functions can be found in the Pro Tools MIDI Control Surfaces guide. The following
d
escription provides a brief overview of the functionality.
To open the HUI plug-in editor, select the PARAM switch immediately to the right of the left-hand display.
To select the insert slot containing the plug-in to be edited, click on
Send Slot
in the mixer page. This will automatically
assign the plug-in to the editor and open the plug-in window on-screen.
In Pro Tools software, selecting a channel via the
SEL
switches only works for tracks assigned to faders 1 to 8. For
channels 9 to 16 the track selected to the plug-in editor is displayed in the top half of the scribble strip.
Press V-Sel 16 to switch between Insert and Param mode – the red LED below the V-pot lights to indicate Param mode.
Insert mode is used to select which insert (1- 5) is being configured, and Param allows the parameters of the selected
plug-in to be controlled.
Insert Mode
V-Pot 16 scrolls the page between Inserts 1-4 and Insert 5, as indicated in the top row of the scribble strip. In the Inserts
1-4 page, Inserts 1-4 can be accessed by pressing V-Sels 9, 11, 12 and 14. In the Insert 5 page, Insert 5 is accessed via V-
Sel 9. The selected insert label will flash to indicate that it has been selected.
Channel 15’s V-Sel switches Assign mode on and off, and the red LED below the pot flashes when Assign mode is on. In
Assign mode, the V-Pot for each insert scrolls through a full list of available plug-ins, with the LEDs around the VPot
indicating how far through the list you have scrolled. Once the desired plug-in has been located, it can be assigned to the
track insert by pressing the associated V-Sel.
Param Mode
Param mode, activated either by pressing V-Sel 16 or by pressing any of the inserts which are currently assigned, brings
the parameters of the plug-in on the currently selected track insert into the plug-in editor. The plug-in parameters are
accessed using V-Sels and V-Pots 9, 10, 11 and 12. The upper row of the scribble strip displays any parameter switch
options controlled by the V-Sels, and the lower row on the scribble strip displays the parameters controlled by the V-Pots.
In Param mode, V-Pot 16 scrolls between the pages of plug-in parameters. When a new page is accessed, the current page
is displayed momentarily (along with the number of parameter pages) in the top row of the scribble strip, in Channels 9
and 10.
V-Sel 7 and 8 are always assigned to the Bypass and Compare functions of the plug-in.