Do you have a question about the Sony DCR-IP5 and is the answer not in the manual?
Section for recording the camcorder's model and serial numbers for future reference.
Important safety warnings to prevent fire or shock hazard.
Guide to recording and playing back moving or still images on tape or Memory Stick.
Instructions for transferring images from the camcorder to a computer.
Details on connecting to the Internet using a Bluetooth device (DCR-IP7BT).
Explains how to navigate and operate the camcorder using the control button.
Guide to accessing and using the Function (FN) screen for various settings.
Steps for connecting the AC power adaptor or battery pack for power supply.
Instructions on how to properly insert a cassette into the camcorder.
Guidance on how to read and understand the camcorder manual.
Important advice on handling and caring for the camcorder's lens and screen.
Detailed steps for installing the battery pack securely.
Instructions on how to charge the InfoLITHIUM battery pack correctly.
Guide to powering the camcorder using the AC power adaptor and a wall outlet.
Instructions on how to slide the write-protect tab to prevent accidental erasure.
Step-by-step guide on how to record a picture using the camcorder.
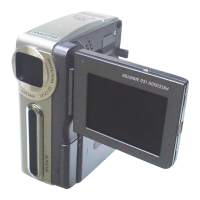
Instructions on how to adjust the LCD panel's angle for better viewing.
Guide to adjusting the LCD screen's brightness level.
Steps to adjust the viewfinder lens for sharp focus.
Explains how to use the camcorder's zoom function for better recordings.
How to use the backlight function when shooting subjects with strong backlighting.
Guide to using the self-timer function for automatic recording.
Instructions for playing back recorded tapes on the camcorder.
How to display recording data (date/time, settings) using the data code function.
Details on different playback modes like pause, fast forward, rewind, and slow speed.
Connecting the camcorder to a TV or VCR using the i.LINK cable for viewing.
Guide to recording still images onto a tape (Tape Photo recording).
Instructions for recording in 16:9 widescreen mode.
How to use fader effects (fade in/out, mosaic, bounce) for recordings.
Details on applying digital special effects like sepia, B&W, and solarize.
Explanation of digital effects like Still, Flash, Lumi, Trail, and Slow Shutter.
Guide to using automatic exposure modes like Spotlight, Soft Portrait, and Landscape.
Steps to manually adjust white balance for natural color balance.
Instructions for manually adjusting exposure for fine-tuning.
Guide to manually adjusting focus for better results in specific shooting scenarios.
How to process scenes with effects like Neg. Art, Sepia, B&W, and Solarize during playback.
How to process scenes with effects like Still, Flash, Lumi, and Trail during playback.
Function to display thumbnails of scenes and search for specific images.
How to search for recorded tape boundaries by title using the Remote Commander.
How to automatically search for recordings by date and start playback.
Function to search for still images recorded on a tape.
Instructions for dubbing or editing tapes using a VCR and the A/V or i.LINK cable.
How to record or edit programs from another VCR using the camcorder.
Guide to superimposing titles onto recordings.
Steps to create and store custom titles in the camcorder's memory.
Information about the Micro Cassette Memory and labeling cassettes.
How to delete all data (title, date, photo, etc.) from the Micro Cassette Memory.
Guide to changing various camcorder settings via the menu system.
Overview of Memory Stick functions, file formats, and usage.
Instructions for recording still images onto a Memory Stick.
How to record moving picture data from tape as a still image onto Memory Stick.
Guide to recording moving pictures and sound onto a Memory Stick.
How to record moving picture data from tape onto a Memory Stick.
How to superimpose still images from Memory Stick onto moving pictures.
Instructions for copying still images from tape to Memory Stick.
How to play back still images stored on a Memory Stick.
How to play back MPEG movie files stored on a Memory Stick.
How to transfer images from Memory Stick to tape.
Function to enlarge still images recorded on a Memory Stick.
How to play back images sequentially in a continuous loop.
How to protect important images from accidental deletion.
Instructions for deleting images from the Memory Stick.
How to specify recorded still images for printing by adding marks.
How to view and edit tape images on a computer using MovieShaker software.
Guide to viewing images from Memory Stick on a computer.
Instructions for accessing the Internet and network functions via Bluetooth.
A guide to common problems and their corrective actions.
Information on compatible cassette types and usage.
Details on the InfoLITHIUM battery, its charging, and effective use.
Explanation of the i.LINK interface standard and its features.
Advice on using the camcorder internationally, including power and TV systems.
Information on condensation, its causes, prevention, and solutions.
Steps for cleaning the video head to ensure normal recording and clear pictures.
Instructions for cleaning the LCD screen and viewfinder.
Guidance on charging the camcorder's internal rechargeable battery.
General precautions for camcorder operation, tape handling, and care.
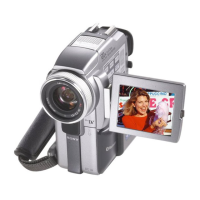
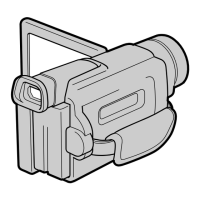
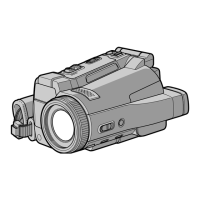
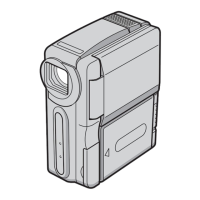
Diagrams identifying all camcorder and remote commander parts and controls.
Guide to using the MovieShaker software for video editing.
Important hardware and software requirements for using MovieShaker.
Instructions on how to launch and start the MovieShaker application.
Overview of the MovieShaker workflow: collecting, placing, editing, and exporting clips.
Steps for capturing images from the MICROMV device into the Clip tray.
Instructions for arranging clips on the Storyboard to create a movie.
How to add transition effects (cross-fade, wipe) between movie scenes.
Guide to selecting scenes for processing and applying effects or trimming.
Instructions for applying visual effects to movie scenes.
How to add text effects, including font, style, and color, to movie scenes.
How to adjust scene volume and playback speed.
Steps for previewing, reprocessing, and exporting the final movie product.
| Type | MiniDV |
|---|---|
| Optical Zoom | 10x |
| Digital Zoom | 120x |
| Image Sensor | 1/4-inch CCD |
| LCD Screen | 2.5" LCD |