29
GB
Additional Information when connecting equipment
Connecting a VCR
We recommend you connect your VCR to the B or C socket using a scart lead. If you do not have a scart lead, use the “Manually
Tuning the TV” section of this instruction manual to tune in the channel of the VCR test signal to TV programme number “0”.
Also refer to your VCR instruction manual to get the VCR test signal.
If your video supports Smartlink please refer to the "Smartlink" section of this instruction manual.
Connecting to External Audio Equipment
1 To listen to the audio of the set on the Hi-Fi equipment:
Plug in your Hi-Fi equipment to the E sockets on the rear of the set if you wish to amplify the audio output
from the TV.
The output level from E sockets can be varied by adjusting the volume of the headphones. Refer to the “Adjusting the sound”
section of this instruction manual to adjust the volume of the headphones.
2 To listen to the Dolby Prologic system sound on the set speakers:
Plug in your Dolby Prologic system decoder amplifier to the D socket on the rear of the set if you wish to listen to the audio
output from your equipment on the TV speaker. If you have a Dolby amplifier, connect the centre output from your amplifier
to the D socket to use the set as a centre speaker. Refer to the “Using the Features menu” section of this instruction manual
and set the option “Speaker” to “Centre in”.
Remember that the maximum input level of this input is 30 W. Be careful never to over this limit.
For mono equipment
Connect the phono plug to the L/G/S/I socket on the front of the TV and select the 4 input signal using the instructions on
this page below.
Select and View the Input Signal
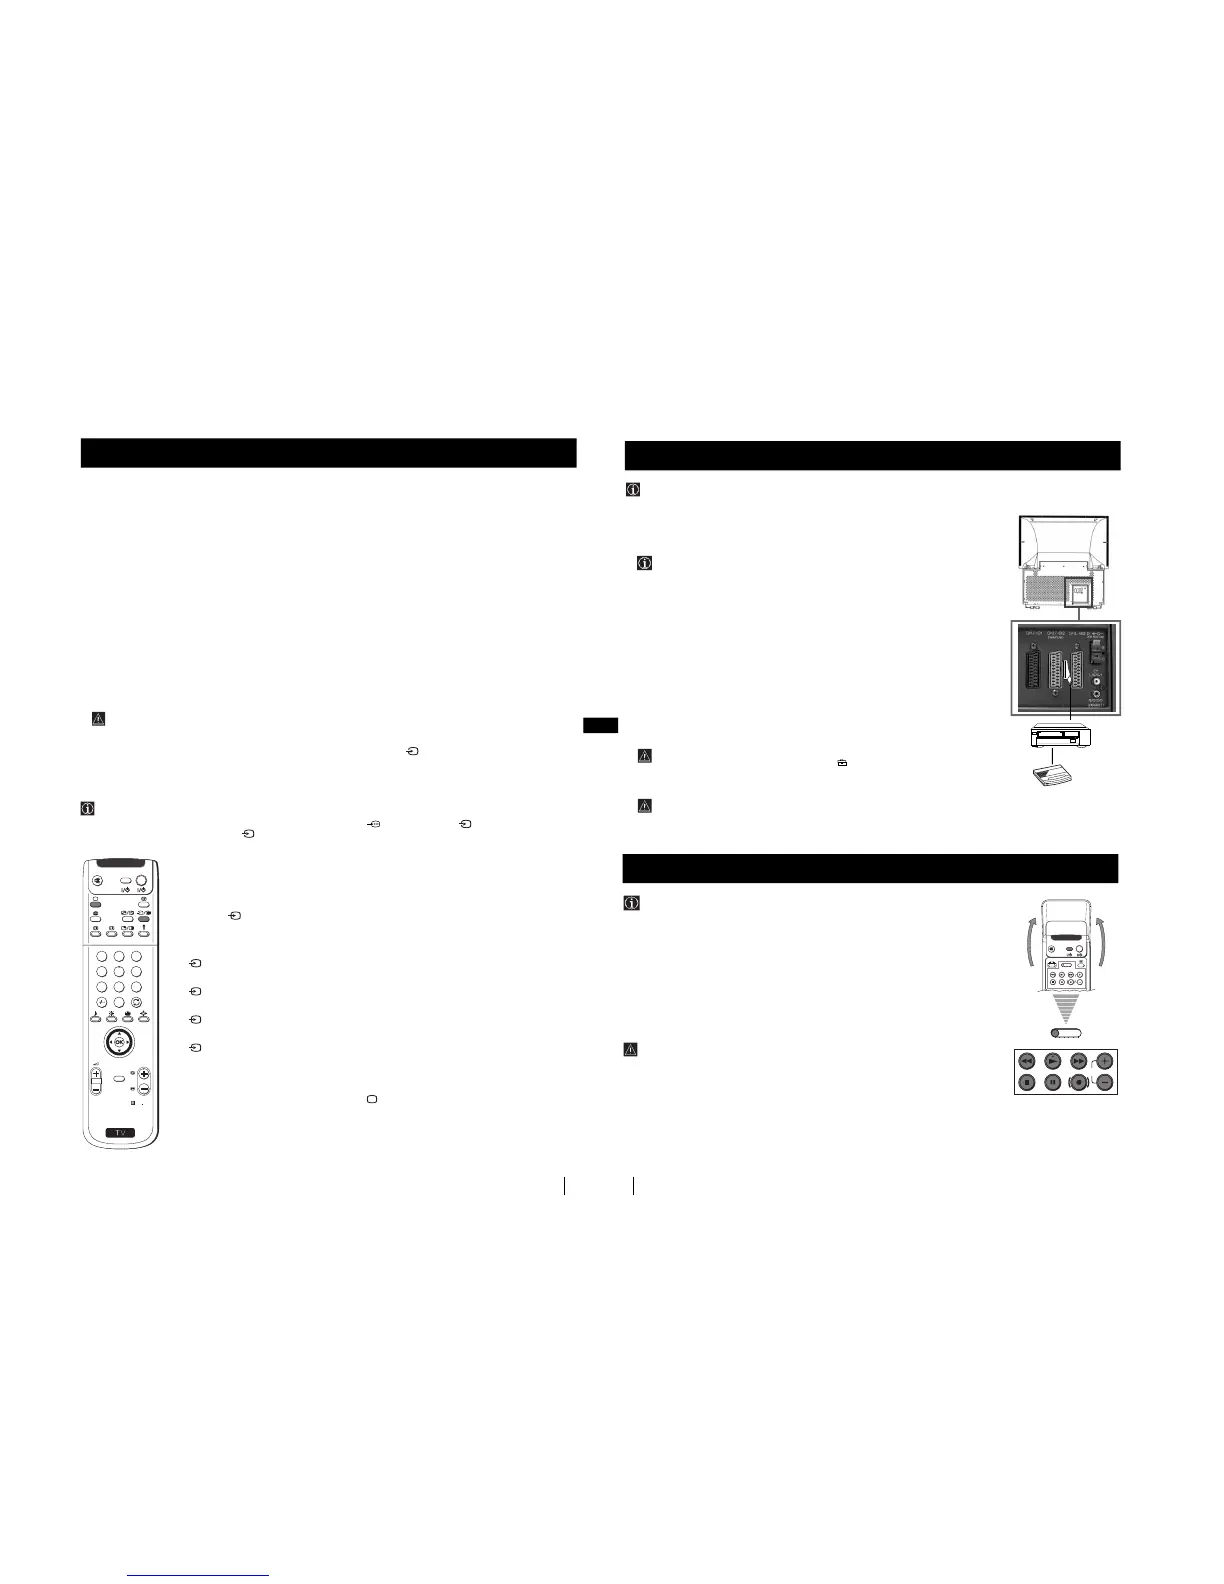
In order to get the input signal of a connected equipment onto the TV screen, you need to select the symbol of the
connector to which you have connected the device.
e. g. : Your VCR is connected to the connector with the symbol
Y
1/ 1. Press the button on the remote control
repeatedly until you see the symbol 1 on the screen.
Optional Connections
S
RM
903
PROGR
MENU
1
4
7
2
5
8
0
3
6
9
TV
V
I
D
E
O
Optional Connections
Using Optional Equipment
1
Connect your equipment to the designated socket, as it is indicated on the previous page.
2
Switch on the connected equipment.
3
Press the button repeatedly on your remote control until the correct input symbol
appears on the screen.
Symbol Input signals
11
11
• Audio/video input signal through the Scart connector A or * RGB
through Scart connector A.
22
22
• Audio/Video input signal through the Scart connector B or * S Video
through Scart connector B.
33
33
• Audio/Video input signal through the Scart connector C or * S Video
through Scart connector C.
44
44
• S Video input signal through the 4-pin DIN connector F or * video input
signal through phono jack G and audio input signal through phono jacks H.
* (automatic detection of the signal according to the connected equipment)
4
To return to the normal TV picture, press the button on the remote control.
30
Optional Connections
Optional Connections
Smartlink is a direct link between the set and a VCR.
For Smartlink you need:
• A VCR which supports Smartlink, NextView Link, Easy Link or Megalogic.
Megalogic is a trademark of Grundig Corporation.
EasyLink is a trademark of Philips Corporation.
• A fully-wired 21 pin SCART cable to connect your VCR to the Scart connector :2/q2
(SMARTLINK) on the rear of the set.
The features of Smartlink are:
• Tuning information such as the channel overview are downloaded from the set to the VCR.
• Direct recording: While watching TV you need to press just one button on the VCR to record
this programme.
• Automatically switching on: With the set in standby mode, pressing the “Play z” button on
your VCR automatically switches the TV on.
If you have connected a decoder to a VCR which supports Smartlink feature, select
the menu “Further Programme Preset” in the (Manual Set Up) menu and select
DECODER AV2 to each coded channel. For more details, please refer to the section
"Using the Further Programme Preset function" of this instruction manual.
For more information on Smartlink, please refer to the Instruction Manual of your
VCR.
Smartlink
VCR
Decoder
Using the buttons underneath the cover of the remote control you can
control other Sony equipment.
1
Open the cover of the Remote Control.
2
Set the selector VTR 1234 DVD according to the equipment you want to control:
VTR 1 Beta VCR
VTR 2 8 mm VCR
VTR 3 VHS VCR
VTR 4 Digital Video (DCR-VX 1000/9000 E, VHR-1000)
DVD Digital Video Disk
3
Use the buttons underneath the cover on the remote control to operate the equipment.
• If your equipment has a COMMAND MODE selector, set this
selector to the same position as the VTR 1234 DVD selector on this set Remote Control.
• If the equipment does not have a certain function, the corresponding
button on the remote control will not work.
Remote Control of other Sony Equipment
VIDEO TV
VTR 1 2 3 4 DVD
CH
CH
VTR 1 2 3 4 DVD
Rear



 To Next Page