5SPEKTRUM NX20 • TRANSMITTER INSTRUCTION MANUAL
EN
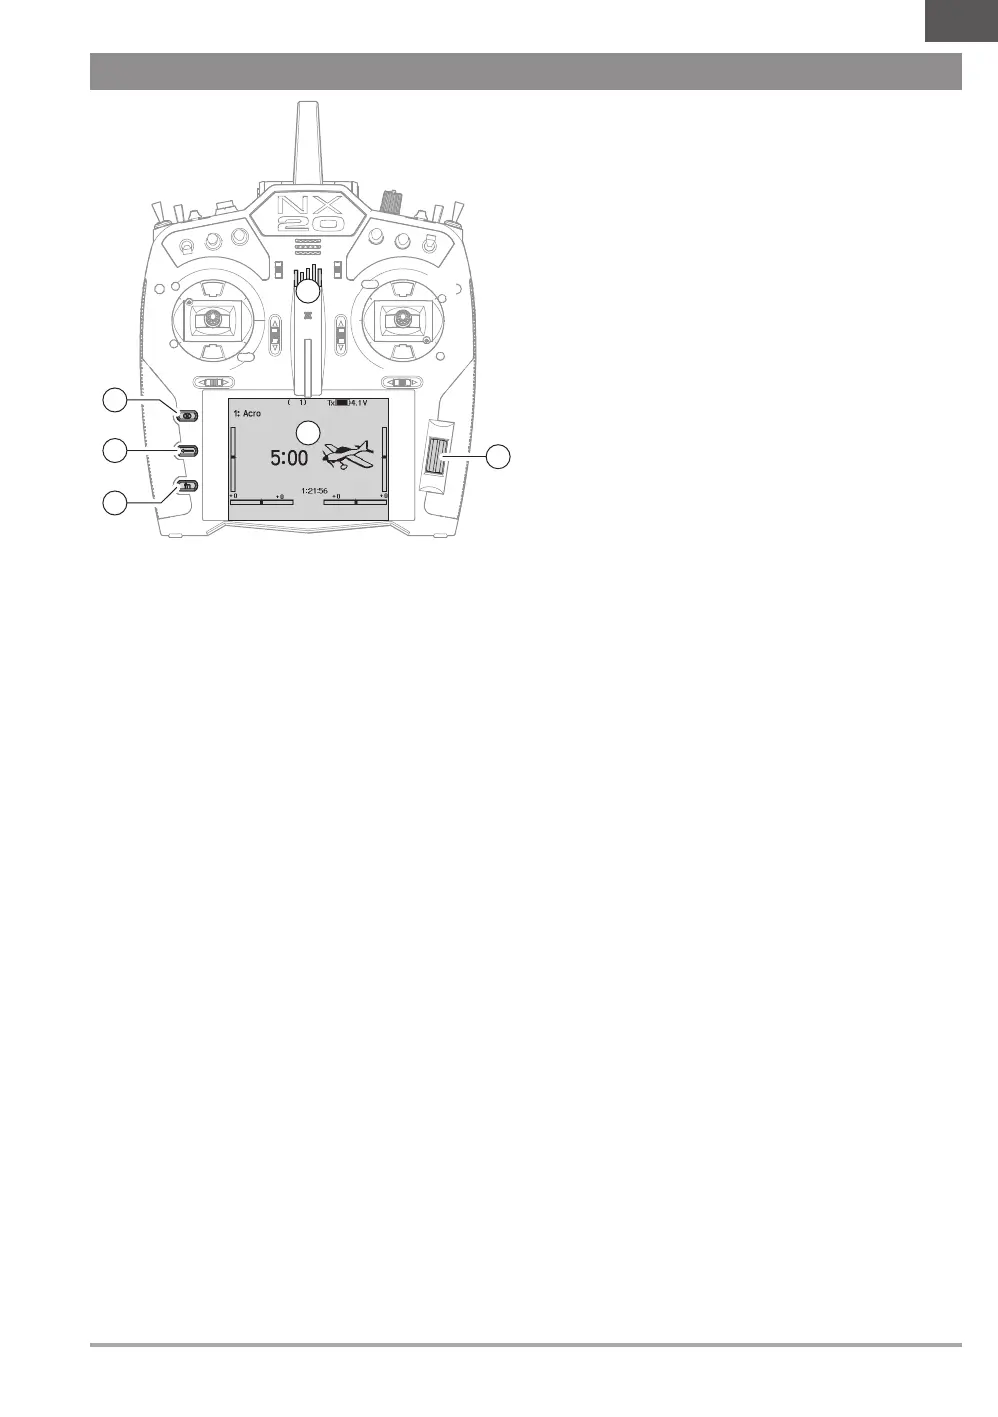
Interface
The power button is the Spektrum logo (1); press and hold for
several seconds to power the transmitter ON or OFF. There are
three buttons on the left side of the screen; Clear (2), Back (3)
and Function (4). The scroll wheel (6) can be pressed or rolled to
access functions and change values.
Main Screen
When powered ON the system will display the Main Screen (5)
which will show basic information for use during operation.
Telemetry screens and a channel monitor are available from the
Main Screen by rolling the scroll wheel.
System Setup
The transmitter will power OFF the RF when you enter the System
Setup menu, power OFF the receiver when entering the System
Setup menu to prevent accidental motor operation. Press the scroll
wheel to open the Function List from the Main Screen, scroll to
the bottom of the list and select System Setup by pressing the
scroll wheel again. The System Setup menu is where you set
model features that define your model (wing and tail type, assign
switches and trims, configure flight modes, etc). This is also where
system-wide settings reside including sound and palette utilities,
wifi, USB and SD card settings.
Function List
Press the scroll wheel to open the Function List from the Main
Screen. This is where model specific features for final model setup
are accessed such as servo settings, rates and expo, throttle
settings, mixing, range testing, etc. These settings are unique
to each model file. Select the model you want to work with first,
define your settings in the system setup menu, and then use the
features in the function list to finalize setup for your model.
Model Files
All the settings for a model are stored under a model file. To
configure a new model, begin by selecting the model file you
want to use. When selecting a new model file you may chose a
preprogrammed BNF model file, select a generic BNF templete, or
define the model type to begin a custom setup.
Model Match technology
The system is designed so the transmitter will only connect to
the receiver it was bound to, and the connection is unique to
the selected model file. The transmitter will only connect with
a receiver when the model file it was bound to is selected,
preventing operation with the wrong model file.
Binding
Binding is the process of linking the transmitter and receiver. Verify
the transmitter is set to the model file you want to use. To bind the
transmitter to the receiver, first put the receiver into bind mode.
Then put the transmitter into bind mode from the System Setup
menu, Function List, or by pressing the I button when powering the
transmitter ON. A connection is established when the LED on the
receiver illumniates solid orange.
BNF Setup
The NX20 is pre-loaded with model files for many Horizon Hobby
BNF aircraft.
1. From the Main Screen press the Clear and Back buttons at
the same time to enter the Model Select menu.
2. Choose Add New BNF, and select the brand of your airplane
and then the model.
or
Chose Add New from Template for a generic BNF template
desgined for simple models with 4 channels or less.
3. Remove the propeller on electric aircraft as a safety
precaution where applicable.
4. Follow your aircraft manual for binding and setup details
which may include SAFE Select. Bind the transmitter to the
receiver. Receivers with AS3X or SAFE must remain still after
powering ON before the transmitter gains control.
5. Check all control surfaces for correct response.
6. Re-install the propeller and test fly.
Custom Model Setup
1. Enter the Model Select menu.
2. Choose Add New Model. Model type is selected when you
set up a new model and will dictate other options within the
menus.
3. Enter the System Setup menu to define basic settings for your
model. If you want to change the model type do that first, all
settings within the model file will be reset when the model
type is changed.
4. Name the model file.
5. Select wing and tail type, which enables functions like flaps
and built-in mixing for dual aileron servos or elevons. The
menus for items like flaps will not appear in the Function List
until a feature requiring its use is selected in the wing and
tail type settings. Changing the wing or tail type will reset any
changes from default in the Channel Assign menu.
6. Remove the propeller on electric aircraft as a safety
precaution where applicable.
7. Bind the transmitter to the receiver.
8. Configure servo directions, center control surfaces, adjust
travel, set rates and flight modes.
9. Configure auxillary functions.
10. Check all control surfaces for correct response.
11. Re-install the propeller and test fly.
BASIC OPERATION
6
5
4
3
2
1
 Loading...