3
2. GETTING STARTED
(Please read carefully before using the machine to prepare coee
for the rst time.)
2.1 Preparation
Carefully remove the machine and all accompanying parts from
the packaging.
Your package should contain the following:
• User manual
• Measuring spoon with assembly tool for lter
• 1 testing strip for water hardness
• Milk container
Note: In the event that your machine needs to be returned to us,
dispatch the machine using the full original packaging. Please
keep all packaging and protective foam for this purpose.
Place the machine on a suitable, level, dry working surface.
Connect the machine to the mains supply by plugging into a
properly installed mains socket.
Your machine is tted with a power cord compartment. If
your machine is located close to the power socket, push any
unwanted cord back into the power cord compartment (Fig 1/R).
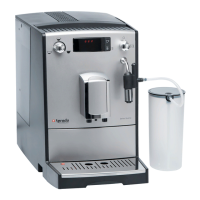
2.2 Controls
Your SPRADA machine oers a wide range of speciality coees to suit
individual tastes. However, most of the basic functions and controls
are common to all the various speciality coees:
• The turn/press selector knob on the left-hand side (left rotary
knob) (Fig 1/B): the left rotary knob is used to control the strength
and amount of your coffee. Turning the left rotary knob alters
the amount of coffee served in ml. Pressing the left rotary knob
alters the strength of your coffee (bean symbol, Fig 1/D). The
more beans shown on the display, the stronger the coffee.
• The turn/press selector knob on the right-hand side (right rotary
knob) (Fig 1/C): turning the right rotary knob allows you to select
a drink or menu item on the display. Pressing the right rotary
knob tells the machine to begin preparing the drink shown on the
display, or if a menu item is shown on the display, takes you to
the sub-menu of the menu item selected. Pressing the left rotary
knob will take you back to the previous level.
• Adjustable spout (Fig 1/E): the spout can be adjusted vertically to
suit the height of your cups or glasses.
2. GETTING STARTED
DOWN
UP
i