Maintenance Procedures – Litter
83
CPR CABLE ADJUSTMENT/REPLACEMENT
Required Tools:
Needle–Nose Pliers (2) 10 mm Open–End Wrenches
NOTE
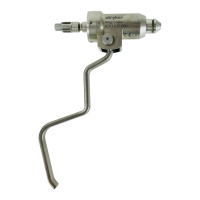
The CPR emergency release allows quick access to the patient when the head section is raised. When han-
dle (A) is squeezed, the attached cable (B) pulls the CPR bracket (C) which pulls the motor coupler out of
the drive screw and causes the head section to drop. If this doesn’t happen when the handle is squeezed,
cable adjustment or replacement may be required.
Cable Adjustment Procedure:
1. If the motor coupler is not pulled far enough away from the motor drive screw when the handle (A) is
squeezed to allow the head section to drop, use two 10 mm open–end wrenches to loosen the two jam
nuts (D) holding the cable in position (one nut is not shown). Turn the nuts to allow less thread exposure
in area 1 (as shown in the illustration on page 84). When adjusted properly, the CPR coupler (E) and CPR
“wing” (F) should be separated, as shown in view two of the illustration on page 85, when the handle is
squeezed fully. When the handle is released, the CPR coupler (E) and “wing” (F) should fit tightly, as
shown in view one of the illustration. Tighten the nuts when the proper adjustment is achieved.
Cable Replacement Procedure:
1. Unplug the bed power cord from the wall socket. Using needle–nose pliers, remove the tension spring
(G) from the CPR bracket (C).
2. Remove the cable to be replaced from bracket (C) and bracket (H).
3. Remove the cable from the cable retainers (J).
4. Remove the cable from the bracket on the handle.
5. Using two 10 mm open–end wrenches, remove the two nuts (D) (one not shown) and remove the cable
from the handle.
6. Reverse steps 1–5 to install the new cable. Refer to the procedure above for cable adjustment.
CPR CABLE ADJUSTMENT/REPLACEMENT
1. Unplug the bed power cord from the wall socket. Using needle–nose pliers, remove the tension spring
(G) from the CPR bracket (C).
2. Remove the end of the cable at the handle from bracket (K).
3. Using two 10 mm open–end wrenches, remove the two nuts (D) (one not shown) and remove the cable
from the handle.
4. Using a Torx screwdriver, remove the two screws (L) holding the handle assembly to the litter and remove
the handle.
5. Reverse the above procedure to install the new handle. See above procedure to cable adjustment.