Maintenance Procedures – Base
66
LIFT POTENTIOMETER REPLACEMENT AND ADJUSTMENT
Required Tools:
Small Standard Screwdriver #2 Phillips Screwdriver Bungee Cord (or equivalent)
5/16” Socket Wrench 3/8” Open End Wrench Side Cutters
B
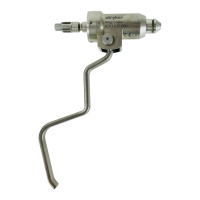
C
A
B
Procedure:
1. Unplug the bed power cord from the wall socket.
2. Using a 5/16” socket wrench, remove the six bolts holding the lower lift cover to the base and remove
the cover.
3. Using a #2 Phillips screwdriver, remove the three screws holding the upper lift cover to the base.
4. Using side cutters, cut the cable tie (A) holding the pot cable to the coil cord.
5. Unplug the pot cable from the sensor coil cord. If replacing a pot at the head end of the bed, unplug the
cables attached to the brake sensor switch.
6. Pull the pot cable up through the base.
7. Using a 3/8” open end wrench, remove the two bolts (B) holding the pot housing (C) to the lift housing.