14
MPC-385 SERIES OPERATION MANUAL – REV. 3.21K (20201120)
Once the start-up sequence has finished, you will see a display that gives the coordinates of
the manipulator. The LED marked 1 will light and the left-hand corner of the display shows
“Drive A” to indicate that the ROE is ready to operate the MP-285/M connected at the
MANIPULATOR A output. Confirm that you get a coordinate display and that you have
removed the shipping screws from both manipulators. If you do not get a coordinate display,
go to the trouble shooting section at the back of the manual. If you have not yet removed the
shipping screws, turn the power off again and remove all shipping screws from both
manipulators.
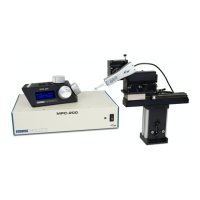
All functions necessary during normal operation are provided by 4 push buttons and two
rocker switches on the top of the ROE-200. Other setup functions are done via buttons and
DIP switches located on the back of the ROE-200 and DIP switches on the back of the MPC-
200 controller.
The three ROE knobs control the three axes of either manipulator (right knob X, left knob Y,
and top knob Z (see Page 15)). Turn any one of the three knobs and notice that the
corresponding axis moves and the coordinate for that axis changes on the MP285/M
connected to the MANIPULATOR A output.
The MPC-200 controller and ROE-200 have a built in Centering function. This is activated
by pressing the white “CENTER” button on the back of the ROE. If both MP-285/M
manipulators are sitting in a wide-open area, and the shipping screws are removed, press the
CENTER button. The ROE-200 display will display the message “PLEASE WAIT MOVE IN
PROGRESS” and the first manipulator will center. After the CENTER operation is complete,
the manipulator axes will each be at the center of travel and the display will read 12500 for
X, Y and Z.
From this location, you can move 12500 microns in each direction on each axis. The unit will
stop automatically at each end of travel (00000 or 25000 microns). These ends are
determined by firmware. Each axis also has magnetic end of travel switches that are not
activated in normal operation. If the magnetic switches are activated, you will see the
message EOT (for End Of Travel) on one of the displayed axes.
If you wish, you can easily switch to the second manipulator (connected to the
MANIPULATOR B output on the back of the controller). This is done by pressing the
Manipulator toggle once. The LED marked 2 will light and the left-hand corner of the display
will change to “Drive B”. While you are controlling the second manipulator, press CENTER
to make sure that this manipulator’s coordinate system is initialized. After centering, you
can demonstrate that the manual knobs are now moving this manipulator.
When the MPC-200 controller is first turned on, the speed of movement is at its fastest,
coarsest Mode. Movement mode can be finer and slower by changing the black “Mode” toggle
switch. As MODE increases from 0, smaller movements are commanded by the same turn of
the ROE knob. MODE 5 or 6 is probably what you will use for the final approach to a cell.
MODE 0 or “Accelerated Mode” is used for fast movements to move the pipette large
distances.
In MODE 0, when you turn the ROE knobs slowly, you get relatively slow
movement that is useful for final moves to place a pipette near a cell. Conversely, when you
make prolonged, rapid turns of the ROE knob, the controller/ROE automatically accelerates
to maximum speed to allow for prolonged, long distance movements. This would be most
useful for manual pipette exchange.