Do you have a question about the Trail Tech STRIKER and is the answer not in the manual?
Explains how to use buttons in normal mode for backlight, screen switching, and stopwatch.
Details entering setup mode, switching screens, scrolling values, and advancing digits.
Instructions on how to reset ride data by holding buttons.
How to enter/exit and scroll values for trip distance adjustment.
Explains the manual's content and importance for proper operation and maintenance.
Information required for warranty service and proof of purchase.
Key warnings including reading instructions, avoiding chemicals, and not using underwater.
Advice on sensor installation, sunlight exposure, cable care, and disassembly.
Lists functions, icons, units, and ranges for various data points.
Details physical attributes, dimensions, weight, and materials of the Striker unit.
Describes the main computer unit, buttons, LEDs, and the remote switch.
Illustrates connections for temperature sensor, remote switch, power cable, and speed sensor.
Explains the reset button function and how to replace the internal battery.
Details bar mounting and different temperature sensor installation methods.
Instructions for mounting the Striker on a flat surface using provided bolts.
How to connect the Striker to a vehicle's 12-volt system for enhanced features.
Step-by-step guide for installing sensors and magnets on ATVs for distance data.
Guide for installing sensors and magnets on motorcycles for speed and distance data.
Explains why accurate wheel size is critical for speed and distance calculations.
Using a ruler to measure wheel diameter and calculate circumference.
Rolling the wheel one revolution to measure distance for circumference calculation.
Most accurate method using known road distance to calibrate wheel size.
Describes the three screens available in normal mode and how to switch between them.
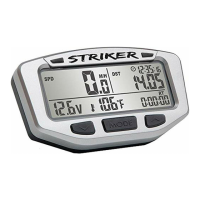
Lists the data displayed on Screen 1: Speed, Trip Distance, Clock, Voltage, Engine Temp, Ride Time.
Details data shown on Screen 2 (Speed, Trip Distance, Clock, Air Temp, Stop Watch) and Screen 3 (Avg/Max Speed, Odometer, etc.).
Describes Normal Mode, Sleep Mode, Setup Mode, Trip Distance Edit, and Trip Data Reset.
Lists all data types the Striker can display: Speed, Voltage, Distance, Time, Temperature.
Explains how the device enters sleep mode and what is displayed.
Details how speed is calculated and displayed (current, average, max) across different screens.
Covers Trip Distance (DST) and Odometer (ODO) display and reset behavior.
How to manually adjust trip distance and change decimal precision.
Explains voltage display, max/min voltage, and voltage warning LEDs.
Details engine and ambient temperature displays, and temperature warning LEDs.
Covers clock display, stopwatch operation, and reset procedures.
Explains Ride Time (RT) and Accumulated Ride Time (ART) display and reset behavior.
Details OIL, WRENCH, and LO-BATTERY icons and how they function.
Explains how the backlight works when connected to vehicle power or on internal battery.
Details how to reset temporary data and lists values affected by the reset.
Clarifies that Accumulated Ride Time (ART) and Odometer (ODO) cannot be reset.
Explains the importance of setup mode and lists the order of settings.
Instructions on how to enter setup mode by holding all three buttons.
How to switch between Miles Per Hour (M/H) and Kilometers Per Hour (KM/H).
Procedure for modifying wheel size digits and confirming the setting.
How to select between 12-hour and 24-hour clock display.
Instructions for modifying the hours and minutes for the time of day.
How to select between Fahrenheit (°F) and Celsius (°C) for temperature readings.
Explains how over-temperature and under-voltage alerts function and require vehicle power.
Setting thresholds for yellow LED caution and red LED critical warnings for engine temperature.
Setting thresholds for yellow LED caution and red LED critical warnings for low voltage.
Setting mileage/time intervals for oil and wrench service reminders.
Choosing whether AVG SPD displays on Screen 2 or Screen 3.
Selecting display for one (0.0) or two (0.00) decimal places for distance.
Addresses issues like the unit not working, incorrect speed readings, and system compatibility.
Covers hazy screens, backlight issues, dead internal battery, and non-functioning LEDs.
Explains how to clear maintenance icons from the screen by setting them to zero.
Defines terms from Accumulated Ride Time (ART) to Maximum Speed (Max SPD).
Defines terms from Odometer (ODO) to Wheel Size.
Details warranty period, repair/replacement policy, and contact information.
Excludes damages from misuse and explains consumer rights that may vary by state.
| Backlight | Yes |
|---|---|
| Current Speed | Yes |
| Maximum Speed | Yes |
| Average Speed | Yes |
| Trip Distance | Yes |
| Odometer | Yes |
| Clock | Yes |
| Ride Time | Yes |
| Stopwatch | Yes |
| Wheel Size Setting | Yes |
| Wireless | No |
| Compatibility | Universal |
| Display Type | LCD |
| Mounting | Handlebar |
| Temperature Range | -20°C to 60°C (-4°F to 140°F) |
| Dimensions | 2.5 x 1.5 x 0.75 inches (63.5 x 38.1 x 19.05 mm) |
| Weight | 2.5 oz (70.9 g) |