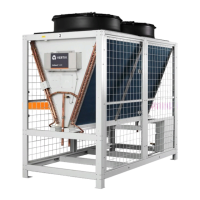
11.2.3 Cleaning the Condenser Coil
1. Clean the area around the condenser to ensure leaves, grass, or loose debris will not be blown into the coil.
2. Turn off the electrical power to the unit using the lockout system.
3. Remove access door panels located on the left or right side of the condenser to gain access to the coil(s) that
are to be cleaned.
4. Remove surface dirt with a vacuum cleaner, preferably with a brush or other soft attachment rather than a metal
tube.
5. Flush the outside of the coil with water to loosen residue dirt. Allow the water to soak for 10 to 20 minutes to
loosen surface residue. Rinse only with warm water (< 100°F).
NOTE: Do not use any chemicals or commercial coil cleaner to clean micro channel exchangers as this may cause
corrosion.
6. Remove dirt and water with a vacuum cleaner, preferably with a brush or other soft attachment rather than a
metal tube.
7. Inspect the coil to make sure that it is draining correctly.
8. Rinse the coil thoroughly again.
9. Vacuum the surface of the coil again and remove any excess dirt and water.
10. Use compressed air blown from the inside out to dry out the coil.
11. Do not impact the coil with the vacuum tube or air nozzle.
12. Repeat the above steps until the coil is completely clean.
a. Do not hit the coil face or header with the hose. This type of damage will impact the coil performance
and operation.
13. Apply low pressure air to the coil face and vacuum out the residual water from the coil to speed up drying and
prevent pooling.
a. Low pressure spray will reduce possible impact damage to the coil.
14. Close the access panel doors to the coil section.
15. Turn on the electrical power to the unit and run the system.
NOTE: Spraying the coil from the outside repeatedly can push a majority of the dirt to the inner section of the fins and
continue to restrict air flow. Keep in mind you may not have the luxury of shutting the unit(s) down for an extended
time. A scheduled shutdown with the operator may be in order.
11.3 Condenser Cleaning - E-coat Coil
A scheduled and documented QUARTERLY cleaning procedure is REQUIRED for all HVAC/R equipment coated with Modine
coil and/or cabinet protection.
11.3.1 General Instructions: (detailed instructions to follow)
Remove surface loaded fibers – Coils Only
Surface loaded fibers or dirt should be removed prior to cleaning and/or water rinse to prevent further restriction of airflow. If
unable to back wash the side of the coil opposite that of the coils entering air side, then surface loaded fibers or dirt should be
removed with a vacuum cleaner. If a vacuum cleaner is not available, a soft non-metallic bristle brush may be used while
brushing the fins, typically vertically for RTPF coils. Coil surfaces can be easily damaged (fin edges bent over) if the brush is
applied across the fins.
11 Maintenance Proprietary and Confidential ©2024 Vertiv Group Corp. 53
Vertiv™ Liebert® MCV Installer/User Guide