EasyManua.ls Logo

Yardistry AVERY User Manual

Yardistry AVERY
40 pages
To Next Page IconTo Next Page
Page #1 background imageLoading...
Page #1 background image
1 support@yardistrystructures.com
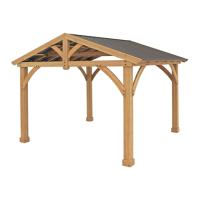
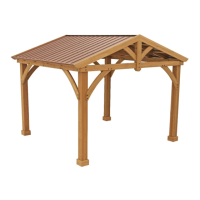
AVERY PAVILION
with ALUMINUM rOOF
Installaon and Operang Instrucons – YM11742
Yardistry – North America
Toll Free Customer Support: 1.888.509.4382
info@yardistrystructures.com
www.yardistrystructures.com
For Spanish instrucons visit our website at:
(Para obtener instrucciones españoles, visite nuestro sio web en:)
hp://yardistrystructures.com/instrucon-manuals/
Revised 11-14-2016
HEIGHT:
10’6” or 3.2m
Height: 9’ 11” (3.02 m)
10’ 7”
12’
[3657.8]
[3225.8]
http://bit.ly/averyinstall
Question and Answer IconNeed help?

Do you have a question about the Yardistry AVERY and is the answer not in the manual?

Yardistry AVERY Specifications

General IconGeneral
BrandYardistry
ModelAVERY
CategoryOutdoor Furnishing
LanguageEnglish

Summary

Important Safety Notice!

General Information

Limited Warranty

Instructions for Proper Maintenance

Assembly Guides

Assembly Tips

Permanent Installation Examples

Part Identification

Hardware Identification

Step 1: Inventory Parts - Read This Before Starting Assembly

Step 2: Post Assemblies

Step 3: Beam Assembly - Front/Back

Step 4: Beam Assembly - Side Part 1

Step 4: Beam Assembly - Side Part 2

Step 5: Frame Assembly and Anchoring Part 1

Step 5: Frame Assembly and Anchoring Part 2

Step 6: Attach Gussets

Step 7: Frame Roof Panel Part 1

Step 7: Frame Roof Panel Part 2

Step 7: Frame Roof Panel Part 3

Installing Roofing Material

Step 8: Attach Roof Panels Part 1

Step 8: Attach Roof Panels Part 2

Step 8: Attach Roof Panels Part 3

Step 8: Attach Roof Panels Part 4

Step 9: Attach Roof Panels to Frame Part 1

Step 9: Attach Roof Panels to Frame Part 2

Step 9: Attach Roof Panels to Frame Part 3

Step 10: Attach Ridge Caps Part 1

Step 10: Attach Ridge Caps Part 2

Step 11: Attach Gable Ends

Step 12: Attach Gable Gussets

Step 13: Truss Assemblies Part 1

Step 13: Truss Assemblies Part 2

Step 13: Truss Assemblies Part 3

Step 14: Attach Plaque

Notes

Related product manuals