Do you have a question about the YASKAWA VIPA System MICRO M13-CCF0000 and is the answer not in the manual?
Provides safety information for handling electrostatic sensitive modules, shipping, and measurements.
Provides instructions for mounting the CPU, including options without a mounting rail.
Details the procedure for attaching an extension module to the CPU and mounting rail.
Explains the steps to mount periphery modules to the CPU and mounting rail.
Describes the CPU connector, data specifications, and the push-in spring-clip wiring procedure.
Details wiring for periphery modules, including connector removal and insertion using a screwdriver.
Procedure for removing connectors and the CPU from the mounting rail or back wall.
Steps to remove the extension module from the CPU and the mounting rail.
Procedure for removing connectors and the periphery module from the mounting rail.
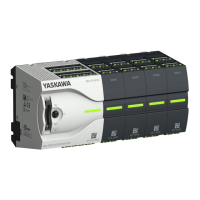
Lists key features and technical properties of the CPU M13-CCF0000, including memory and interfaces.
Identifies the components of the System MICRO CPU M13C, including connectors and switches.
Details the electrical interfaces of the CPU, including DI, DO, AI, and Ethernet connections.
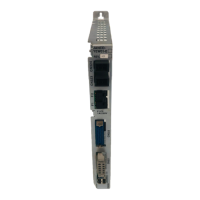
Describes the EM M09 extension module, its interfaces, protocols, and serial bus connections.
Contains technical specifications for the CPU's power supply, digital inputs, and outputs.
Provides technical specifications for the EM M09 extension module, including housing and environmental data.
Describes CPU checks for projects, firmware, and VSC upon power-on and stop states.
Describes CPU configuration using Siemens hardware configurator and virtual PROFINET IO device.
Guides on connecting System SLIO modules via the CPU's backplane bus.
Configuration of the integrated Ethernet PG/OP channel for programming and remote control access.
Setting standard parameters using Siemens hardware configurator via object properties.
Setting standard parameters using Siemens hardware configurator via object properties.
Setting VIPA-specific CPU parameters via the properties dialog in the virtual IO device.
Describes methods for transferring projects to the CPU: MPI, Ethernet, and memory card.
Procedure to transfer projects to the CPU via Ethernet using SIMATIC Manager and IP address parameters.
Steps to create and copy project files (WLD) to a memory card for CPU transfer.
Explains using EM M09 module and MPI programming cable for project transfer.
Explains the three CPU operating modes: STOP, START-UP (OB 100, OB 102), and RUN.
Explains the three CPU operating modes: STOP, START-UP, and RUN.
Details CPU security mechanisms like Watchdog and parameterizable cycle time surveillance.
Explains the process of erasing user memory and resetting the CPU to its initial state.
Step-by-step procedure to perform an overall reset using the operating mode switch.
Procedure to perform an overall reset via SIMATIC Manager while online with the CPU.
Describes executing a firmware update for the CPU and components via memory card.
Procedure to completely delete internal RAM and reset the CPU to its delivery state.
Explains standard and extended protection for blocks, securing them against unauthorized access.
Details command files (e.g., vipa_cmd.mmc) executed automatically from memory cards.
Using test functions like 'Debug' and 'Monitor' for operand and RLO status display.
Describes reading the diagnostics buffer via SIMATIC Manager and VIPA-specific event IDs.
Covers project engineering in SPEED7 Studio and parametrization of digital I/O and functions.
Lists supported technological functions: Counting, Frequency measurement, Pulse width modulation.
Provides properties of the analog input, including voltage range and submodule 'AI2'.
Properties of the analog input, including voltage range and isolation.
Wiring details for the X6 connector, including analog signals and power supply.
Properties of digital inputs, including voltage, frequency, interrupt functions, and status indication.
Properties of digital inputs, including voltage, frequency, interrupt functions, and status indication.
Wiring diagrams and descriptions for X1 and X5 digital input bytes.
Properties of digital outputs, including voltage, current, and status indication via LEDs.
Properties of digital outputs, including voltage, current, and status indication via LEDs.
Wiring details for the X2 digital output byte.
Properties of the counter function, including channels, operating modes, and user program control.
Properties of the counter function, including 4 channels and various counting modes.
Wiring details for counter inputs (X1: DI byte 0).
Selection of counter operating modes like Count continuously, once, and periodically.
Describes counter operation in Count continuously mode.
Describes how the counter operates continuously with load value, upper/lower limits.
Explains counter operation counting once, forward or backward, with gate control.
Details periodic counter operation, forward or backward, with load value and limits.
Explains how additional functions influence the counter behavior.
Explains SW and HW gate functions for starting, stopping, and interrupting counters.
Defines counter output behavior based on comparison value and pulse duration.
Steps for configuring connections in NetPro, including properties and requirements.
Describes configuring the CPU as an intelligent DP slave on a master system.
Steps to configure the CPU in SPEED7 Studio's hardware configuration.
Configuration of the integrated Ethernet PG/OP channel for programming and remote control.
Procedure for placing and parametrizing I/O modules in the device configuration.
Details operating parameters like count direction, gate function, start/end values, comparison, and hysteresis.
Describes methods for transferring projects to the CPU: MPI, Ethernet, and memory card.
Procedure for transferring projects to the CPU via Ethernet using SPEED7 Studio.
Steps to create and copy project files (WLD) to a memory card for CPU transfer.
Configuration of the CPU using a virtual PROFINET IO device and GSDML file.
Configuration of the integrated Ethernet PG/OP channel for programming and remote control.
Procedure for transferring projects to the CPU via Ethernet using TIA Portal.
Steps to create and copy project files (WLD) to a memory card for CPU transfer.
| Category | Computer Hardware |
|---|---|
| Series | MICRO |
| Model | M13-CCF0000 |
| Manufacturer | YASKAWA |
| Type | PLC |