30
RTCA SP Instrument Operator’s Manual
B
B
Installation
Installation of the RTCA SP Instrument
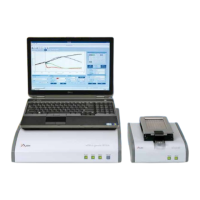
Remove instruments from boxes
Remove RTCA Analyzer from the box.
Remove RTCA SP Station from the box.
Remove RTCA Control Unit and RTCA Software Package from the box.
Connect the RTCA Analyzer to the RTCA Control Unit
Locate the serial cable with two female connector ends (9-pin). Plug one end of the
cable into the Serial port of the USB-Serial Converter Cable and attach the other end
of the cable to the COM port on the back of the RTCA Analyzer. Plug the Adapter into
a USB port on the RTCA Control Unit.
Place the RTCA SP Station into an incubator
Wipe the RTCA SP Station with tissue paper or a soft cloth slightly soaked with 80%
alcohol or another sterilizing agent.
Avoid spraying any sterilizing agent directly on the RTCA SP Station, except
Contact Pin cleaning (see Cleaning and Exchanging the RTCA Contact Pins 96)!
Ideally, before placing the RTCA SP Station inside an incubator, it is recommended
to set up the RTCA SP Instrument outside the incubator using a procedure similar
to that being described here in section 3.5, and to perform a Resistor Plate Verifi cation
as described in section 3.6.
Plug the 15-pin fl at ribbon cable into the back of the RTCA SP Station, tighten the two
screws on the cable, then place the RTCA SP Station in the incubator and run the fl at
ribbon cable from the RTCA SP Station to the outside of the incubator, making sure
that the incubator door still closes.
Connect the RTCA SP Station to the RTCA Analyzer
Insert the female connector at the end of the ribbon cable into the EPS port on the
rear panel of the RTCA Analyzer.
To avoid condensation it is important to wait for at least TWO hours (after placing
the RTCA SP Station inside the incubator) before running any experiments or
turning on the power of the RTCA Analyzer.
Attach the power cord to RTCA Analyzer and RTCA Control Unit
Attach the DC power plug of the AC adaptor (with attached power cord) to the RTCA
Control Unit and connect the power cord to an AC outlet.
Do NOT turn on the RTCA Control Unit.
Attach the power cord to the RTCA Analyzer and plug it into an AC outlet.
Do NOT turn on the RTCA Analyzer.
Wait for two hours to let the RTCA SP Station reach an equilibrium temperature
without condensation.
Turn on the RTCA Control Unit.
Turn on the RTCA Analyzer using the power switch located at the back of the Analyzer.
e LED on the front panel of the RTCA Analyzer should be green.
e RTCA Analyzer and RTCA SP Station are ready to run an assay.
e RTCA Analyzer is pre-programmed and ready to communicate with the RTCA
S o w a r e .
ere is one button on the front panel of the RTCA Analyzer which is used to perform a
self-test of the instrument. A red LED will light up if the RTCA Analyzer fails the self-test.
In this case, please contact your local ACEA representative.
RTCA SP Instrument Operator’s Manual
Installation of the RTCA SP Instrument
e RTCA Analyzer and RTCA SP Station are ready to run an assay.
e RTCA Analyzer is pre-programmed and ready to communicate with the RTCA
ere is one button on the front panel of the RTCA Analyzer which is used to perform a
self-test of the instrument. A red LED will light up if the RTCA Analyzer fails the self-test.
In this case, please contact your local ACEA representative.
Remove instruments from boxes
Remove RTCA Analyzer from the box.
Remove RTCA SP Station from the box.
Remove RTCA Control Unit and RTCA Software Package from the box.
Connect the RTCA Analyzer to the RTCA Control Unit
Locate the serial cable with two female connector ends (9-pin). Plug one end of the
cable into the Serial port of the USB-Serial Converter Cable and attach the other end
of the cable to the COM port on the back of the RTCA Analyzer. Plug the Adapter into
a USB port on the RTCA Control Unit.
Place the RTCA SP Station into an incubator
Wipe the RTCA SP Station with tissue paper or a soft cloth slightly soaked with 80%
alcohol or another sterilizing agent.
Avoid spraying any sterilizing agent directly on the RTCA SP Station, except
Contact Pin cleaning (see
Cleaning and Exchanging the RTCA Contact Pins 96
Cleaning and Exchanging the RTCA Contact Pins 96)!Cleaning and Exchanging the RTCA Contact Pins 96
Ideally, before placing the RTCA SP Station inside an incubator, it is recommended
to set up the RTCA SP Instrument outside the incubator using a procedure similar
to that being described here in section 3.5, and to perform a Resistor Plate Verifi cation
as described in section 3.6.
Plug the 15-pin fl at ribbon cable into the back of the RTCA SP Station, tighten the two
screws on the cable, then place the RTCA SP Station in the incubator and run the fl at
ribbon cable from the RTCA SP Station to the outside of the incubator, making sure
that the incubator door still closes.
Connect the RTCA SP Station to the RTCA Analyzer
Insert the female connector at the end of the ribbon cable into the EPS port on the
Insert the female connector at the end of the ribbon cable into the EPS port on the
Insert the female connector at the end of the ribbon cable into the EPS port on the
Insert the female connector at the end of the ribbon cable into the EPS port on the
rear panel of the RTCA Analyzer.
To avoid condensation it is important to wait for at least TWO hours (after placing
To avoid condensation it is important to wait for at least TWO hours (after placing
To avoid condensation it is important to wait for at least TWO hours (after placing
To avoid condensation it is important to wait for at least TWO hours (after placing
the RTCA SP Station inside the incubator) before running any experiments or
the RTCA SP Station inside the incubator) before running any experiments or
the RTCA SP Station inside the incubator) before running any experiments or
the RTCA SP Station inside the incubator) before running any experiments or
turning on the power of the RTCA Analyzer.
Attach the power cord to RTCA Analyzer and RTCA Control Unit
Attach the DC power plug of the AC adaptor (with attached power cord) to the RTCA
Attach the DC power plug of the AC adaptor (with attached power cord) to the RTCA
Attach the DC power plug of the AC adaptor (with attached power cord) to the RTCA
Attach the DC power plug of the AC adaptor (with attached power cord) to the RTCA
Control Unit and connect the power cord to an AC outlet.
Do NOT turn on the RTCA Control Unit.
Attach the power cord to the RTCA Analyzer and plug it into an AC outlet.
Attach the power cord to the RTCA Analyzer and plug it into an AC outlet.
Attach the power cord to the RTCA Analyzer and plug it into an AC outlet.
Attach the power cord to the RTCA Analyzer and plug it into an AC outlet.
Do NOT turn on the RTCA Analyzer.
Wait for two hours to let the RTCA SP Station reach an equilibrium temperature
Turn on the RTCA Control Unit.
Turn on the RTCA Analyzer using the power switch located at the back of the Analyzer.
e LED on the front panel of the RTCA Analyzer should be green.
e RTCA Analyzer and RTCA SP Station are ready to run an assay.
e RTCA Analyzer and RTCA SP Station are ready to run an assay.
e RTCA Analyzer and RTCA SP Station are ready to run an assay.