HM135/HM435 Programmer software guide
Preliminary version Page 25
We recommend, when possible, to leave the monitor ON in order to improve the transceiver’s ease of use.
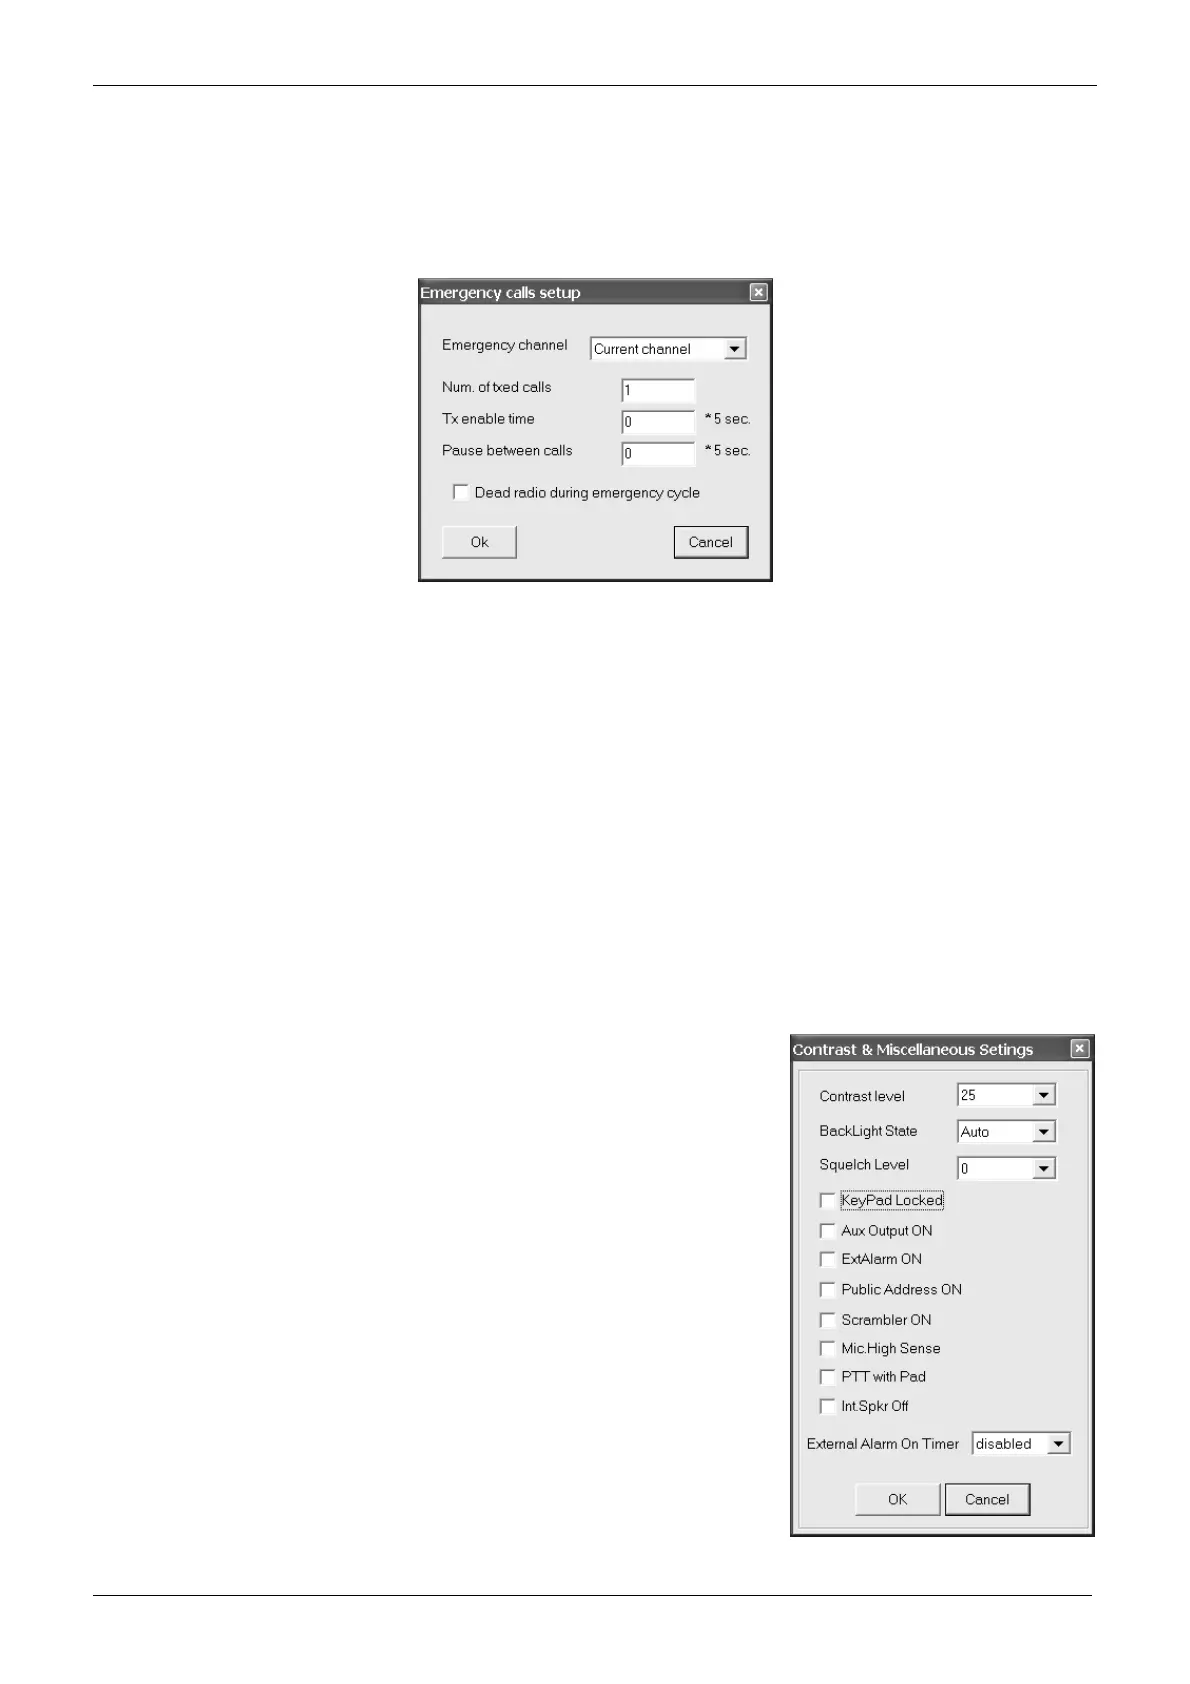
6.8 Emergency call setup
You can better define the radio behavior in emergency state, for example design a fixed emergency channel, how many calls
must be transmitted, the pause between calls etc.
1) From the Global Data window - Set-Up 2 area - click the Emergency calls button: the Emergency calls setup window will open.
2) Use the Emergency channel drag down button to define the channel in which you want the emergency call should be sent. You can
chose a fixed channel among one of the previously programmed ones, or leave the emergency selective call transmitted in the currently
selected channel by selecting Current channel.
3) Type the number of selective calls which must be transmitted in the Num. of txed calls box.
4) Type the time to allow free Tx after the selective call has been transmitted in the Tx enable time box.
The time can be selected in multiple of 5 seconds, e.g. if you need to select 10 seconds type 2.
5) Type the pause time between each calls in the Pause between calls box.
The time can be selected in multiple of 5 seconds, e.g. if you need to select 10 seconds type 2.
6) If you want to deactivate all the functions during the emergency cycle, tick the Dead radio during emergency cycle checkbox.
7) Click the OK button to confirm or Cancel to exit without changing the previous settings
6.9 Contrast and miscellaneous setups
This window allows to adjust the preset LCD contrast and backlight and the default squelch level. Moreover, you can
enable/disable a variety of miscellaneous settings, such as the microphone with keypad, the optional internal scrambler
board, the internal speaker and so on.
1) From the Global Data window - Set-Up area - click the Contrast/Misc. button: the Contrast & Miscellaneous settings window will
open.
2) Click the Contrast level drag down button and set the LCD contrast level.
3) Click the Backlight state drag down button and set the LCD/keypad backlight mode:
• Auto - LCD backlight automatically activated every time a command is used and
automatically switched off about 20 seconds after the last command is used
• Off – LCD backlight permanently disabled
• On - LCD backlight permanently enabled
4) Click the Squelch Level drag down button and set the squelch level you want to preset
on the radio
5) If you want to preset the keypad locked, tick the KeyPad Locked checkbox
6) If you want to enable the auxiliary output on the rear connector, tick the Aux Output ON
checkbox
7) If you want to enable the external alarm, tick the ExtAlarm ON checkbox
8) If you want to enable the PA (public address) service, tick the Public Address ON
checkbox
9) If you want to enable the optional scrambler (internal) board, tick the Scrambler ON
checkbox
10) If you want to preset the high sensitivity of the microphone, tick the Mic.High Sense
checkbox
11) If the radio is equipped with the optional microphone with keypad (e.g. for variable selcall
service), tick the PTT with Pad checkbox
12) If you want to disable the internal speaker (you need the radio working only with the
external speaker), tick the Int.Spkr Off checkbox
13) If you want to enable the external alarm on timer, select the appropriate timer value with