Manual, Robotic Tool Changer, QC-5 through QC-27
Document #9610-20-2254-09
Pinnacle Park • 1041 Goodworth Drive • Apex, NC 27539 USA • Tel: 919.772.0115 • Fax: 919.772.8259 • www.ati-ia.com
32
16. Look straight into the sensor plate assembly and verify the detection shaft does not touch the
Lock and Unlock sensors. If the sensors touch the shaft, adjust the sensor position. Refer to
Section 6.2.2—QC-20 and QC-21 Proximity Sensor Adjustment, Test, or Replacement.
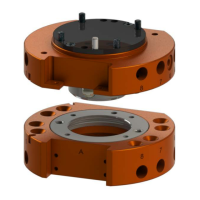
Figure 3.18—Verify Sensor and Detection Shaft Clearance
Tool Changer
Master Plate
Lock/Unlock Sensors
and Detection Shaft
Sensor Plate
Assembly
CAUTION: Do not apply Lock or Unlock air pressure to the Tool Changer prior
to installing an interface plate. Applying air pressure can damage the cover
plate, O-ring or may cause injury to personnel from ying debris. Always install
an interface plate and have the Tool Changer mounted securely to the robot
before applying air pressure. Refer to Section 3.1—Robot Interface Plates and
Section 3.2—Master Plate Installation for more information.
17. Connect the Lock and Unlock sensor cables and manually move the Tool Changer piston to the
locked and unlocked positions.
18. Verify the sensors properly work.
a. Turn the power on to the sensor.
b. Verify that the Locked signal turns ON and the sensor LED is illuminated when the Tool
Changer is in the Locked position.
c. Verify that the Unlocked signal turns ON and the sensor LED is illuminated when the Tool
Changer is in the Unlocked position.
d. If not, adjust and test the sensors. Refer to Section 6.2.2—QC-20 and QC-21 Proximity
Sensor Adjustment, Test, or Replacement.
19. Install the new interface plate to the robot and the Tool Changer Master plate to the interface
plate, refer to Section 3.2—Master Plate Installation.
20. Safely resume normal operation.