*Subject to change without notice Atomos Sumo19 – User Manual Edition 1: September 2017 39
Record Modes:
In standard record mode there are a number of features that are
implemented with safety in mind. Source Drop – If a connection is lost
due to the cable being pulled out from either side of the signal path the
recordingwillstopandclosethatle.Assoonasyouplugthecable
backinitwillstartrecordinganewlewithouthavingtopressrecord
again.
IfACpowerislosttherecordedlesarestillsafe.Oncetheunitis
poweredbackupitwilldetectthebrokenleandaskyoutorepairthe
clip now or later. With a power loss there will be some loss of content.
Typically the last 5-10 seconds of footage.
Alongside the standard recording functionality additional Record Modes
are available in the form of Pre Roll and Time Lapse.
Pre Roll Record
This option is enabled from the input menu under Record section. With
this option turned on you will see a white circular arrow around the record
buttonandaredPreRolliconwillashinthetoplefthandcorner.Whilst
enabled the input is constantly been recorded with approximately the last
8secondsinHDand2-3secondsin4Kbeingcachedintomemory.The
frame rate and codec selected will affect the number of seconds being
cached for pre roll. Using a lower bit rate codec setting and shooting at
lower frame rate will increase the length of pre-roll.
When the record button is pressed or trigger is sent, the buffered pre-roll
data in memory will be written out to the start of the recording. This
means if you are few seconds slow hitting the record button when
something interesting happens you will still capture the shot.
With Pre Roll mode activated the Recorder is constantly caching
frames internally to the unit and as such any feature that can not be
changed whilst recording is disabled. This includes audio channel
select, 3D LUT record, codec, disk options etc. Time Lapse record is
also disables when Pre Roll is enabled.
Time Lapse
Video Time lapse provides the ability to create seamless time lapses with
out capturing individual images that require compiling in post. Utilizing
video also takes away the wear on you camera shutter that can be
expensive to replace if you are doing lots of time-lapse work.
This function is accessed via the input menu and then selecting the Time
Lapse option in the bottom left of this menu.
The Time Lapse Recording menu will then open to
provide you with a number of options.
Time Lapse On/off – this allows you to turn on time
lapse recoding mode and when an input is present the
record button will white have dashed lines around it
like a clock face.
When time lapse is enabled Pre-Roll cannot be enabled.
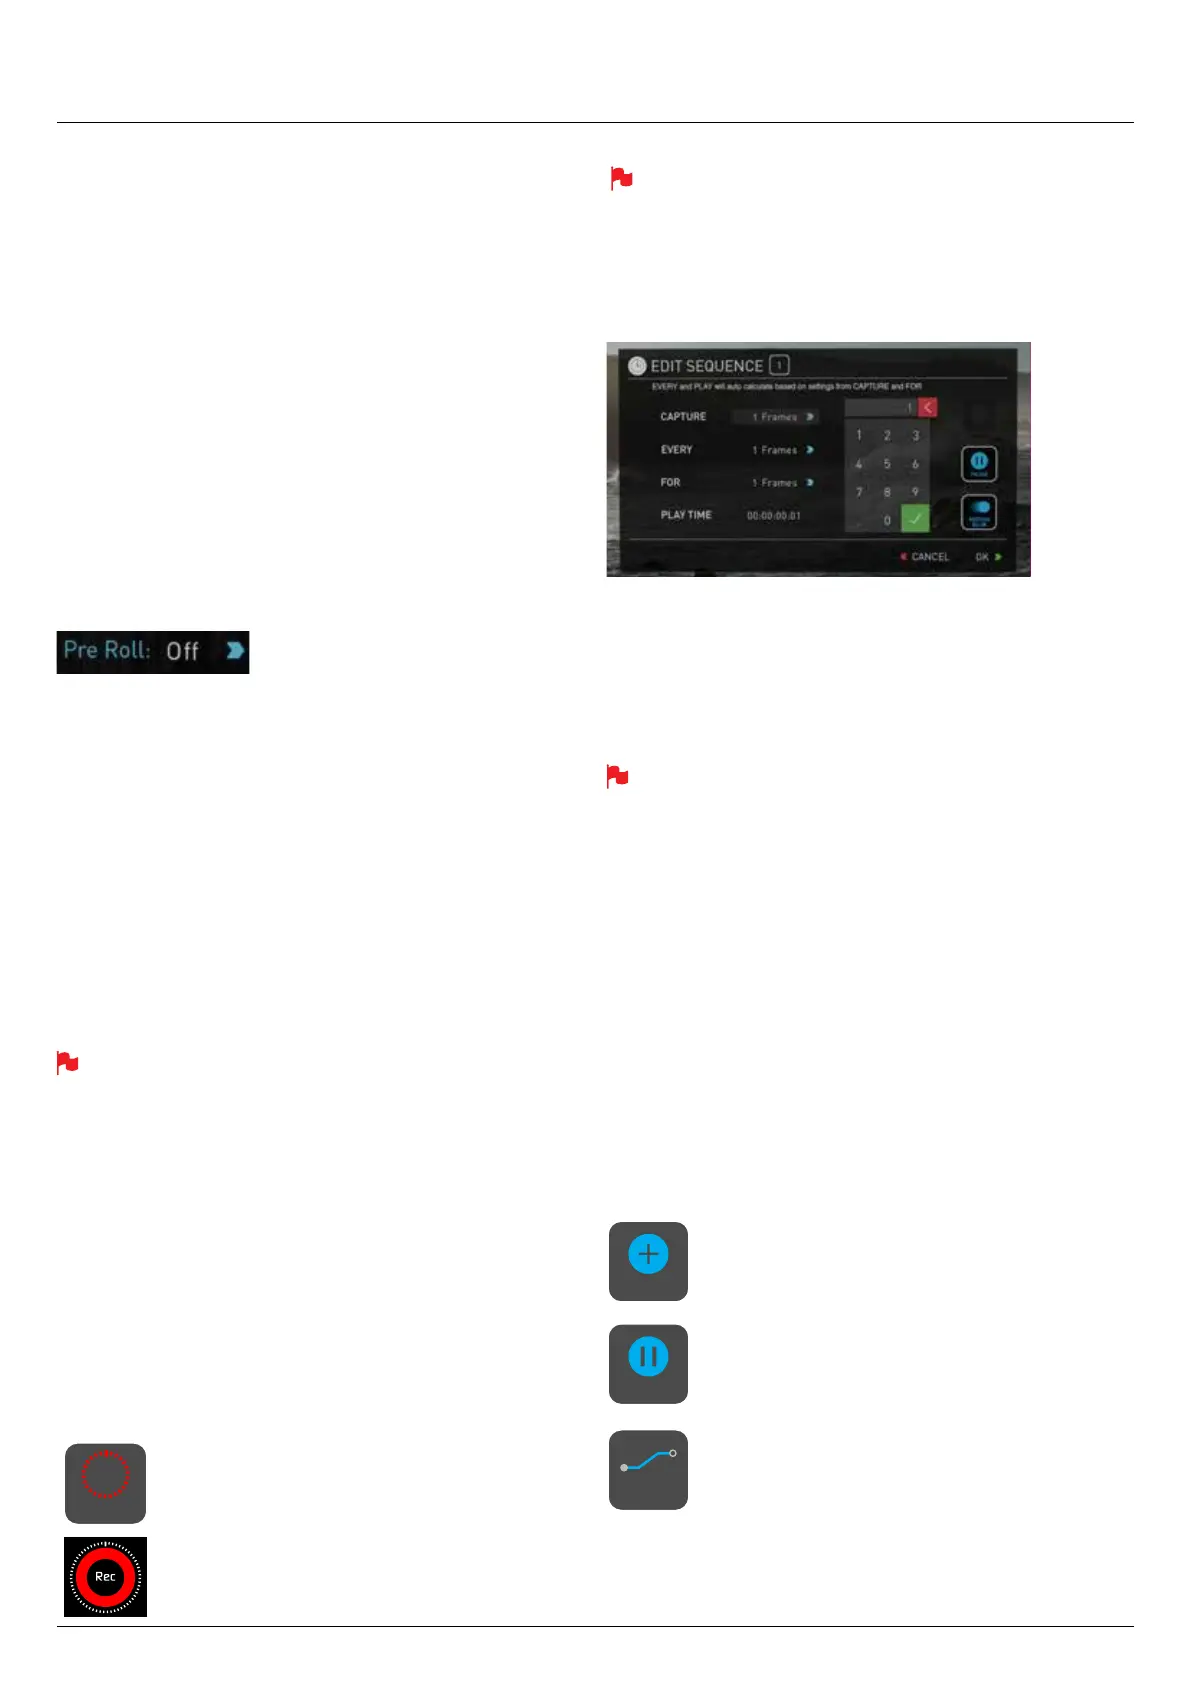
A sequence entry will already be present in the menu and to edit the
entry simply touch to highlight it and then tap on the blue arrow at
right hand side of the entry. This opens the Edit Sequence menu where
you can alter the following settings:
Capture–Speciesthenumberofsequentialframestobecaptured
Every–Speciesthefrequencyofthecapture.
For–denestheamountoftimetorepeattheprocessforthisentry.
Play time – this will display the playback duration for the above settings.
TimescanbespeciedinFrames,Second,minutesandhours
The number of frames specied for ‘Capture’ will capture in quick
succession at the specied time – so for example if it is set to capture
5 frames every 1 minute, The 5 frames will be captured sequentially
at the start of every minute. The frames captured will not be evenly
spread across the minute.
When setting up a sequence you can also choose to add Motion blur to
an entry. With this option enabled the behavior is slightly different. The
numberofframesspeciedin‘Capture’areaddedtogetherwiththe
resulting single summed frame being recorded. You will notice that the
Playtime decreases when you have motion blur turned on as multiple
frames are been summed to a single frame instead of been recorded
sequentially. When motion blur is on the maximum setting for ‘Capture’ is
64 frames.
ThesequencesettingforthecurrententryissavedwhenyoulaptheOK
button.
The Add icon allows you to add additional entries to your
time lapse sequence. Up to 10 sequences can be added
willautomaticallyowintoeachother.
Pause sequences can also be set up to allow the
recordingtobepausedforaspeciedamountoftimewith
no frames captured.
After the required number of sequence entries have been
set up an option to apply a smooth transition can be
selected. This will apply a ramp between the different
sequence entries to improve the blend between differing
capture settings. The icon will be white when the option is
selected.
11. Record mode options
OFF
TIMELAPSE
ADD
SMOOTH
TRANSITION
PAUSE