1
2
3
4
5
6
7
8
9
10
11
12
13
14
15
16
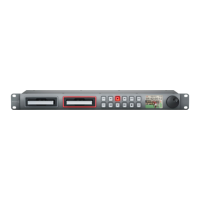
SOLO
SET
SRC
VIEW
MENU
Blackmagic MultiView 16
ETHERNET SD/HD/3G/6G-SDI IN
REF IN
LOOP OUT
IN
HDMI OUT 6G-SDI OUT HD-SDI OUT
RS-422
CNTRL
USB
1 2 3 4 5 6 7 8 9 10 11 12 13 14 15 16
1
2
3
4
5
6
7
8
9
10
11
12
13
14
15
16
SOLO
SET
SRC
VIEW
MENU
Blackmagic MultiView 16
ETHERNET SD/HD/3G/6G-SDI IN
REF IN
LOOP OUT
IN
HDMI OUT 6G-SDI OUT HD-SDI OUT
RS-422
CNTRL
USB
1 2 3 4 5 6 7 8 9 10 11 12 13 14 15 16
Connect to Blackmagic Videohub Control software by clicking on the ‘select a
Videohub’ button, then select your Blackmagic MultiView 16 from the list
To configure your network settings:
1 Press the ‘menu’ button and turn the rotary knob to highlight the ‘networking’ tab.
2 Press the ’set’ button to enter the ‘network settings’ page.
3 Turn the rotary knob to select the ‘IP address’ tab.
4 Press the ’set’ button to highlight the first field of the IP address. You can use either the
rotary knob or numbered pushbuttons to enter values.
5 Press ’set’ to confirm the first field of the IP address, then repeat the above step for the next
three fields until you have set the desired IP address. If you need to assign the Subnet and
Gateway address, they can be set using the same method.
6 Press the ‘menu’ button twice to return to the home screen.
For more information on how to use Blackmagic MultiView 16 with Blackmagic Videohub
Control software, refer to the Blackmagic MultiView instruction manual. You can find
the latest manual and product updates at the Blackmagic Design support center at:
www.blackmagicdesign.com/support
Use the rotary knob or the number
buttons on Blackmagic MultiView
16’s control panel to assign values
to your network settings
64Blackmagic Videohub Control