24
*
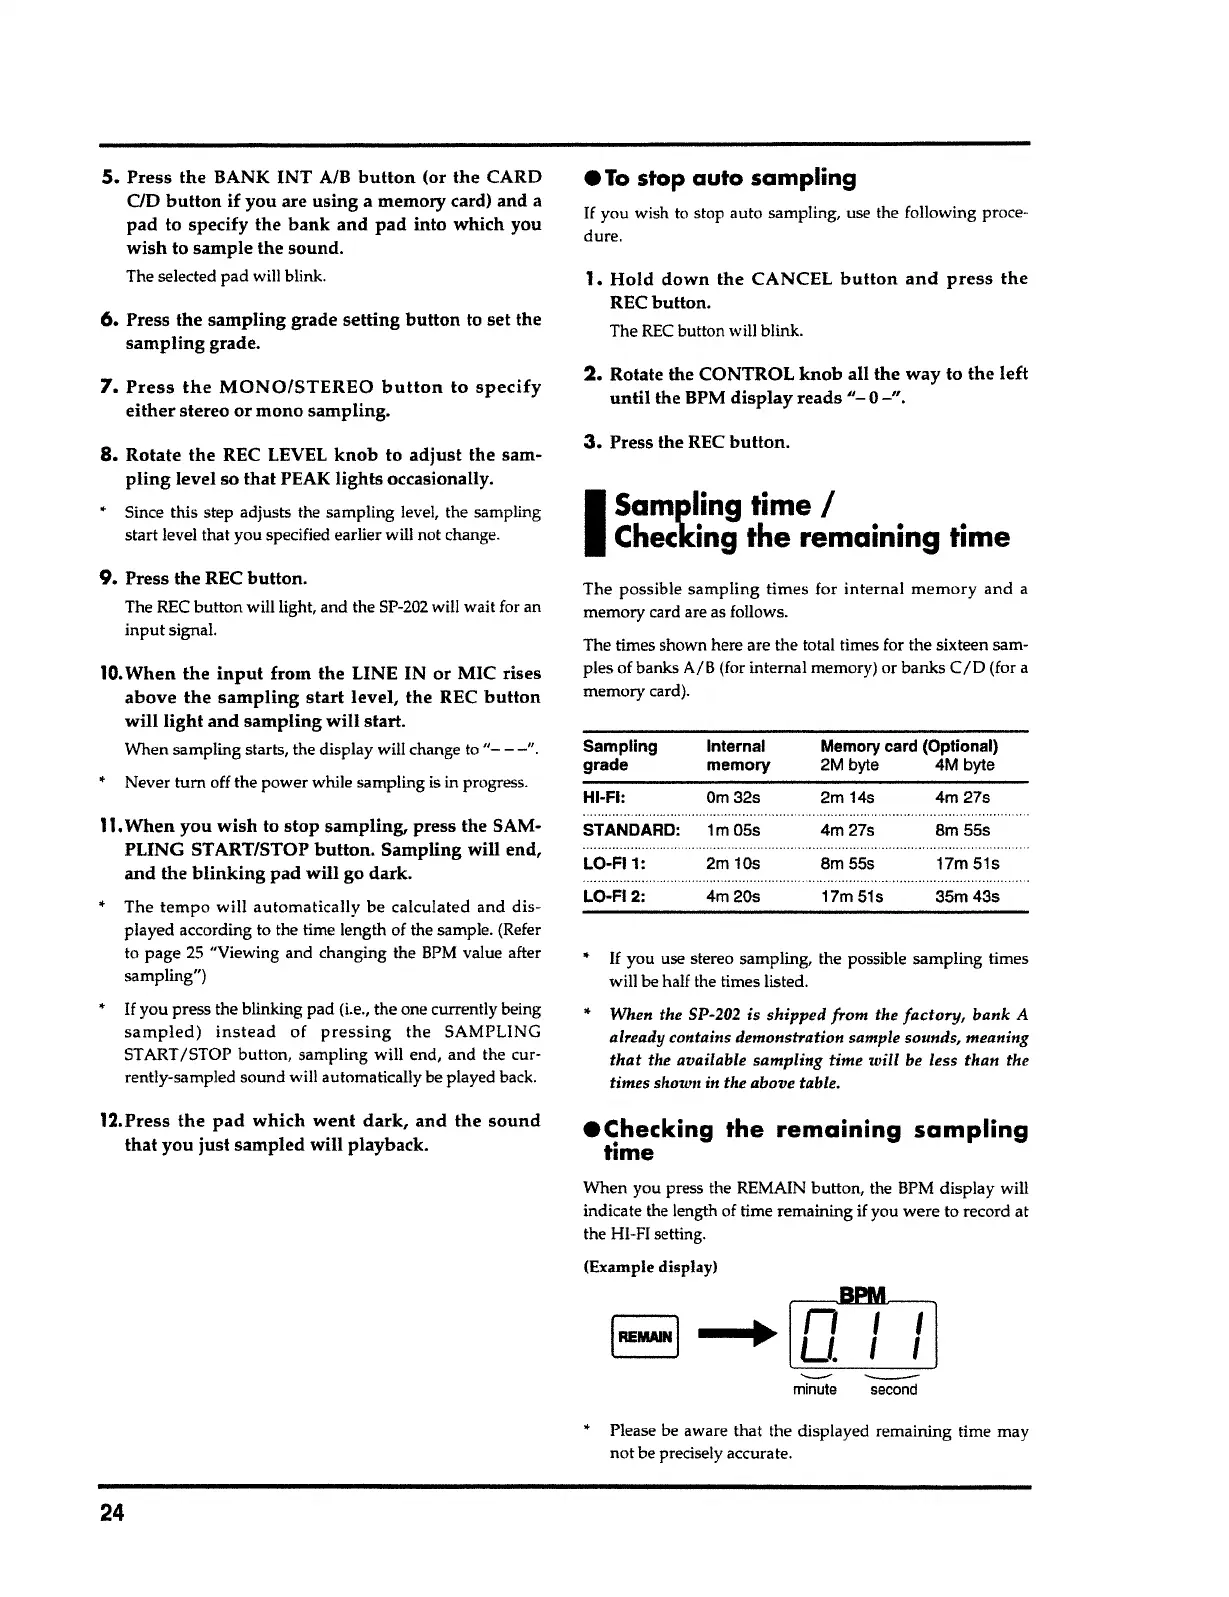
Please be aware that the displayed remaining time may
not be precisely accurate.
---
-
minute
second
..
~
Lbl_J_JJ
IREMJJNI
When you press the REMAIN button, the BPM display will
indicate the length of time remaining if you were to record at
the HI-FI setting.
(Example display)
•
Checking
the remaining sampling
time
•
If
you use stereo sampling, the possible sampling times
will be half the times listed.
"
When the SP-202 is shipped
from
the
factory,
bank A
already contains demonstration sample sounds, meaning
that
the available sampling time
will
be less than the
times shown in the above table.
Sampling Internal
Memory card (Optional)
grade memory 2M byte 4M byte
HI-Fl: Om32s 2m
14s
4m27s
STANDARD: 1m05s 4m27s
Sm
55s
......................
.......................
LO-Fl 1:
2m 10s
8m55s
17m 51s
LO·FI 2:
4m20s 17m51s 35m43s
The possible sampling times for internal
memory
and a
memory card are as follows.
The times shown here are the total times for the sixteen sam-
ples of banks
A/
B
(for internal memory) or banks
CID
(for a
memory card).
I
Sampling time
I
Checking the remaining time
3.
Press the REC
button.
2.
Rotate the CONTROL
knob
all the way to the left
until
the BPM
display reads"- 0-".
1.
Hold
down the CANCEL
button and press the
REC button.
The REC button will blink.
•
To
stop auto sampling
If
you wish to stop auto sampling, use the following proce-
dure.
12.Press the
pad which went dark,
and the
sound
that
you just sampled will playback.
11.
When you wish to stop sampling, press the SAM-
PLING ST ART/STOP
button.
Sampling will end,
and the
blinking
pad will go dark.
• The
tempo
will automatically be calculated and dis-
played according to the time length of the sample. (Refer
to page
25
"Viewing and changing the
BPM
value after
sampling")
•
If
you press the blinking pad (i.e., the one currently being
sampled) instead
of
pressing the
SAMPLING
START /STOP button, sampling will end, and the cur-
rently-sampled sound will automatically be played back.
10.
When the
input
from the LINE IN or MIC rises
above
the sampling start
level, the REC
button
will light and sampling will start.
When sampling starts, the display will change to
"- - -".
•
Never tum off the power while sampling is in progress.
9.
Press the REC button.
The REC button will light, and the SP-202 will wait for an
input signal.
8.
Rotate the REC LEVEL
knob
to
adjust
the sam-
pling
level so that PEAK lights occasionally.
• Since this step adjusts the sampling level, the sampling
start level that you specified earlier will not change.
7. Press the MONO/STEREO button
to
specify
either
stereo or mono sampling.
6.
Press the sampling grade setting
button
to set the
sampling
grade.
5.
Press the BANK INT A/B
button
(or the CARD
CID
button
if you are using a memory card) and
a
pad to specify the
bank
and pad into which you
wish
to sample the sound.
The selected pad will blink.